


Review: XP-Pen Artist 24 Pro on Linux
Table of Contents
- Updates and Erratum:
- Install guide:
- Install Digimend:
- Add the X11 rule:
- Xsetwacom script:
- Testing with Xinput
- Udev/Hwdb rule for second button on the stylus and other buttons.
- Misc:
- Youtube link: https://youtu.be/0QEnRWNIjtU
- Peertube link: https://peertube.touhoppai.moe/videos/watch/17599386-f4c9-41e7-8a94-83ae09540a93
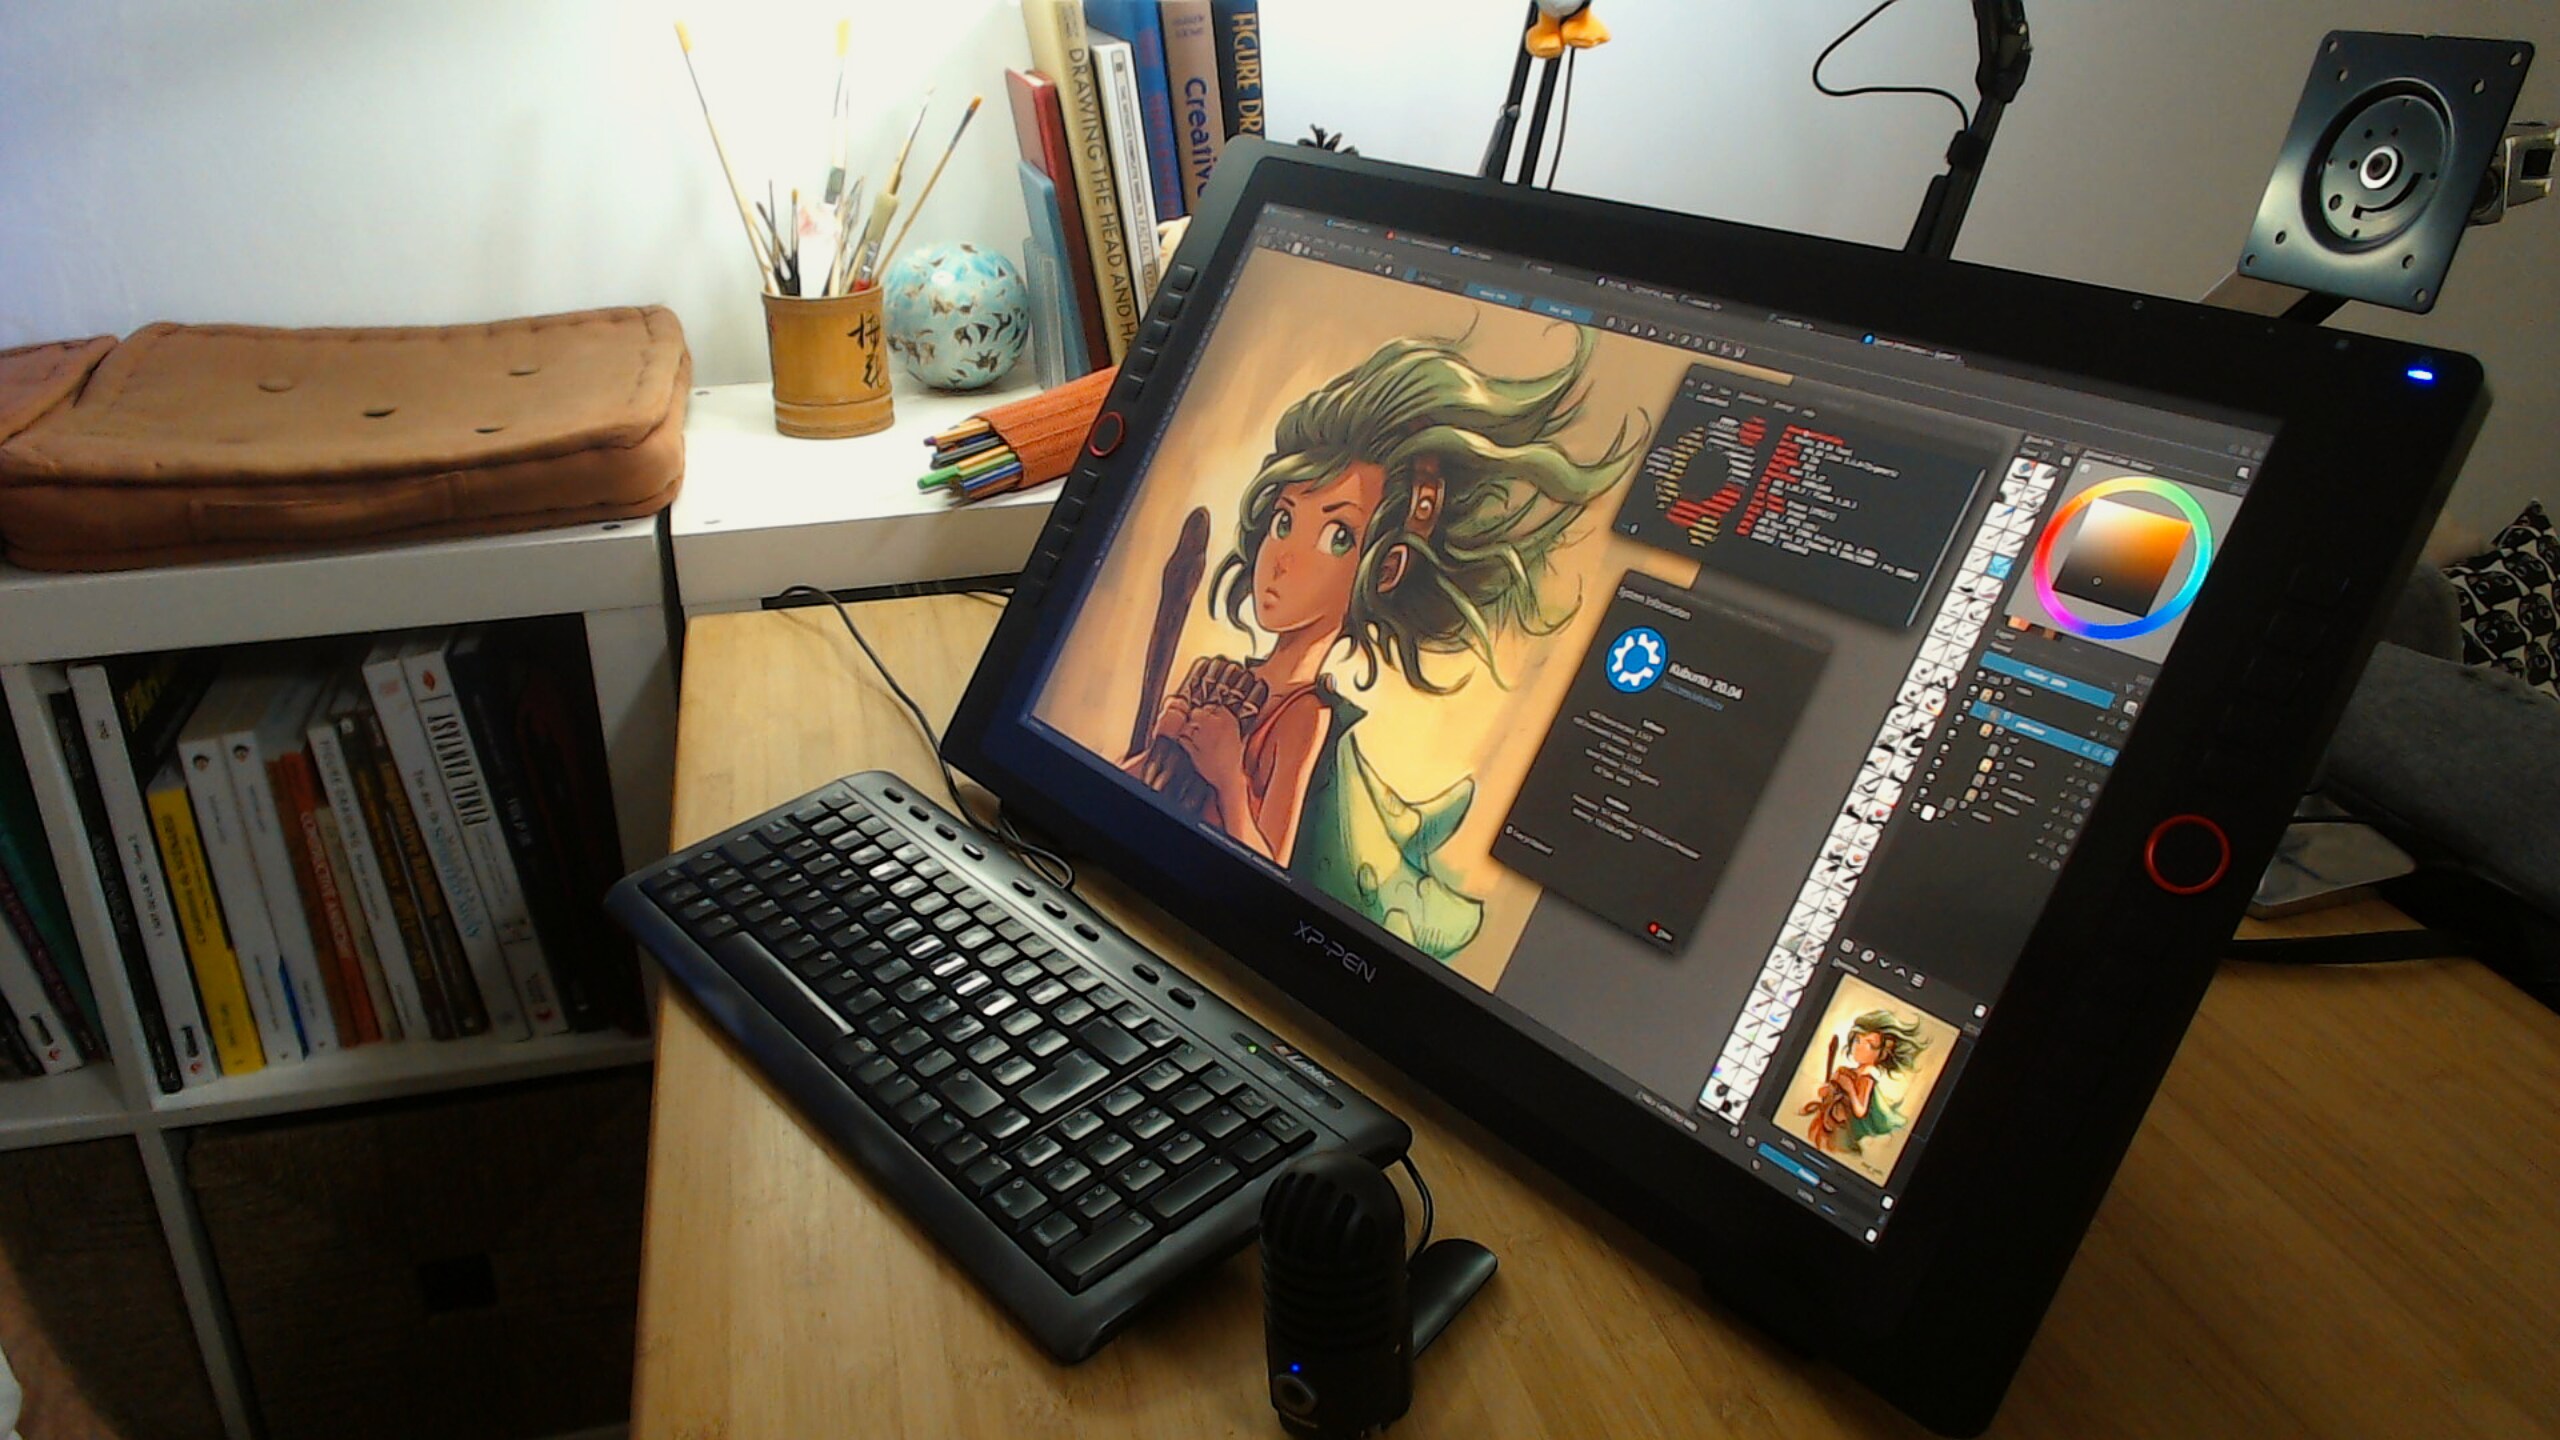
Here is my deep review of the XP-Pen Artist 24 Pro on GNU/Linux (Kubuntu 20.04)! The large, 24" QuadHD pen tablet. I'm testing all the part as I could on this video. XP-Pen sent me this tablet for free in exchange of a video review and I want to be transparent about this deal. It was a good opportunity and I had full freedom in our agreement (that's why I accepted). I hope you liked it, I took a lot of passion and fun to make this review. I hope I'll be able to continue to make more in the future!
Tablet on the page of XP-Pen:
- Specification: https://www.xp-pen.com/product/602.html
- USA store: https://bit.ly/2RFurjo
- CA store: https://bit.ly/3utJQlz
- PH store, get 1000 pesos coupon in : https://bit.ly/3eQxz5v
Note: You can use the code: DAVID24PRO to get 15% off while purchasing! The code is available until May 24 2021.
Timeline:
- 00:00 Intro
- 00:50 Hardware
- 05:08 GNU/Linux Driver
- 07:37 Opinions and conclusion
Updates and Erratum:
You'll find here update of things I discovered after making the video:
[2023-08-29] New Udev rules with more buttons customised: I updated the article with my new script to customize the button.
[2023-01-22] New overlay, a dead bug and a new universal Keyboard Tray (Cintweak): I published a video update of the changes I made and little accident I had with the tablet. The new overlay really improved the tablet a lot!
[2022-05-19] All Drawings and inking of episode 37 were done with this tablet: I published a photo showing my current setup with the tablet and a Cintweak keyboard tray.
[2021-06-13] New proprietary driver 3.1.4, released 10 june: XP-PEN released a new proprietary driver, without changelog available but with a new version and timestamp. After test, the Deb package no longer have permission issues but tilt is still missing.
[2021-06-11] Pressure curve: With time and thin tuning, I advice now xsetwacom --set "UGTABLET 24 inch PenDisplay stylus" PressureCurve 0 10 40 85 pressure curve for the stylus instead of initial 0 20 100 100 setting I proposed. I use mainly this pen-display tablet as my second monitor now, to sketch on it rarely. I'm back at using my Intuos4 XL as I thought, the ergonomy of large pen-display is just bad for my productivity.
[2021-05-12] Digimend diagnostic is published: https://github.com/DIGImend/digimend-kernel-drivers/issues/535 , I made my homework carefully; and reported all the specification of the device to the Digimend project. It's not a sign this will be managed soon: I saw many other tablet with full descriptors (and even open Pull Request) from 2018 on it... But at least the data are now available.
[2021-05-12] Protective/Anit-glare film investigation: From what I start to see; the overlay is considered as a consumable for XP-Pen? like pen nib? I can't think of something else when I read on their store "pack of two" here: https://storexppen.com/buy/protective-film-24-pro.html , so give me a month or two with it, and I'll tell you here how robust the first overlay sheet was.
[2021-05-11] ERRATUM: Micro-USB instead of USB-C: I spoke about a 'Micro-USB' cable; it's in fact a USB-C cable. Sorry, all this 'mini' USB standards got me confused to name this one correctly.
[2021-05-11] ERRATUM: 65536 level of pressure: The label that appears at 03:24 in the video is inexact: the device has (probably) 8192 level of pressure maximum. By the way; the level are not well distributed as the first 10% of the stylus nib contact will be mostly ignored then from 10 to 30% it will grow super quick and then it require a lot of pressure to reach 100% (not the best default curve to be polite, but one that can be smoothed with driver workaround). I saw tablet with 512 level of pressure having better built-in feeling and sensitivity to low pressure levels. About the erratum; I should have noticed 65536 looks like an address space of 64 KB (65,536 bytes). I noticed that after testing it on other tablet I own in house; all also revealing the same 65536 max number.
[2021-05-10] Perfect match for Ergotron Arm: No surprise, the tablet could really adapt to my Ergotron Arm with the VESA 100x100mm pattern that appears after unscrewing the default stand. The tablet is less heavy than my old Cintiq21UX that was over 10Kg; this one is probably half. Anyway, it requires a bit of adapting the Ergotron to be rigid enough to not move with a weight like that.
[2021-05-09] No magnetic noises with Wacom Intuos4 around: After the review, I connected back my IntuosXL to my Philips 27'' for my production (QuadHD also, near to 100% sRGB, but not perfect but with −at least− the best antiglare and frameless design). I kept the XP-Pen Artist 24 Pro as my second monitor with the Ergotron Arm (ready to be used for a drawing). I was affraid the two tablet would interact; something I already saw with Intuos and Cintiq (especially the one able to share same Stylus). But here; no noise, no shakes; the two tablet are probably set to use distinct frequency; and that's perfect for me.
Install guide:
The guide under is not part of the review 'deal' and a personal work I made to allow you to run your XP-PEN Artist 24 Pro on Linux with the Free/Libre and Open Source driver Digimend. You'll see on the review the proprietary driver has issues; and the worst: being closed/non-free and so we don't know what it does. Remember that while I'm writing this, the tablet is still not officially supported by the Digimend project; and so it require many manual workarounds and post-installation process. But the base main component; the Ugtablet+stylus sensor is recognized.
Limitation: The following guide was written for Kubuntu 20.04 LTS + Digimend driver version 10; it might works as well on any other Xorg/Linux distro with newer version of the driver; but be aware that Fedora/Arch/Ubuntu doesn't store the configuration files at the same place; you'll have quickly to check where it is for xorg.conf.d and hwdb.d to succeed. GNU/Linux distro are fast moving targets; and I don't have any ideas if this might work also in another situation. Use it as your own risk (but it should be fine, and everything here is easy to revert).
I detailed my guide here so non-technical user (artists and Linux beginners) could follow it. I'm also taking the time to not just throw command-lines, but explain why and what it does. For tweaking the configuration files of your tablet, you'll need a text-editor. Here I use Micro. If you don't want to install it, just replace any micro of this article with the default nano text-editor or your favorite.
Install Digimend:

I installed here the version 10 https://github.com/DIGImend/digimend-kernel-drivers/releases/tag/v10 as a Debian package (link finishing by .deb). On Kubuntu 20.04, a simple double-click on the deb will launch the installer. On other 'buntu, I often met distro who doesn't ship this type of Debian package installer by default (how sad). In this case; you can still install them using the command line: sudo dpkg -r xp-pen-pentablet*.deb , Once done, restart your computer.
Add the X11 rule:
If you run lsusb in a terminal, you'll find a line describing your tablet and this listing also give you the address of the device. Mine was: Bus 003 Device 007: ID 28bd:092d Tablet PTK-1240.
So, I created the file 60-xppen.conf in the folder /usr/share/X11/xorg.conf.d/ (you need administrator permission to create that) this way:
sudo micro /usr/share/X11/xorg.conf.d/60-xppen.conf
Once the blank editor was opened, I pasted this inside the editor:
Section "InputClass"
  Identifier "XP-Pen 24 Pro Frame"
  MatchUSBID "28bd:092d"
  MatchIsKeyboard "on"
  MatchDevicePath "/dev/input/event*"
  Driver "libinput"
EndSection

Section "InputClass"
  Identifier "XP-Pen 24 Pro Tablet"
  MatchIsTablet "on"
  Driver "wacom"
  MatchUSBID "28bd:092d"
  MatchDevicePath "/dev/input/event*"
EndSection
This will ask the wacom driver to handle our tablet; you can see the MatchUSBID "28bd:092d" part, very important to target the right tablet (we found this adress with lsusb). I saved, and then restarted the computer again.
If everything went right, you should see an ouput after typing xsetwacom --list, mine was:
UGTABLET 24 inch PenDisplay stylus id: 10 type: STYLUS Xsetwacom script:
Once the tablet is recognised by the Wacom driver; you can customize only the mapping of the stylus, its pressure curve and the first button of the stylus with it. That's not much compare to what Xsetwacom can do with a full support, but still this is very cool.
If you prefer a graphic interface; the kde-config-tablet was able to handle it (sudo apt install kde-config-tablet, then restart the computer and launch in the system configuration the tablet settings). But here I prefer using a bash script that will apply at each start-up of my system my favorite settings. Each setting is set with the xsetwacom command line.
Here under is my own script; fully commented (line starting by # are not read by computer, so I added a sort of instruction on them). If you paste this script on a text-editor and save it as xppen_Artist-24-Pro.sh (where you want on your disk, mine is on a folder I created for my scripts /home/deevad/scripts and then you'll see this your text editor will show with color what are important lines, and what are just comments.
Don't reuse the script under as it is, it will not work. You need to read it and adapt it to your system. Especially the part about mapping it to your monitor xrandr identifier, and you might need to calibrate with xinput-calibrator
After saving it, you'll need to right click on the file > Properties (Permission tab) and activate "Is Executable" checkbox and press OK. Once your script is ready, you can run it by double clicking on it. This customisation will be lost at every restart of your computer (not the script, only the effect). If you want to run it automatically; just add the script to your 'Autostart' (type autostart in the menu; Plasma has a nice interface for that with a button "Add Script" ).
The script:
#! /bin/bash
# Setup xp-pen 24 pro
# License: CC-0/Public-Domain license
# author: deevad
# ---------------------
# XP-PEN ARTIST PRO 24
# ---------------------
# Tablet definition
# Identifier obtained using the 'xsetwacom --list' command line
# The tablet appears after installation of the Digimend kernel driver (10 or more)
# And after creating a special rule for Xorg.
# See blog post on https://www.davidrevoy.com/index.php?tag/hardware for it.
tabletstylus="UGTABLET 24 inch PenDisplay stylus"
# Constrain stylus to use it's own monitor
# using the 'xrandr' command-line will output the list of your monitors and how they are named
# Mine here is "DisplayPort-1"
xsetwacom --set "$tabletstylus" MapToOutput "DisplayPort-1"
# Calibration
# Start by reseting calibration to default area
xsetwacom --set "$tabletstylus" ResetArea
# Default area is '0 0 32767 32767', a square for a 16:9 tablet! Fun...
# You can obtain it by uncommenting the two lines under
# xsetwacom --get "$tabletstylus" Area
# Calibrate your device manually with `xinput_calibrator` after connecting only the Xpen-Pen pro-art
# (Area is "MinX" "MinY" "MaxX" "MaxY"), then tweak manually adding or rmoving +50 here and there to obtain
# something pleasing:
xsetwacom --set "$tabletstylus" Area 100 120 32794 32797
# Calibrate the curve of the pressure (hard or soft)
# Use https://web.archive.org/web/20180318103411/http://linuxwacom.sourceforge.net/misc/bezier.html
# for an interface to get the 4 values (red,red and violet,violet)
xsetwacom --set "$tabletstylus" PressureCurve 0 10 40 85
# Buttons:
# First button on the stylus (=button2, button 1 is the tip and it works correctly by default)
# Mine is 'Ctrl' to pick color:
xsetwacom set "$tabletstylus" button 2 key Ctrl
# Configuration data trimming and suppression
# The event of this device are not legion; better to not filter any for sensitivity
# Minimal trimming is also good.
xsetwacom --set "$tabletstylus" Suppress 0 # data pt.s filtered, default is 2, 0-100
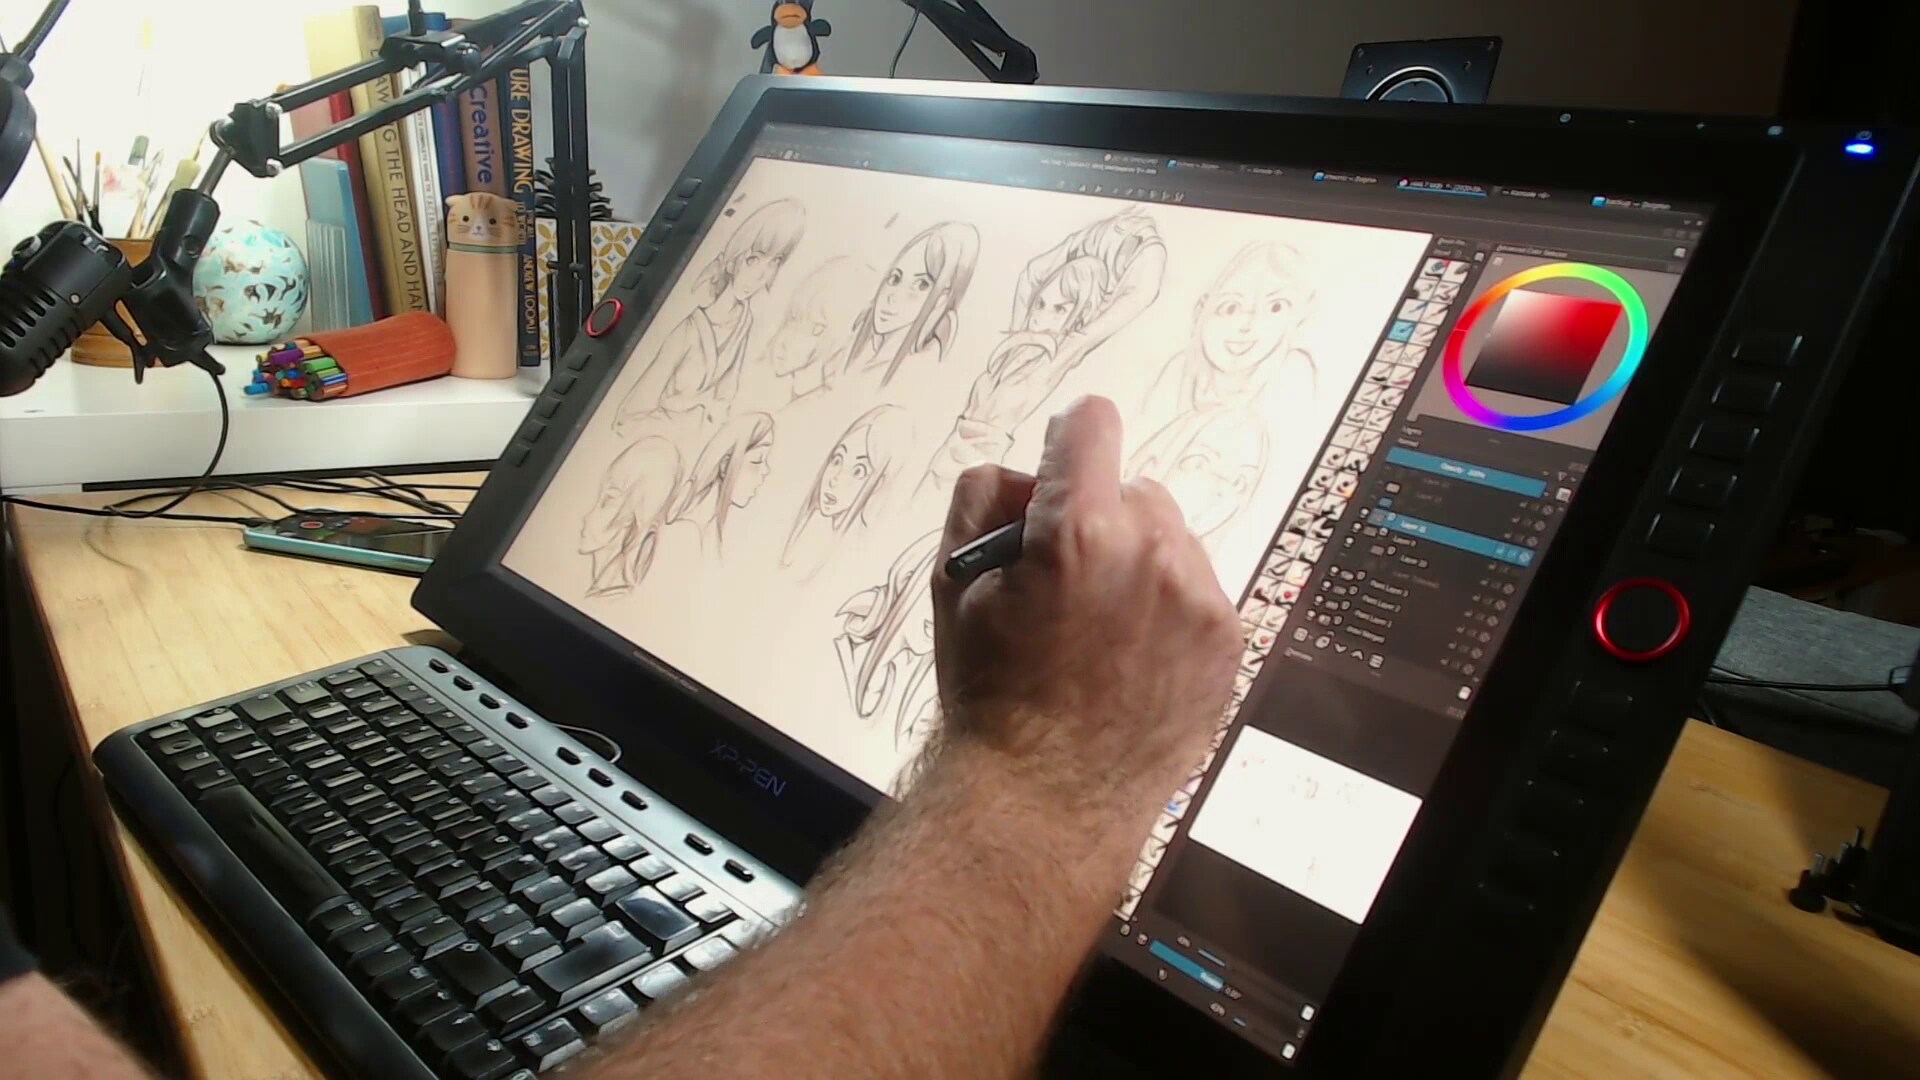
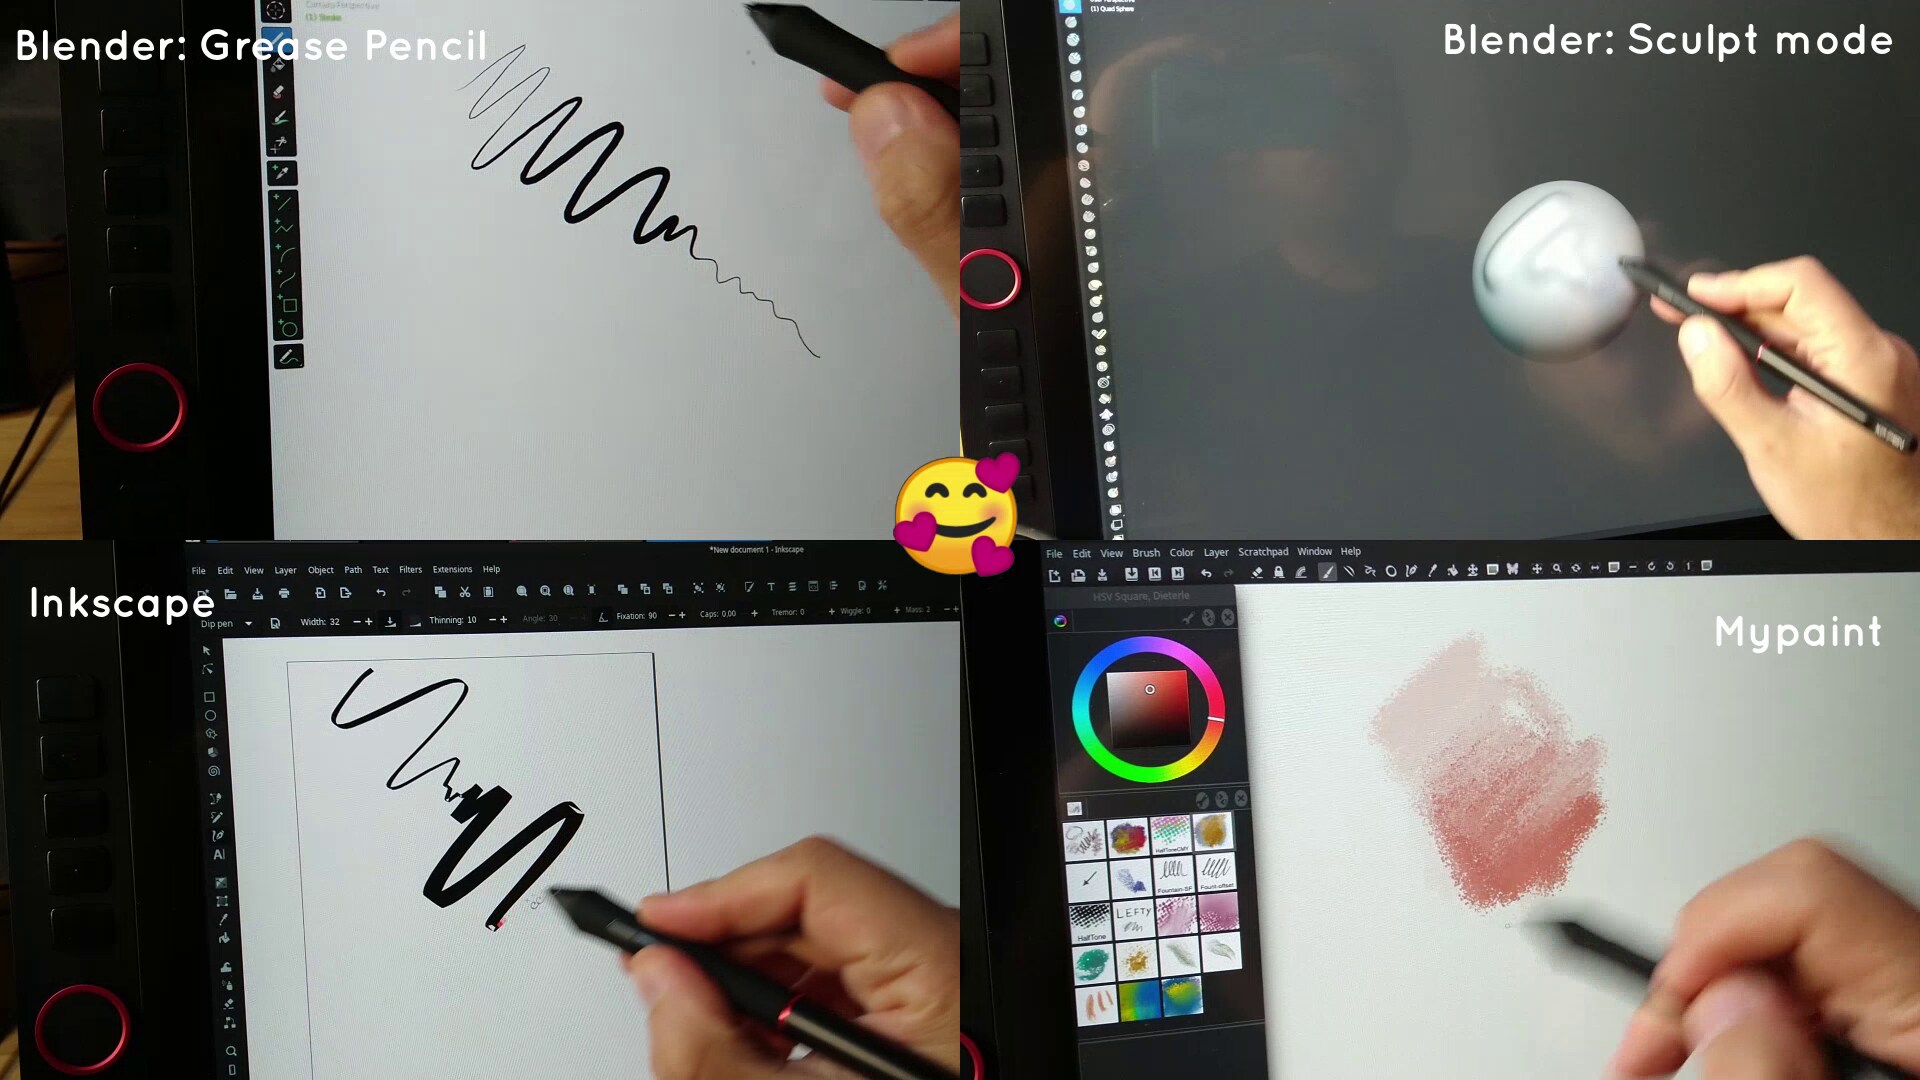
xsetwacom --set "$tabletstylus" RawSample 1 # data pt.s trimmed, default is 4, 1-20If you managed well, the tablet stylus mapping and pressure of the XP-Pen Artist Pro 24 should work on Mypaint, Blender, Gimp, Inkscape, etc...
Testing with Xinput
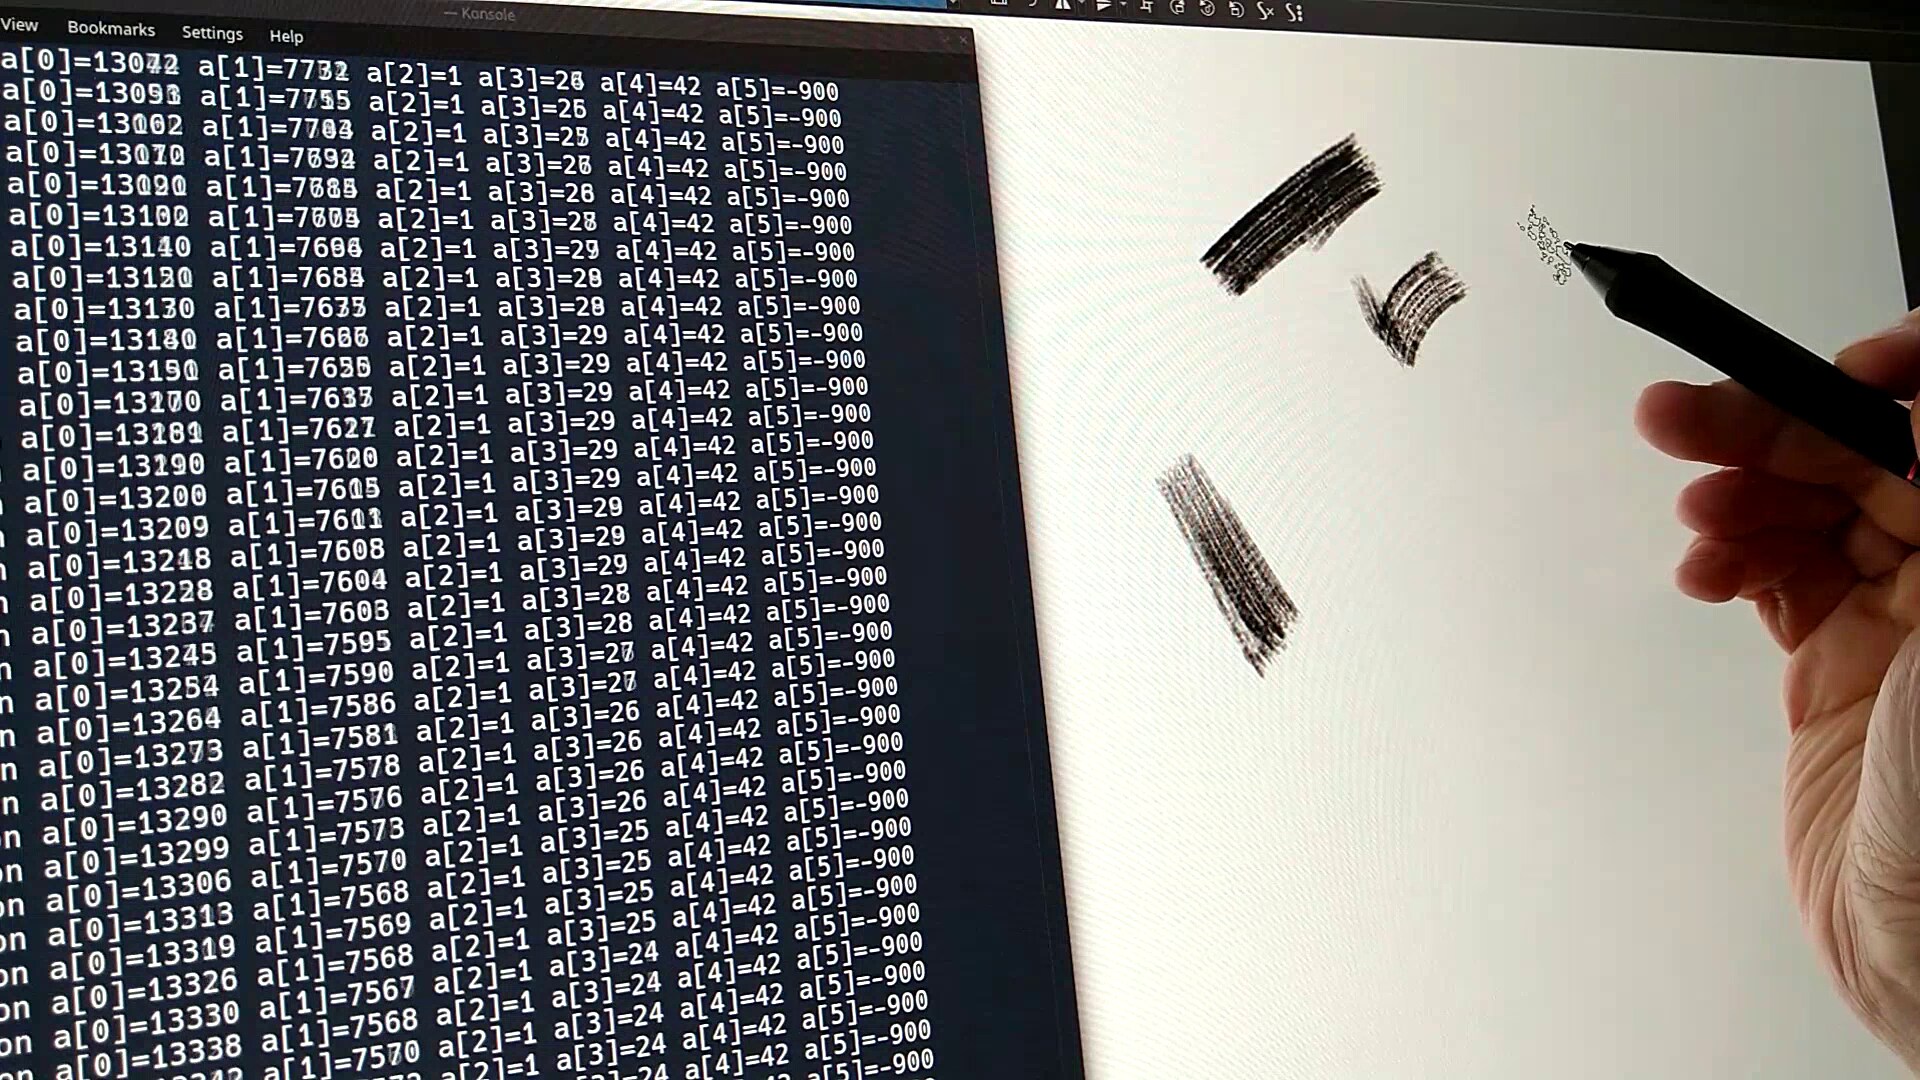
If you want to test your stylus; run at first xinput to get an identifier of your stylus. Here is mine:
UGTABLET 24 inch PenDisplay stylus id=23Then launch with customising the "id" (23 here):
xinput test 23Once you'll draw on the monitor, the terminal will report all the events of the stylus.
Udev/Hwdb rule for second button on the stylus and other buttons.
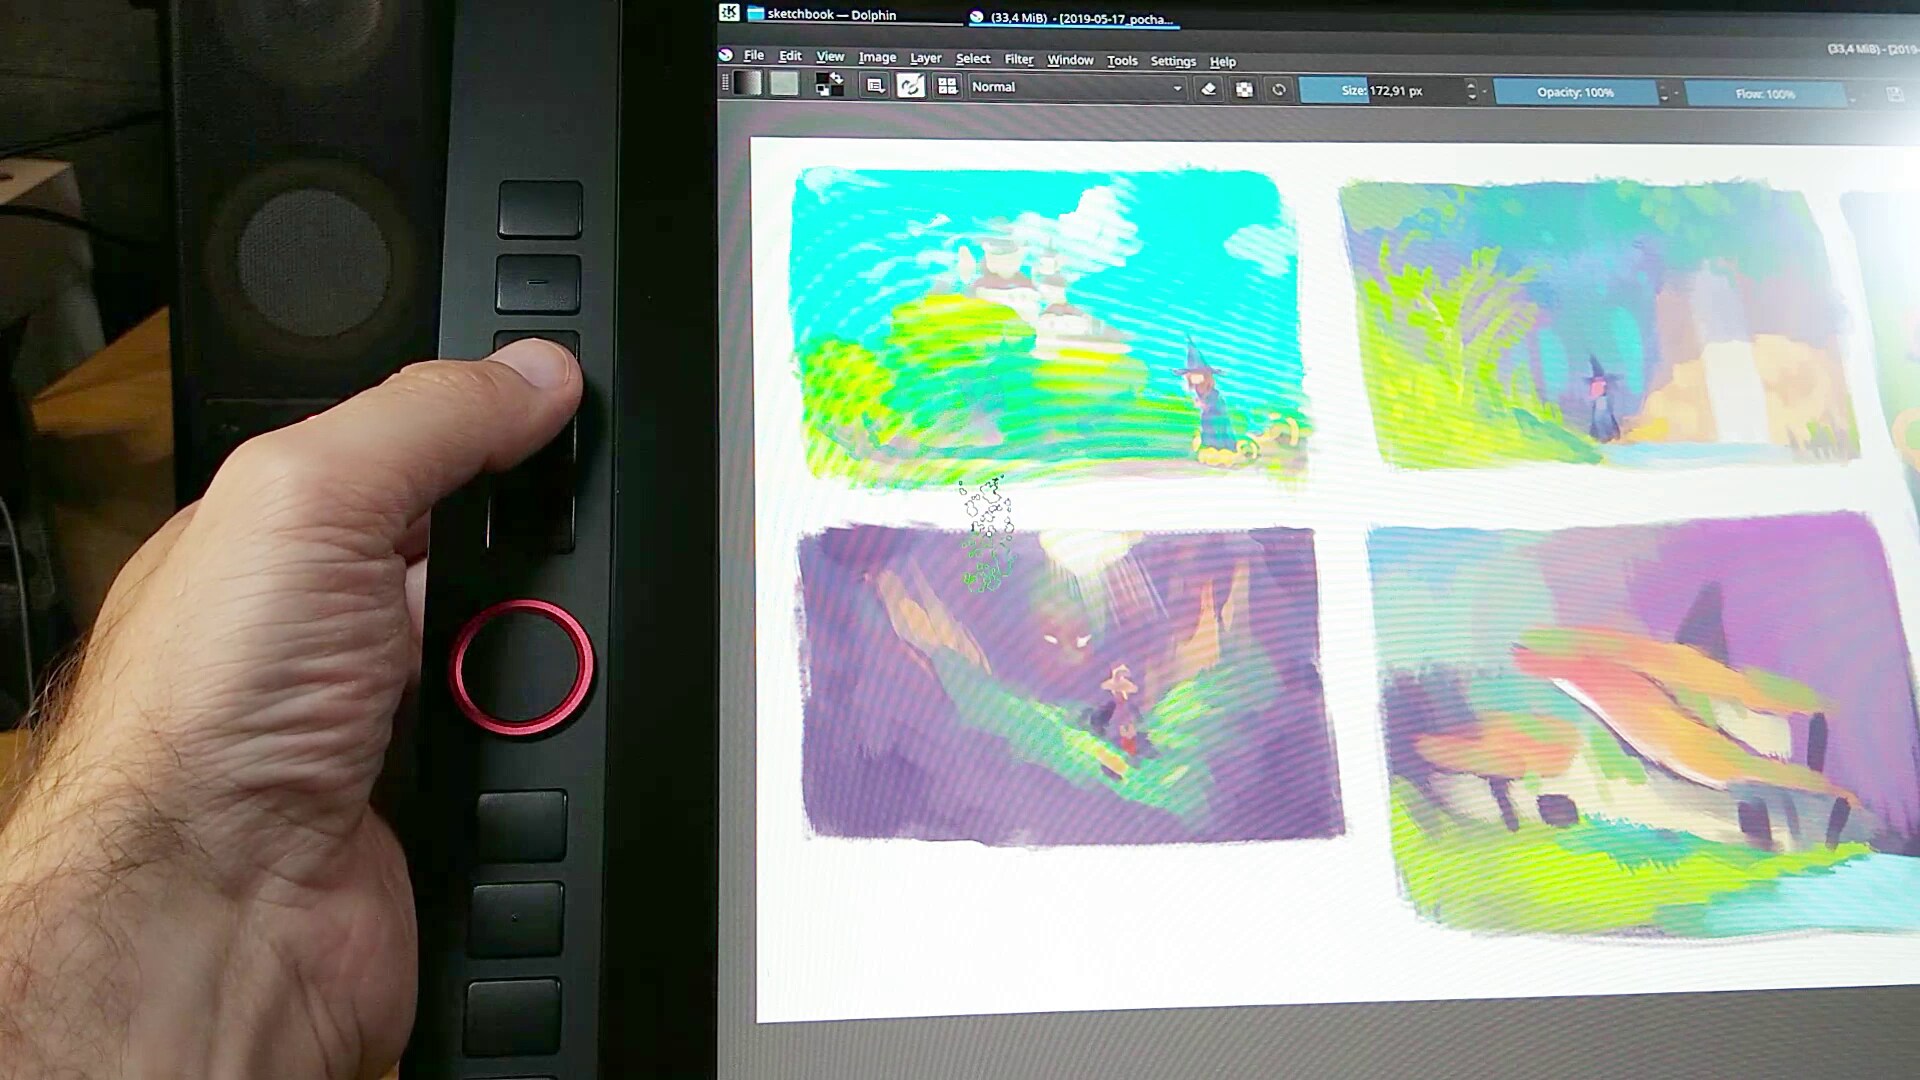
Customizing the second stylus button of the XP-Pen Artist 24 Pro (the one on top) was my top priorities. I created a Udev/Hwdb rule to simulate a right click after catching the event. To do so, create a Udev/Hwdb custom rule with sudo micro /etc/udev/hwdb.d/90-xppen.hwdb and paste this:
evdev:input:b0003v28BDp092De0100-e0*
 KEYBOARD_KEY_d0045=0x14c
You can find how I found the identifier of the tablet device b0003v28BDp092De0100-e0* (complex and different for every devices) thanks to the entry on the Arch Linux wiki about udev that describes the method to retrieve one. To test the custom rules, save the file; and run the one-liner under to recompile and restart Udev. The change should be instant without needing it to reboot.
sudo systemd-hwdb update && sudo udevadm control --reload && sudo udevadm trigger
If you want to customize the button to another key, 0x14c is a keyboard scancode. You can find a list of Keyboard scancode here; it will give you the last two number/letter for the key you need to target.
The tablet buttons (on the frame) by default behave like a keyboard and send events that were pre-recorded by XP-Pen (call them 'hardcoded'). They aren't that bad. It's possible to edit some of them. Thanks Jbigler on Github who described the events, I'm copy/pasting their great description of the default key under:
Left side:
01. b             70005 / code 48 (KEY_B)
02. e             70008 / code 18 (KEY_E)
03. alt           700e2 / code 56 (KEY_LEFTALT)
04. space         7002c / code 57 (KEY_SPACE)
05. ctrl+S        700e0 / code 29 (KEY_LEFTCTRL) + 70016 / code 31 (KEY_S)

LDL: ctrl+-       700e0 / code 29 (KEY_LEFTCTRL) + 70056 / code 74 (KEY_KPMINUS)
LDR: ctrl++       700e0 / code 29 (KEY_LEFTCTRL) + 70057 / code 78 (KEY_KPPLUS)

06. ctrl+z        700e0 / code 29 (KEY_LEFTCTRL) + 7001d / code 44 (KEY_Z)
07. ctrl+alt+z    700e0 / code 29 (KEY_LEFTCTRL) + 700e2 / code 56 (KEY_LEFTALT) + 7001d / code 44 (KEY_Z)
08. ctrl+shift+z  700e0 / code 29 (KEY_LEFTCTRL) + 700e1 / code 42 (KEY_LEFTSHIFT) + 7001d / code 44 (KEY_Z)
09. v             70019 / code 47 (KEY_V)
10. l             7000f / code 38 (KEY_L)

Right side:
11. ctrl+o        700e0 / code 29 (KEY_LEFTCTRL) + 70012 / code 24 (KEY_O)
12. ctrl+n        700e0 / code 29 (KEY_LEFTCTRL) + 70011 / code 49 (KEY_N)
13. ctrl+shift+n  700e0 / code 29 (KEY_LEFTCTRL) + 700e1 / code 42 (KEY_LEFTSHIFT) + 70011 (KEY_N)
14. ctrl+e        700e0 / code 29 (KEY_LEFTCTRL) + 70008 / code 18 (KEY_E)
15. f             70009 / code 33 (KEY_F)

RDL: [            7002f / code 26 (KEY_LEFTBRACE)
RDR: ]            70030 / code 27 (KEY_RIGHTBRACE)

16. d             70007 / code 32 (KEY_D)
17. x             7001b / code 45 (KEY_X)
18. ctrl+delete   700e0 / code 29 (KEY_LEFTCTRL) + 7004c / code 111 (KEY_DELETE)
19. ctrl+c        700e0 / code 29 (KEY_LEFTCTRL) + 70006 / code 46 (KEY_C)
20. ctrl+v        700e0 / code 29 (KEY_LEFTCTRL) + 70019 / code 47 (KEY_V)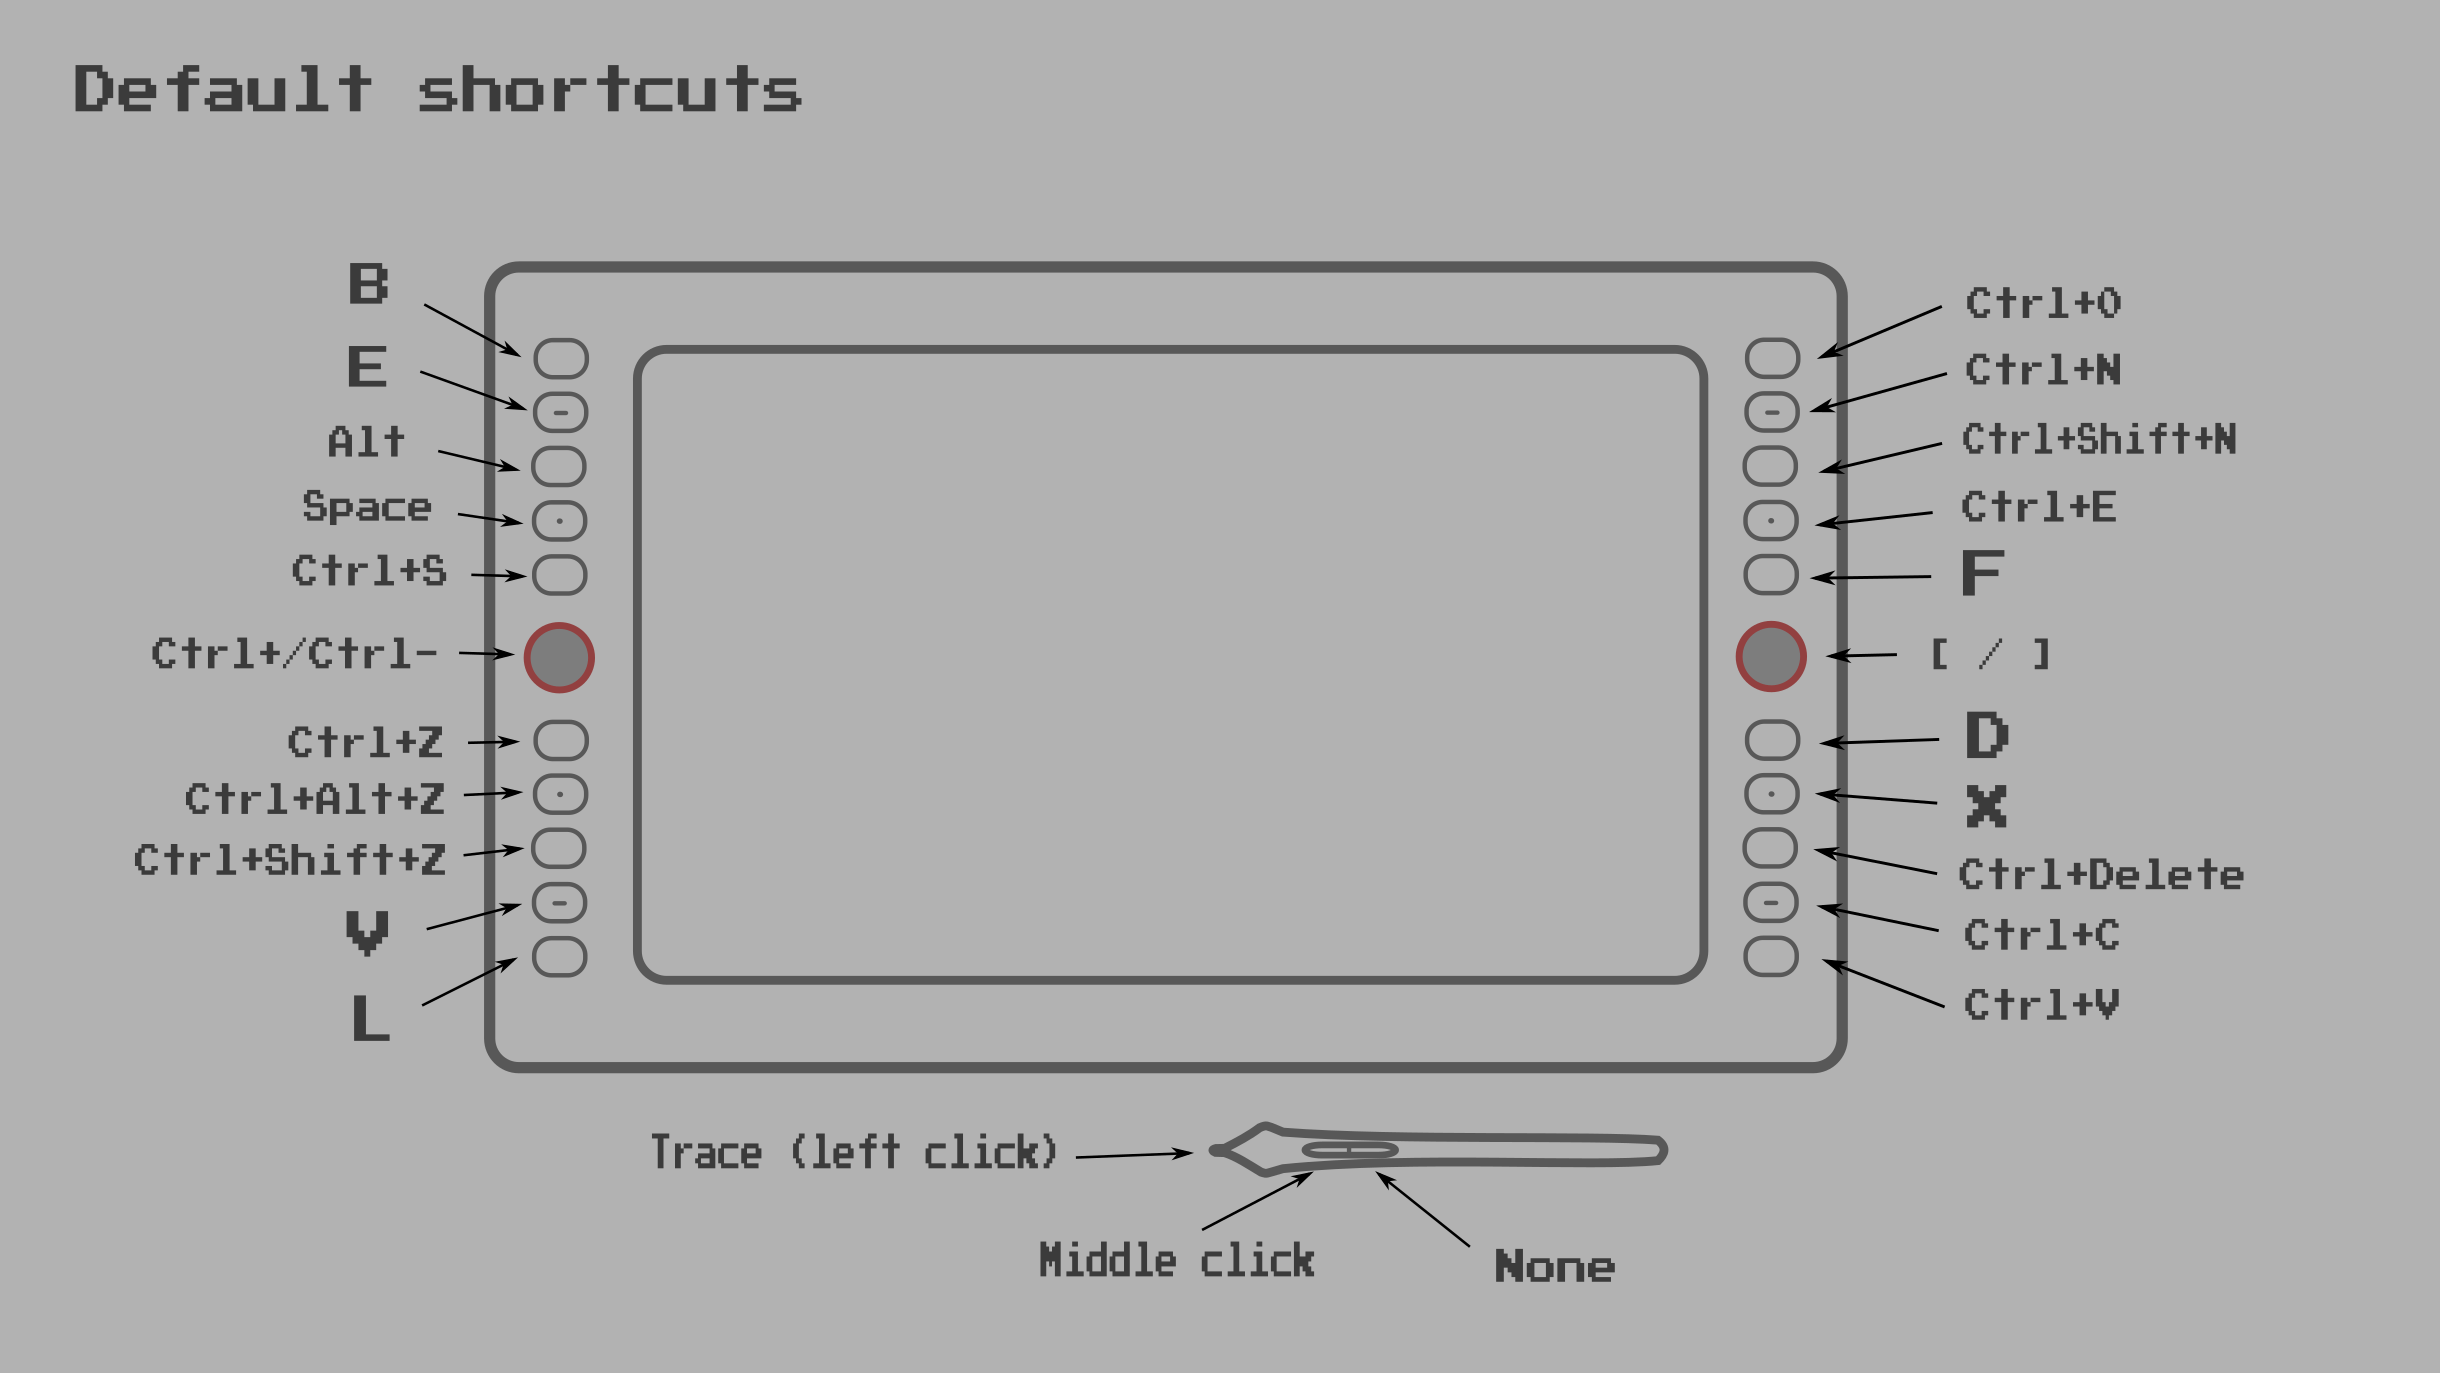
So, you can only switch a key for another one; and shortcut with two two or three key will be limited to shortcut using also three keys. Note also if you want to switch Ctrl for Shift; all your Ctrl+something shortcut will switch for Shift+something. So, it's limited, but possible to customize with a little bit of thinking.
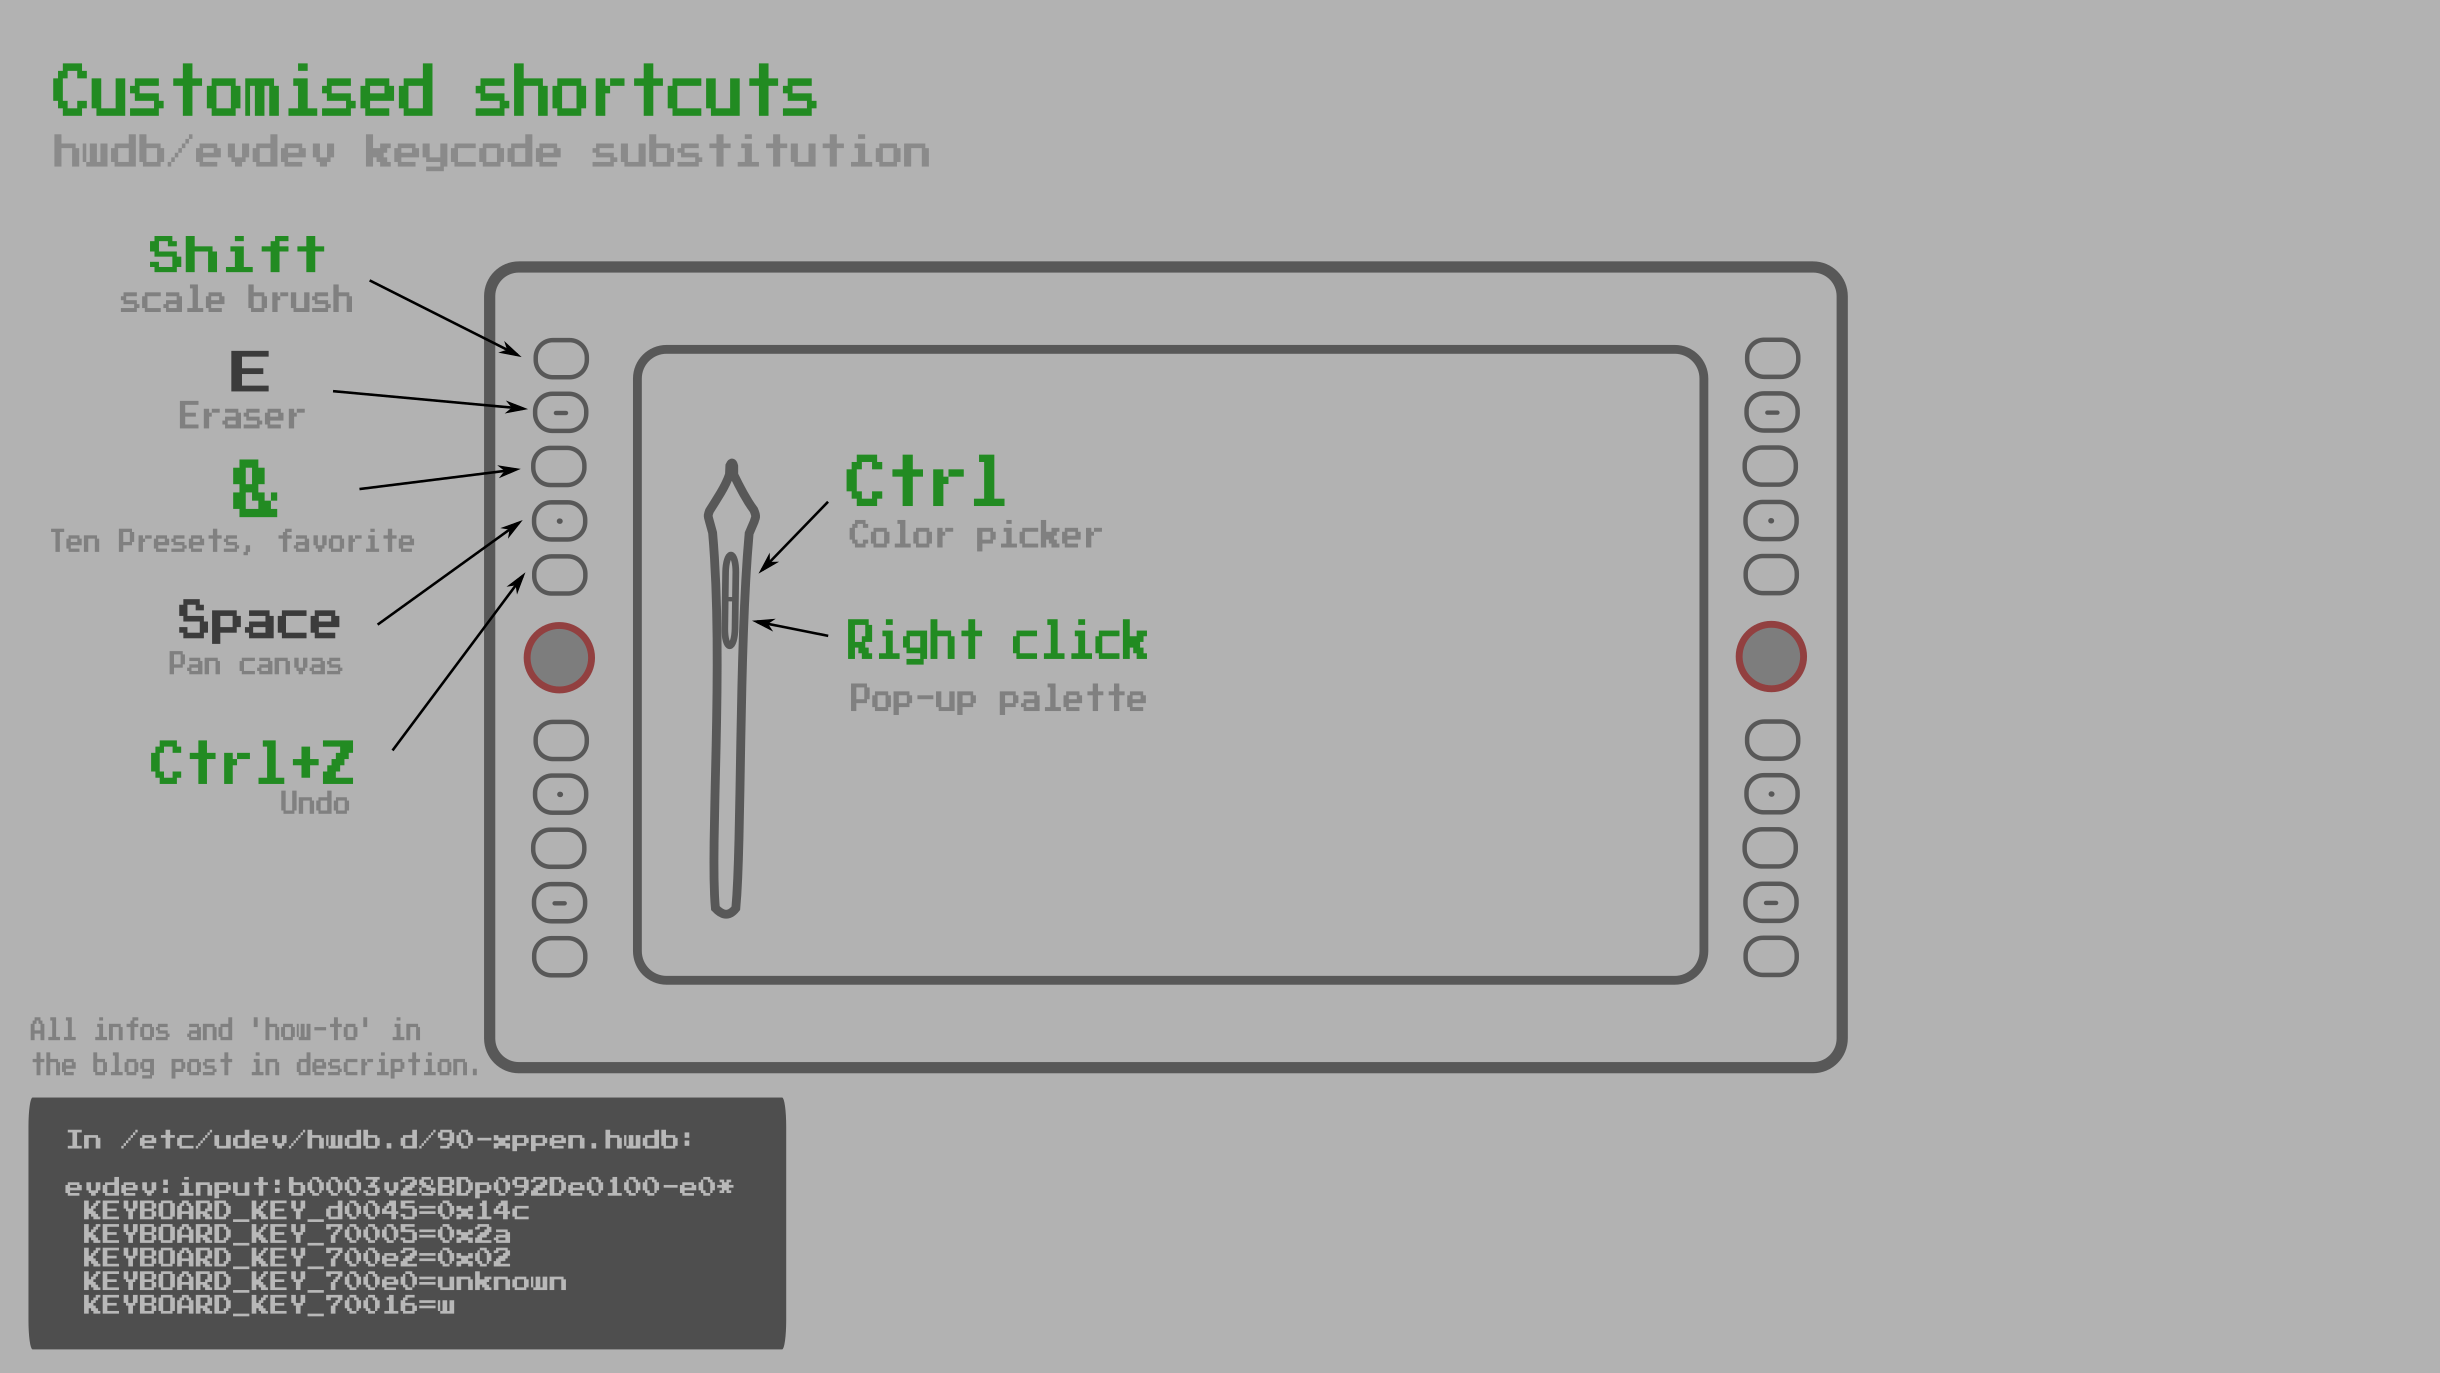
All of that are Udev/Hwdb rules as described on the previous chapter about customizing the second button on the stylus. ( on sudo micro /etc/udev/hwdb.d/90-xppen.hwdb )
Here I'm sharing the B of the brush on first key ( 01. b) for a 01. Shift to resize my brush with:
KEYBOARD_KEY_70005=0x2a
The second one, 'e' is ok for the eraser toggle of Krita, so I'm keeping this one.
Third is a 'Alt'; not usefull for me. I'll replace with a '&' symbol; something I can remap on Krita ( I use it with the '10 preset plugin' , to switch to a brush preset; here in my case, an eraser. You can see the method in my video about keyboard shortcut on Krita. )
KEYBOARD_KEY_700e2=0x02
I keep the default spacebar; useful to pan document.
Debatable: I'm switching all Ctrl key to null event... because Ctrl+s, Ctrl+q (to quit; on Azerty keyboard the Ctrl+Z of default is switched for a Ctrl+Q).
KEYBOARD_KEY_700e0=unknown
I'm switching the 's' alone for a 'z' (a 'w' because this is qwerty to azerty)
KEYBOARD_KEY_70016=w
All in all , here is my Udev/Hwdb file with the stylus (sudo micro /etc/udev/hwdb.d/90-xppen.hwdb):
evdev:input:b0003v28BDp092De0100-e0*
 KEYBOARD_KEY_d0045=0x14c
 KEYBOARD_KEY_70005=0x2a
 KEYBOARD_KEY_700e2=0x02
 KEYBOARD_KEY_700e0=unknown
 KEYBOARD_KEY_70016=w
Run a sudo systemd-hwdb update && sudo udevadm control --reload && sudo udevadm trigger to refresh after saving your file.
Update, end August 2023:
Here is my /etc/udev/hwdb.d/90-xppen.hwdb of the moment, a bit more advanced than the initial one. I found new resources to help me to customize it: a visual representation of the Azerty layout with scancode and a list of the possible keywords. I also found the syntax to add comments.
evdev:input:b0003v28BDp092De0100-e0*
 KEYBOARD_KEY_d0045=0x14c # [Stylus] binds 1st stylus button to Control
 KEYBOARD_KEY_700e0=reserved # [ALL] binds Control to nothing!
 KEYBOARD_KEY_70005=leftshift # [1] binds B to Shift
 KEYBOARD_KEY_700e2=1 # [3] binds Alt to & (qwerty 1)
 KEYBOARD_KEY_7002c=0x1d # [4] binds Space to Ctrl
 KEYBOARD_KEY_70016=0x56 # [5] binds S to < (scancode azerty FR)
 KEYBOARD_KEY_70056=i # [dial+] binds + to i (qwerty comma)
 KEYBOARD_KEY_70057=o # [dial-] binds - to o (qwerty period/dot)
 KEYBOARD_KEY_7001d=a # [6] binds Z to Q (qwerty A)
 KEYBOARD_KEY_7000f=semicolon # [10] binds vL to M (qwerty semicolon)
 KEYBOARD_KEY_70012=w # [1R] binds O to Z (qwerty W)
 KEYBOARD_KEY_70011=y # [2R] binds N to Y
 KEYBOARD_KEY_70009=2 # [5R] binds F to é (qwerty 2)
 KEYBOARD_KEY_7002f=comma # [dialR+] binds [ to semicolon (qwerty comma)
 KEYBOARD_KEY_70030=dot # [dialR-] binds ] to colon (qwerty period/dot)
 KEYBOARD_KEY_70007=3 # [6] binds D to " (qwerty 3)
 KEYBOARD_KEY_7001b=4 # [7] binds X to ' (qwerty 4)
 KEYBOARD_KEY_7004c=5 # [8] binds Delete to ( (qwerty 5)
 KEYBOARD_KEY_70006=0x0c # [9] binds C to ) (azerty scancode)
Misc:
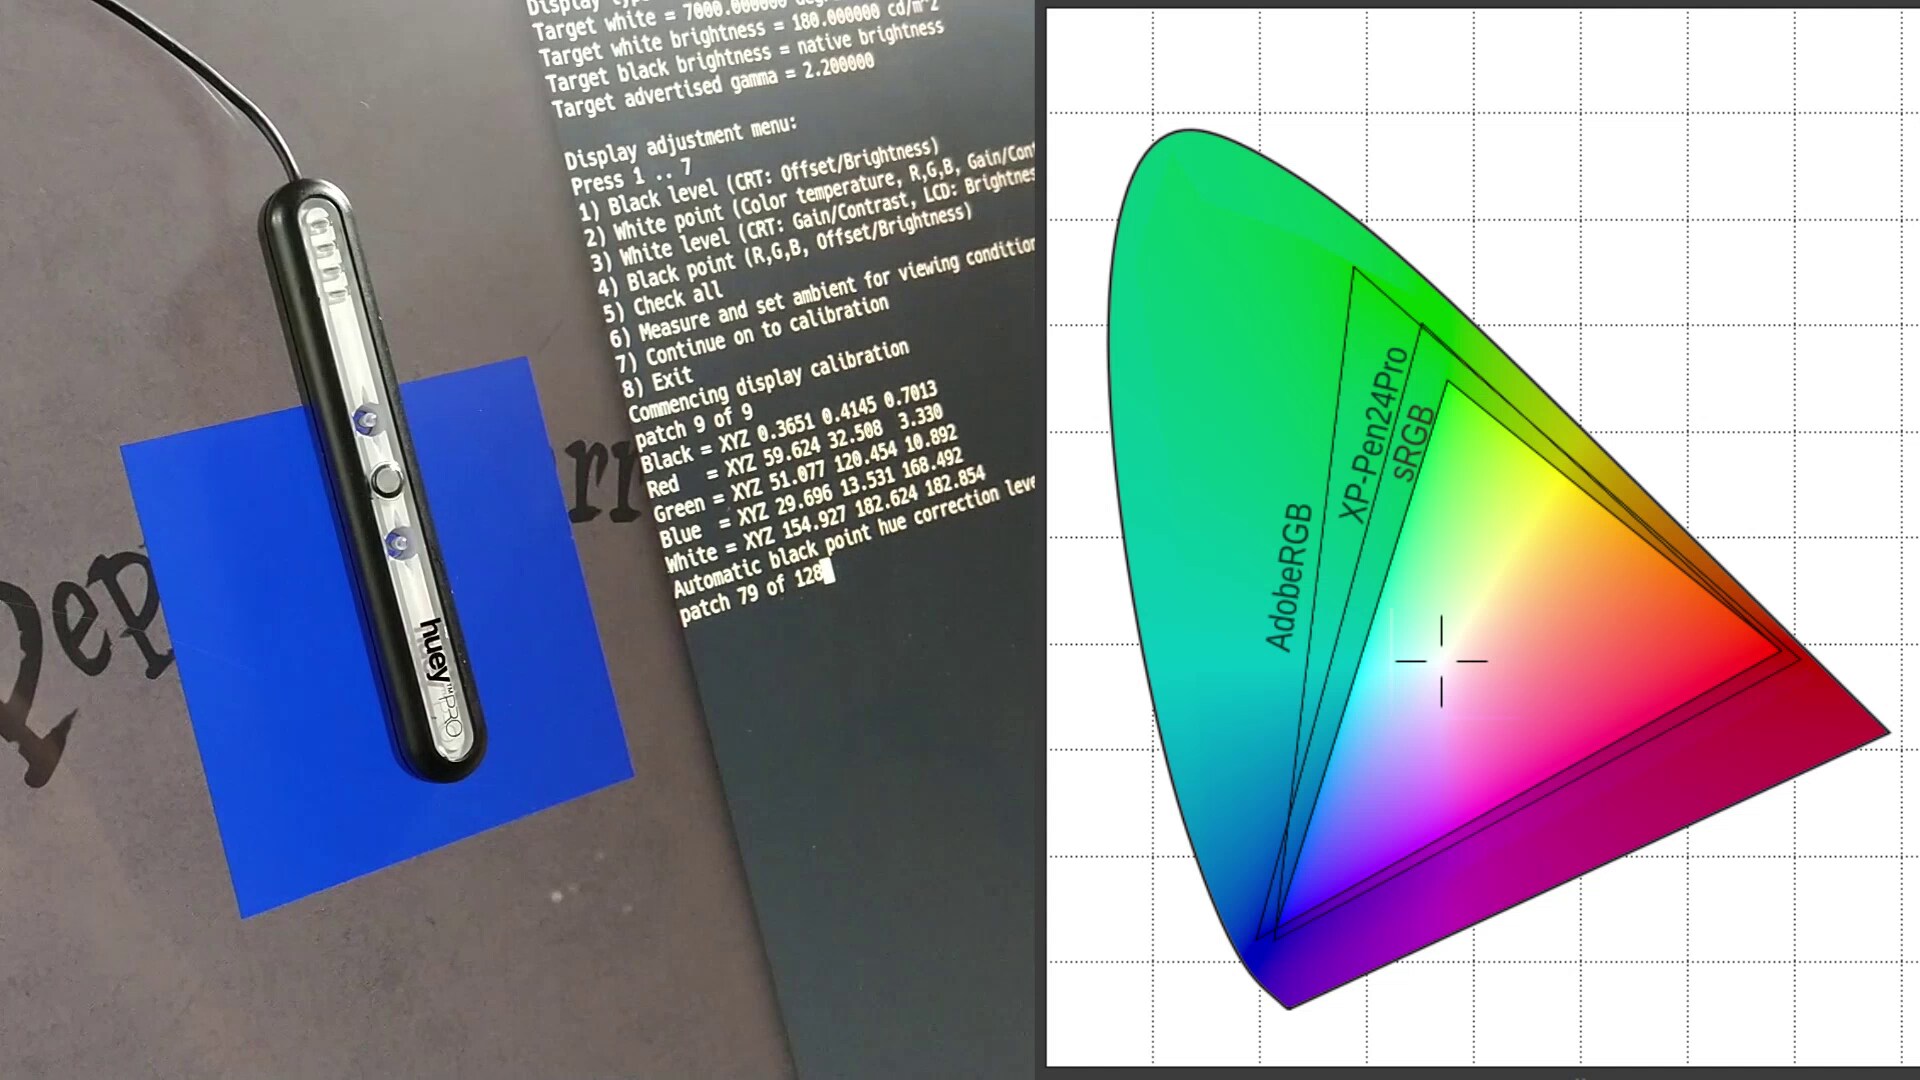
Calibrate the QuadHD display
Here is a one liner to calibrate your color on Ubuntu 20.04 tablet with argyllCMS (I used here a Pantone Huey Pro calibrator):
dispcal -d 1 -t 6500 -b 160 -g 2.2 -v -o $(date +%Y-%m-%d)_XPPEN24PRO
Here is a summary of the option so you can spice it to your needs:
-d 1for monitor 1.-t 6500for the temperature, to target 6500K.-b 160for 160 cd/m² brightness.g 2.2for a gamma at 2.2.-vverbose mode, print more information during the process.-o $(date +%Y-%m-%d)_XPPEN24PROthe output filename (here with a auto iso date prefix).
If you are a bit lost with this options; you can still let ArgyllCMS default decides for you with simply:
dispcal -d 1 -v -o $(date +%Y-%m-%d)_XPPEN24PRO
Once you have the ICC file; you can apply using the color interface setting of Plasma/KDE; or you can apply it by command line with:
dispwin -d 1 /home/deevad/scripts/2021-05-11_XPPEN24PRO.icc
You'll get the list of your monitor with dispwin -help and you can add that to a bash script and launch that at startup (see the method detailed on xsetwacom chapter of this article).
Note: If you don't have any calibrator, your best setting with the OSD of the tablet might probably be to keep the Gamma at 2.2, the brightness at 60 and the Color mode to sRGB.
Fix IntelHD Gfx card not recognising the QuadHD resolution:
On my laptop with a IntelHD integrated chipset for graphics I ran for test, the maximum resolution detected was a 1920x1200... Note this card wasn't enough performant to run Krita on this tablet without any noticable lag. If you connect this tablet to a computer, I advice you to get a performant one!
I case you run into this issue; you can fix it with by checking how is named your output (often named by xrandr after the name of the cable/plug) ; mine for this laptop was HDMI-1; you can do so with the command xrandr and then, run this:
cvt -r 2560 1440
The output gives:
2560x1440 59.95 Hz (CVT 3.69M9-R) hsync: 88.79 kHz; pclk: 241.50 MHz
Modeline "2560x1440R"  241.50  2560 2608 2640 2720  1440 1443 1448 1481 +hsync -vsync
Perfect! it is the specifications you need to add to a custom new xrandr profile: So, write:
xrandr --newmode "2560x1440R"  241.50  2560 2608 2640 2720  1440 1443 1448 1481 +hsync -vsync
xrandr --addmode HDMI-1 2560x1440R
xrandr --output HDMI-1 --mode 2560x1440R
And success, your XP-Pen Artist 24 Pro should switch after that to 2560x1440 quadHD resolution.
Fix the XPPEN proprietary driver
In case you are OK with using the proprietary driver (I'm not, but in this case, don't install the Digimend one) and this one doesn't work ( tested on xp-pen-pentablet_3.1.0.210331-1.x86_64.deb, 30 April 2021) ; it means the installer failed at giving permission in post-install. You can fix it simply with:
sudo chown $(whoami) /usr/lib/pentablet
sudo chmod +x /usr/lib/pentablet/pentablet
References and useful links:
-
Youtube video: XP-Pen Artist 15.6 Pro on Linux (in Japanese) Yoshi's full video about the 15inch Pro proprietary driver and libinput/xsetwacom driver, I can't understand a single word; but I could see what he does on his Arch XFCE desktop thanks to the command lines. Good resource.
-
"XP-Pen Artist 22R Pro by Draghi and Jbigler on DIGImend/digimend-kernel-drivers's Github Same diagnosis, similar model and the first hint to make the stylus works perfectly.
-
"XP-Pen Artist 13.3 Pro" issue by Urfoex on DIGImend/digimend-kernel-drivers's Github A diagnosis similar in all point to what I experience using the 24 Pro. I wish I read this thread sooner, I discovered it late on my research.
-
" XP-Pen Innovator 16 diagnostics - ID160F #474 on DIGImend/digimend-kernel-drivers's Github" Very good feedback from Pivui and Razcore-art.
-
"Using Udev hwdb" on Arch Wiki" Useful to map the second button of the stylus. On 'buntu; the package is
sudo apt install evemu-tools, and you can use it after that withsudo evemu-describe. -
List of common scancode for the Linux keyboard Useful list of scancode default key for keyboards.
-
An interactive widget to get pressure curve number for Xsetwacom
