


Kubuntu Linux 19.10 for a digital painting workstation: Reasons and Install guide.
Table of Contents
- Reasons
- Installing Kubuntu 19.10
- Settings
- Restore a functional Alt key
- Deactivate the hot corner
- Don't darken colors of parent windows
- Don't drag from any part of the GUI
- Start system with an empty session
- Fix non-persistent numlock key
- Neutralize the colored gray on theme
- Thinner Windows style
- A black theme for an interface on top
- Add a workspace
- File-Manager Dolphin, Krita & Git previews:
- A better kickoff menu
- Custom default folders
- Firefox media integration:
- Color Calibration and Management
- Software
- Web development
- Other, Misc
- Disable Apport crash report dialog:
- Fix Imagemagick memory limit.
- Fix issue with sleep/suspend/hibernate mode
- References & links:
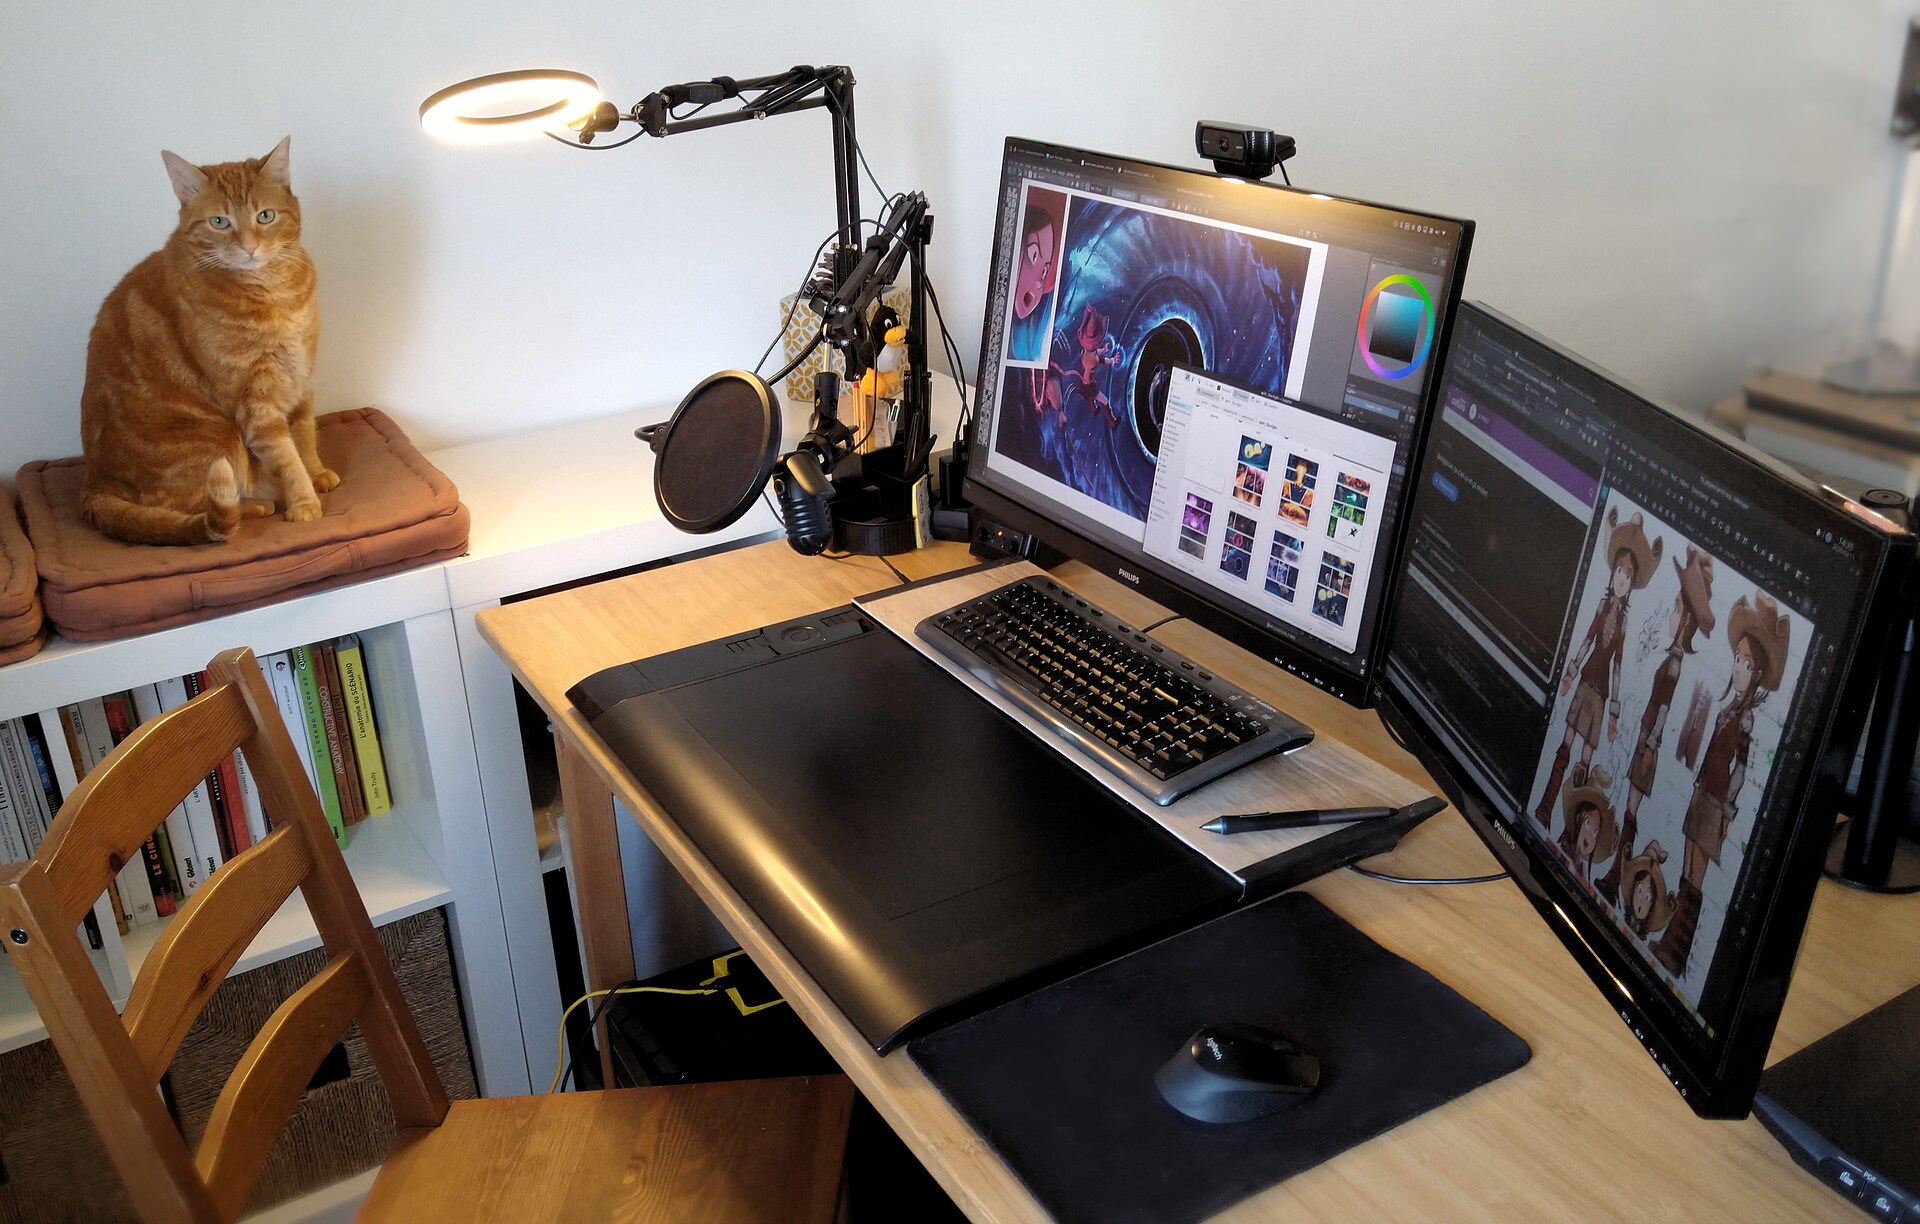
My assistant introducing my workstation running Kubuntu at home
As you probably knows if you follow my blog, I'm using exclusively a GNU/Linux operating system for my workstation. I produce everything I do with it (webcomic, website, book, freelance, videos, etc...) and all of that since more than ten years now. Along the way, I tried so many existing solution for my workstation!.. And that's not a little journey because on this type of systems the options are numerous as you can see by yourself on this graph representing the development of various Linux distributions..
From April 2018 to end 2019, I used the same distro: Kubuntu 18.04 LTS and I was happy with it. It's even the first time I stick 1,5 year with the same operating system. I updated it recently to the latest version of Kubuntu 19.10 and this version made me even happier!
So, I decided to take notes on the way while reinstalling everything as I did over the last ten years when I wrote my previous five long install guide. Then the notes transformed into a draft, and now you'll find on this article two parts. First, my reasons to use it and why I advice it for a digital painting workstation. In a second and last part, I'll detail my tips, command-lines and methods to adapt the base Kubuntu install into an operating system similar to the one I use.
This article might help newcomers or even advanced user facing same problematic as I do and will answer the question "What distro do you use?" I keep receiving all the time. It might also anticipate the "Have you tried xxxxxx?" / "Why do you think xxxxx is better?" replies I often get back. :-)
Reasons
My main big reasons to use a GNU/Linux open-source system evolved a bit from the origins:
- Independence (no one have a control on what I watch, what I use and how I use it).
- Technology (performance, scripting, standards).
- Transparency (open-source: you can investigate any parts).
- Control of my data and privacy.
But almost all distros provide that so here is a list of what I prefer specifically on Kubuntu 19.10 compared to other existing solutions:
Graphic Tablet GUI
Kubuntu 19.10 ships out of the box with a first class and fully featured tablet configuration panel, including the possibility to setup all buttons (eg. modifier on stylus button as "Ctrl"), add profiles and switch between them, mapping to custom area and support of multi monitors switch and calibration for pen-display!... That's something that no other desktop environment has to the date (the closer being GNOME but with many features missing in comparison). On the past, I ran custom bash script for years before having the possibility to setup my tablet this way. By the way, if you wonder what type of tablet I'm using, it's a Intuos4 XL (using only 3/4 of the total active surface) with a recent stylus (from Cintiq 13HD era) and with a Huion WH1409 overlay sheet and a DIY wood deck for my keyboard on the non-used upper part because of the mapping (see photo on the header of the article). For the why, read this article because it is a bit too long for here.
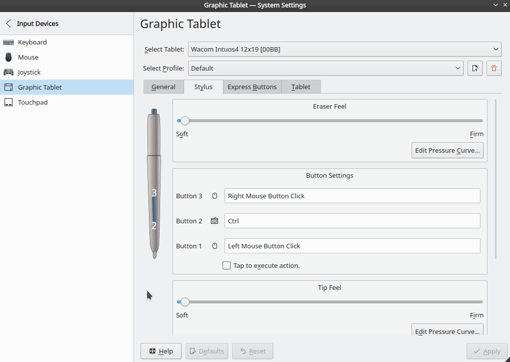
Graphic Tablet panel in the System Settings
Friendly with images format
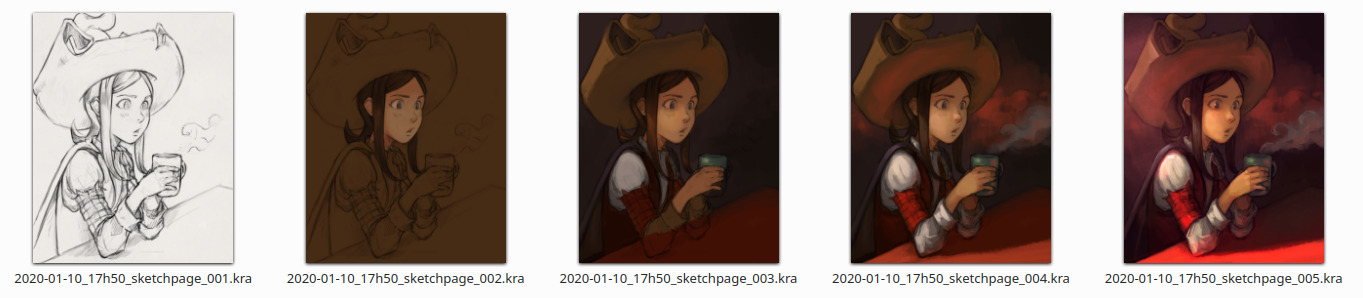
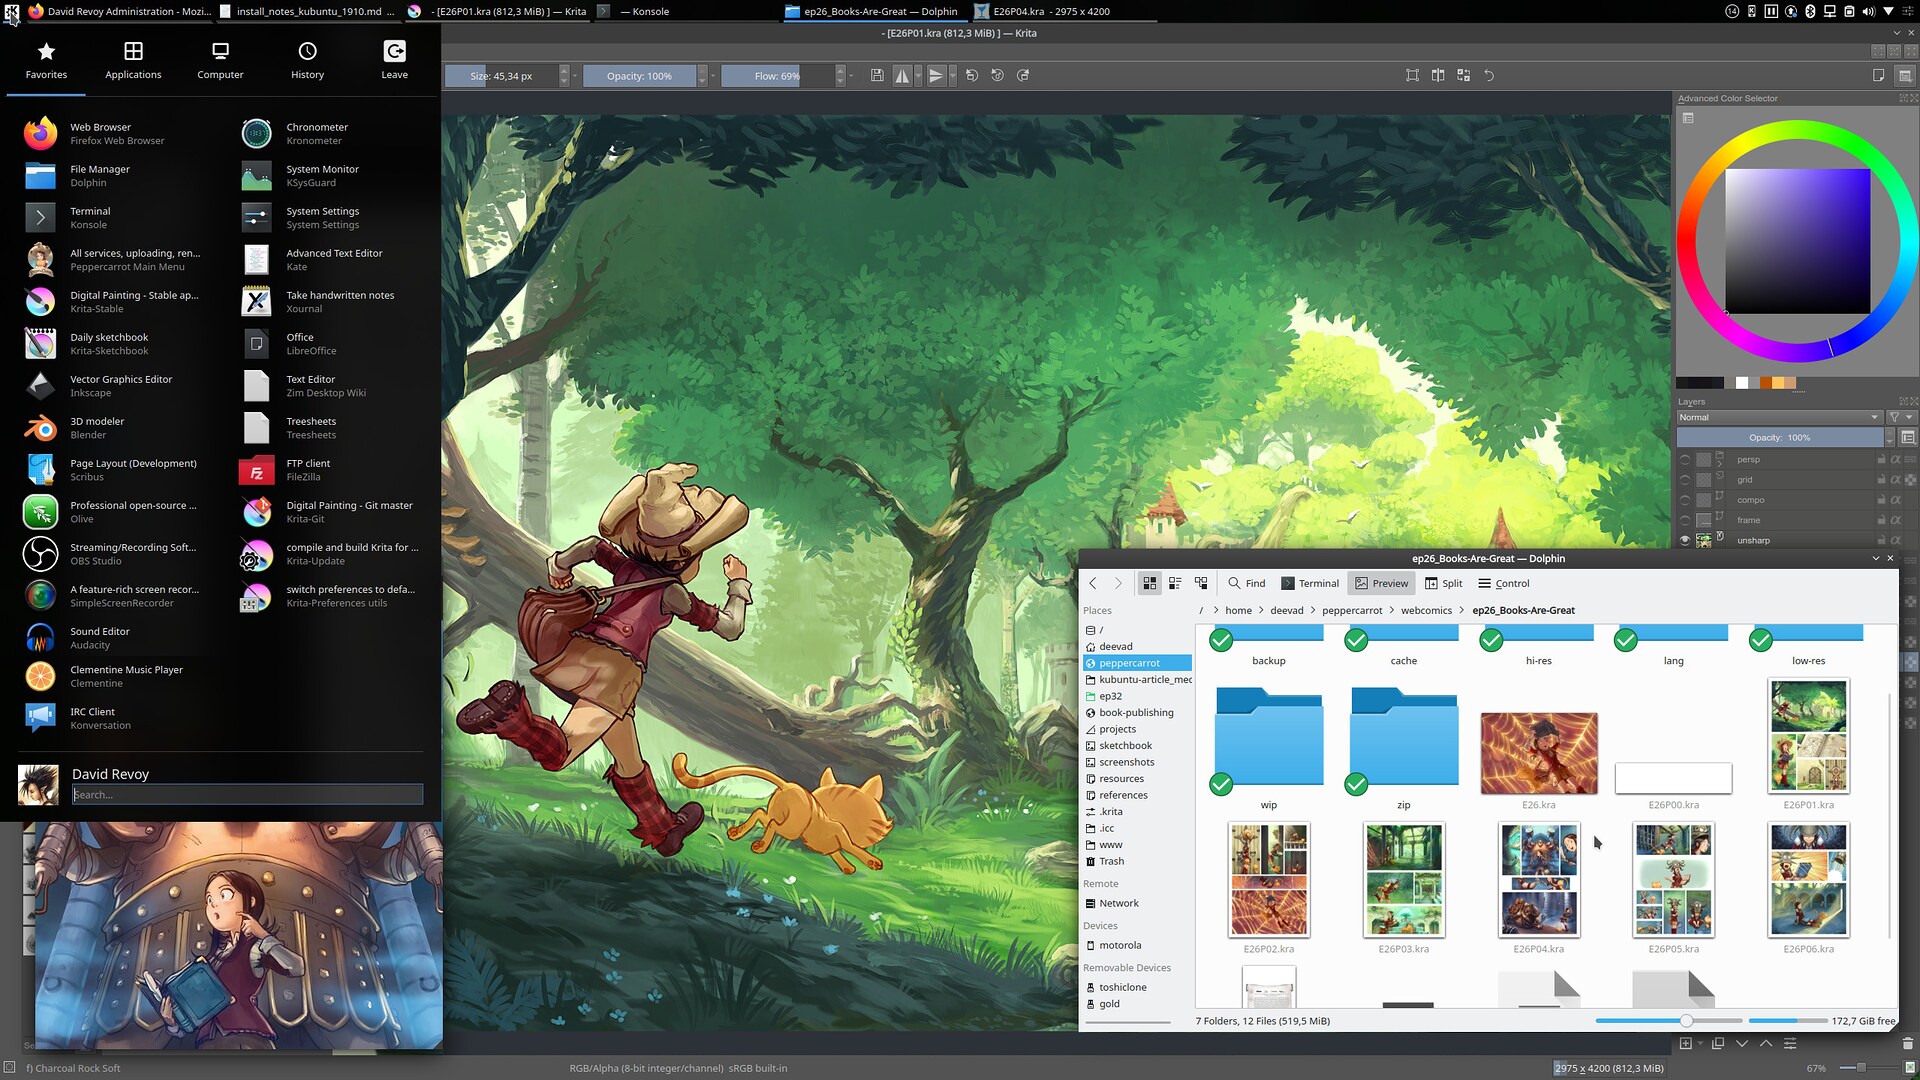
Dolphin, the file explorer of Kubuntu can generate very large thumbnails for your artworks as you can see under. It supports a lot of image format: Krita source files (kra), Open Raster (ora), Photoshop files (psd) and many other classics (png, jpg, etc...). This is very comfortable to work on a project with many illustrations where very often the filename is not relevant and where your decision of editing will be made according to the content of the thumbnails.

Support of kra, psd, ora and tiff thumbnails
This compatibility will also affect the image viewer and you'll be able to display psd and kra files instantly like for any other usual image format (jpg, png, tiff, tga). This ability to quick preview a heavy layered source file really helps in production.

Nomacs image viewer displaying a Krita (kra) layered high resolution comic page instantly.
If you work with incremental saves or many versions of the same image project, having the ability to read larger thumbnail will be help you in your editing choices. You'll also have a better overview on your projects while working on them. I know it sounds a bit obvious; but not for everyone because the mainstream popular file explorer on GNU/Linux —Nautilus— limited by design all the thumbnails to 128px pixels maximum and keeps adding a confusing white rounded border around the picture that alter the representation of pictures.
Friendly with colors
On Kubuntu you can change the color of the theme in the settings. This possibility allows the quick setup of a neutral gray UI, an important feature for working with colors balance. Many themes from other distros force color brand on users; including a flashy main color for selection in relation with the logo. This research of an identity via a strong color damage the work of those who works with colors. And making theme with slightly colored gray (cold or warm) is worst.

Colors panel in the System Settings
Another great feature, are custom colored directories and Git integration in the file explorer; for a person like me with a memory driven for color, shapes and position this is precious to organize my files. I can also see that way what files changed recently and possibility to pull, push, add and commit via the right-click menu. In my opinion, Kubuntu opens Git contribution to non-developer and that's something precious for teamwork.
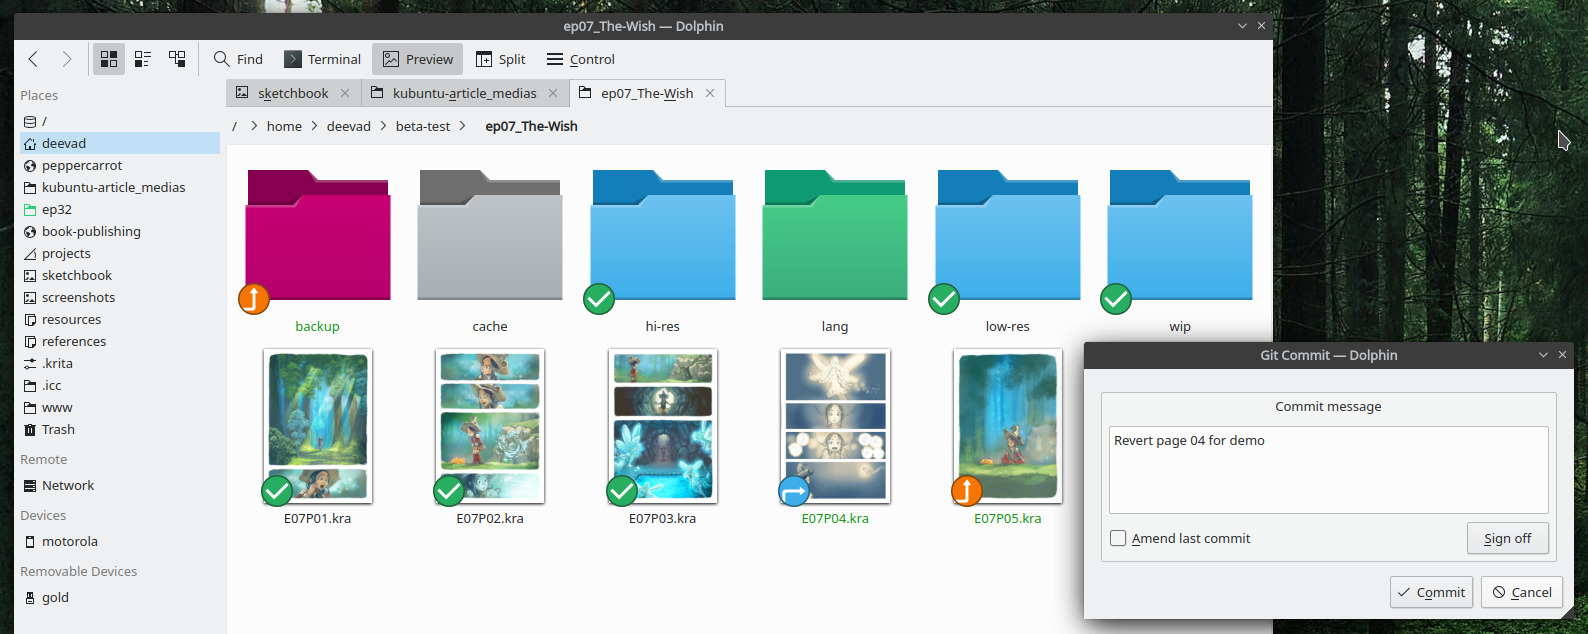
Colors folders and emblems for Git integration
Other
- A configurable "Open With" menu on right-click to optionally edit your files with other software and setup the position of how they appear on the list. So you can set you kra files to open on double-click with a viewer and with a right click edit it with Krita. This feature sounds obvious, but not all file explorer have a good ergonomy for managing file association.
- Support customization of the user interface. Almost all elements of the user interface (launcher, icons, toolbar) can be modified to mimic any popular desktop environment ergonomy or create your own. Here I prefer a classic bar with a menu, windows lists and system tray; black and on top.
- Support multi-monitors workflow with possbilities as listing windows per monitors, adding menus or widget where you want. It's not just a main monitor and a slave monitor: you'll have two monitors. The tiling in quarter by default is also precious for managing windows on large monitor (eg. QuadHD monitors).
- Perfect system integration for Krita and this is convenient if it is your main tool (Kubuntu is built by the same community: KDE): it improves performances, theming, icons and drag&drop of files.
- Compatible with many devices and has a large knowledge base online thanks Ubuntu community: it works fine for my hardware: a Dell Vostro 430 PC tower I bought 10 years ago with various upgrade: a 8 x Intel Core i7 870 @ 2.93Hz, 16GB RAM and a Nvidia GeForce GTX 650 Ti (requiring Nvidia proprietary drivers, but really easy to install).
Issues and flaws:
- No graphical user interface for color management of your monitors, printers, etc... I'll write a workaround in the second part about it.
- Thumbnails and image viewer are not color managed (eg. don't expect displaying correctly a PNG using a linear profile).
- Current version, Kubuntu 19.10, will end its life in July 2020. It's a too short release cycle imo. My guide here under is based on 19.10 and will be updated for the next long term support version Kubuntu 20.04 to be released on end April 2020 (19.10 systems will be able to update to this new version without reinstalling everything).
Installing Kubuntu 19.10
Ok, now let's start with how to get everything working like that. Quick usual disclaimer: this article gives no warranty and do all of this at your own risk. I tested all of that on my workstation while reinstalling, I tested it again for my laptop and that's all I can help. I tried to detail all the steps to be friendly with newcomers: Mac and Windows users.
Download the ISO:
You'll find a free copy of Kubuntu on their website, menu 'Download'. If you are not familiar with how to write an ISO to a USB flash drive, I recommend following the information down the download page of the Ubuntu website with specific information for user coming from Windows, MacOS or other operating systems.
Pre-installation adviced:
Before booting on the flash drive USB, I'll recommend to have a full backup of any important data. While installing Kubuntu, use the manual partition tool when Kubuntu ask where to install it. This option will open an interface to manage how to split your disk into partitions. I propose here:
- For the Operating System: 25GB (minimum) → formated as ext4 → root '/'.
- An area for memory swap: 8GB → formated as swap
- Your user profile and documents: The last bigger part of your disk → formated as ext4 → '/home'.
Software & Updates, Additional Drivers and upgrade:
Once installed and during the first reboot, press your menu button and start typing "Disco" to select Discover; "the app store" of Kubuntu. You'll find at the bottom a "Sources" button. This one will open a panel with a button on the top "Software Sources", click it and enter your password. On the first tab, select the best mirror (Download from > Other > Select Best Server). You'll save a ton of time for the updates if you do that after the first launch.
Then go to the tab 'Additional Drivers' and install the proprietary proposed driver (especially if it makes your hardware more stable and performs better, a common situation on GNU/Linux for NVidia drivers, unfortunately.)
When all of that is done, close this dialog and in Discover press the colored "Update" button and do all the updates: a fresh system always have a lot of update to do.
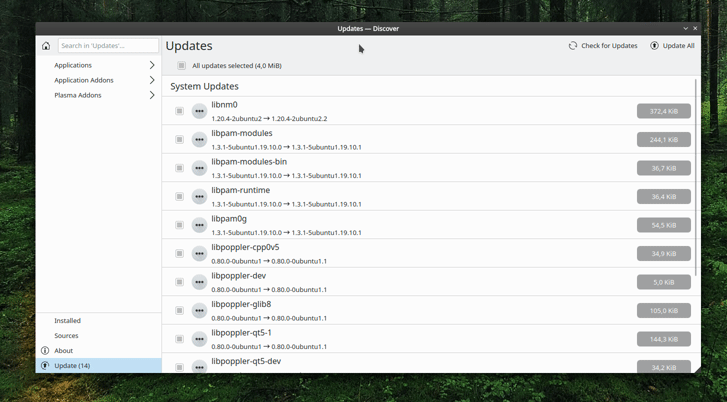
Discover is great to review each update and read what changed package per package
As an alternative, you can do the same update with this two lines inside "Konsole" the terminal app of Kubuntu. This line will ask for your password as the change affect your operating system. Just note that Ctrl+C works to copy this lines but you'll need to Ctrl+Shift+V to paste it inside Konsole, because Ctrl+V is reserved historically to other terminal based features.
sudo apt update
sudo apt upgrade
Settings
Here is the list of settings I recommend to alter in Kubuntu in order to adapt them to visual content creation:
Restore a functional Alt key
By default Kubuntu own the Alt modifier Key on your keyboard to move windows. This is something apparently Developers enjoys more than anything because it will never change despite my efforts reporting it. This important modifier key is used in software like Krita and Blender. You can fortunately change this behavior, and transfer this feature to the Super key (the Windows key).
In the settings: Windows Management > Windows behavior > Windows Action: Switch the Modifier 'Alt key' to 'Meta key'.
Deactivate the hot corner
Hot corners are probably cool but doesn't work very well with a tablet. I tend to forget about them, then I quickly remember as I take back a mouse. Kubuntu comes with a predefined hot corner to show all windows, it can be deactivated this way:
In the settings: Desktop Behavior > Screen Edges > deactivate the top left corner "present all windows"
Don't darken colors of parent windows
Darkening the parent windows often breaks usability of visual apps (eg. a color picker windows that can't access color of the parent).
In the settings: Desktop effect > Dialog Parent (darken the parent windows) unchecked
Don't drag from any part of the GUI
This feature allows one to drag the window from any pixels inside the GUI. With a stylus in hand, it leads to many unintentional drag as soon as someone tries to adjust a slider a bit quickly.
In the settings: Application Style > (check the little configuration icon near to 'Breeze') > in the 'Configure Breeze' panel turn "Windows drag Mode" to title-bar only".
Start system with an empty session
By default, Kubuntu will restore at startup all the app that were still opened at shutdown. If you prefer starting fresh with an empty desktop:
In the settings: Startup and Shutdown > Login Screen (SDDM) > choose "Start with empty session" or the computer will launch all programs open when you pressed the shutdown button.
Fix non-persistent numlock key
For French AZERTY keyboard, numbers are more accessible via the numpad. But without a persistent numlock key you'll have to press numlock every start, unless: In the settings: Hardware > Input device > Numlock on startup "Turn on"
Neutralize the colored gray on theme
Having blueish gray, or warm gray on the user interface can mess with your perception of color balance and then affect your work. Breeze, the default theme comes with colored grays...
In the settings: Colors > Mouse hover "Breeze" to select the tiny pen 'edit' button.
You can then edit the colors, the main issue is with "Focus decoration" > Remove the saturation of the color to make it neutral. And switch all title bar (active/inactive) to a neutral gray: I use here #3c3c3c.
Thinner Windows style
A useful tips to save room on monitors for more vertical space and so more brush presets, palette or options that matters while painting:
In the settings: Application style > Windows decoration > Windows Border size 'No borders':
- Put your mouse over the Breeze thumbnail to reveal the hidden Edit button (a little pencil icon, I know: this interface is not a good design)
- Then in the panel: General > Button size > Small
- Also, remove "Draw a circle around close button" exept if you like it.
- Go back to the Settings main menu, then: Fonts > Fonts > Lower windows title to 9pt, bold.
A black theme for an interface on top
This is a personal taste; it blends better with the edges of my border-less monitors and it's easier to forget about them:
In the settings: Workspace theme > Plasma theme > Get New Plasma Themes and find Unity-Plasma
Move the panel to the top screen border (the configuration icon on bottom-right > Screen edge and drag and drop the panel to the top).
Add a workspace
Workspaces are great for productivity! I use only two workspace:
- "General", to take notes, reply to email, work on my script, the website or read social medias.
- "Production" were I have an always ready "virtual easel" with my setup ready to paint.
In the settings: Desktop Behavior > Virtual Desktops ; one row, top one "Internet" and "Production" on two row. I switch them scrolling on a Pager widget in my top bar on second monitor.
File-Manager Dolphin, Krita & Git previews:
Open the file manager, and go to Control > Configure Dolphin:
In General > Preview tab, activate 'Krita documents' and any other preview you are interested in. (eg. I deactivate here the directory previews).
For the Git preview, it will be in the same panel but only after installing the plugins:
sudo apt install dolphin-pluginsOptional while you are around: cleanup the Services not used for a more compact right-click menu.
A better kickoff menu
The default menu of Kubuntu has only a single column of favorite application. If you do content creation including audio, video, art; you might have as I do dozens of favorite app. Fortunately, an alternative menu exist and let you setup more column and resize the menu:
Click on the option of your panel (icon on far right) then click on "Add a new widget" and go to get new widget button on the bottom of the list to pick new widget online. You'll find an update for the default Plasma kickoff menu with more option (resize, column, icon size) and less scroll: Kickoff/Grid https://store.kde.org/p/1317546/. This just feels right!
If you loose the 'Super' key action to open the menu, right-click on the kickoff button, "Configure Application Launcher", then in the dialog go to "Keyboard shortcut tab" and assign Meta+F1 as a shortcut (Meta is the "Windows" key, also called "Super"). This is a workaround because the Meta/Super key alone will be rejected. For an unknown reason, this non logic tips works: you'll have your menu pop up after a single Meta/Super key press after that.
A longer start menu with two columns
Custom default folders
By default, GNU/Linux system forces you to adopt a directory structure in your home folder. "Desktop", "Videos", "Public", etc... This doesn't suit every needs. You can fortunately customize that. Mine are slightly different (mostly undercase). To edit them, open your Files, show hidden folder with Ctrl+h and then edit .config/user-dirs.dirs with a text editor (eg, kate). Then edit the lines to your liking, save and close.
XDG_DESKTOP_DIR="$HOME/beta-test"
XDG_DOCUMENTS_DIR="$HOME/documents"
XDG_DOWNLOAD_DIR="$HOME/downloads"
XDG_MUSIC_DIR="$HOME/music"
XDG_PICTURES_DIR="$HOME/pictures"
XDG_PUBLICSHARE_DIR="$HOME/public"
XDG_TEMPLATES_DIR="$HOME/resources/templates"
XDG_VIDEOS_DIR="$HOME/videos"
After that close all the instance of the file manager:
killall dolphinWhen you'll restart it, the change will be done.
Firefox media integration:
This is a little plus, but I admit I like it to be able to quickly pause the podcast or music I'm listening (more and more often via a webrowser) while painting :
Firefox addons for plasma integration: [https://addons.mozilla.org/en-US/firefox/addon/plasma-integration/].
Color Calibration and Management
This part unfortunately was working on previous Plasma4 but doesn't work anymore since years now. Here is my workaround:
Create ICC:
To do a classic calibration of two monitors (I have a USB Pantone Huey Pro colorimeter) at 160cd/m², 6500K and Gamma 2.2 we will use argylcms tools (previously installed) this way:
dispcal -d 1 -t 6500 -b 160 -g 2.2 -yl -v -o MONITOR1
dispcal -d 2 -t 6500 -b 160 -g 2.2 -yl -v -o MONITOR2
Just follow the instruction on the terminal, place your colorimeter and wait for getting your ICC. Simple.
Load the ICC:
To apply the ICC on each start-up; we will have to do a script containing something like that (adapt the path):
#! /bin/sh
dispwin -d 1 /absolute/path/to/MONITOR1.icc
dispwin -d 2 /absolute/path/to/MONITOR2.icc
Save that into a ICC-loader.sh, right click on the file and give it permission to execute, then in the Kubuntu menu search for "Autostart" then in the dialog "add a new script" and customize the path to load our ICC-loader script.
Software
Here is the list I use; if you don't know them, I invite to select the keyword of their name with your right-click and search more information about them. Needless to say I love all the software on this list and a epic THANK YOU if you contributed to them:
My favorite utilities:
sudo apt install filezilla kronometer clementine nomacs xournal treesheets audacious audacious-plugins audacious-plugins-data xsane zimThe GNU/Linux graphic tools:
sudo apt install gimp inkscape scribus blender fontforge fontforge-extras peek argyllAudio/video editing tools:
sudo apt install audacity obs-studio simplescreenrecorder olive-editor guvcviewDevelopment tools, codecs and libraries:
sudo apt install git wget unzip imagemagick ffmpeg mencoder htop zenity parallel diffutils rsync exiftran lftp python3-unidecode xclip curl cryptsetup jo libgdk-pixbuf2.0-dev libxml2-utils ruby ruby-sass gitk meld notify-osd libnotify-bin optipng flashplugin-installer libcurl4 unrar trash-cli libavcodec-extra lame flac unrar zip unzip p7zip-full p7zip-rar rar x264 libdvdnav4 gstreamer1.0-plugins-bad gstreamer1.0-plugins-ugly ffmpegthumbnailer sshpass pandoc jq texlive-extra-utils pdftkAnd here is micro, a simpler editor than the default Nano (with sane shortcut: Ctrl+C, Ctrl+V, Ctrl+S and Ctrl+Q) for my quick edit of config files in the Terminal. It also has line number, code syntax colored, and support for mouse. With that tool and after years of nano, I re-enjoy editing files as sudo inside the terminal.
curl https://getmic.ro | bash
sudo mv micro /usr/bin/micro
System administration:
sudo apt install mc samba ppa-purge screenfetchKrita
I install two versions of Krita on my computer:
- A compiled from the sources version to participate bug-tracking and feedback.
- A stable appimage version for production.
I already wrote two illustrated articles about them: my Krita compile guide for cats and the Krita appimage article.
Quick install of Krita 4.2.6 AppImage:
As I'm writing this guide, I'm using the 4.2.6~appimage in production and since October 2019. This is not a perfect version but a version I can do project with from A to Z without a crash and no big trouble. To get a dedicated Krita-stable and the shortcut in your menu (customize the path to your liking):
mkdir ~/software
cd ~/software
wget https://download.kde.org/stable/krita/4.2.6/krita-4.2.6-x86_64.appimage
wget https://upload.wikimedia.org/wikipedia/commons/thumb/7/73/Calligrakrita-base.svg/1200px-Calligrakrita-base.svg.png
chmod +x krita-4.2.6-x86_64.appimage
And for the launcher,
mkdir -p ~/.local/share/applications
micro ~/.local/share/applications/krita-stable.desktop
And paste into this recipe (customize the path; /home/deevad is my user folder, you'll need to adapt your code to yours).
[Desktop Entry]
Categories=Graphics;
Name=Krita-Stable
Comment=Digital Painting - Stable appimage
Exec=/home/deevad/software/krita-4.2.6-x86_64.appimage
Icon=/home/deevad/software/1200px-Calligrakrita-base.svg.png
MimeType=image/openraster;application/x-krita;
StartupNotify=true
Type=Application
Save (Ctrl+S) and quit (Ctrl+Q), then
chmod +x ~/.local/share/applications/krita-stable.desktopNow when you type "Krita" after pressing super; you'll have the new Krita icon and you'll be able also to use it to "Open With" your documents, or put it on your favorite in dock. Note that with this recipe you can install many other software and use in parallel many version of Krita.
Compile Krita from source:
If you want to follow the development and help with beta-testing you can read my cat guide here to compile it. But during the process, you'll realise you'll need to install libraries to build the code from source and the only way to get the list is by playing trial and errors. One after one. I spent those two hours for you, here is my list that work out-of-the-box on Kubuntu 19.10:
sudo apt install cmake debhelper extra-cmake-modules gettext libboost-system-dev libeigen3-dev libexiv2-dev libfftw3-dev libgif-dev libgsl-dev libjpeg-dev libkf5archive-dev libkf5completion-dev libkf5config-dev libkf5coreaddons-dev libkf5crash-dev libkf5guiaddons-dev libkf5i18n-dev libkf5itemmodels-dev libkf5itemviews-dev libkf5kio-dev libkf5widgetsaddons-dev libkf5windowsystem-dev liblcms2-dev libopencolorio-dev libopenexr-dev libpng-dev libpoppler-qt5-dev libqt5opengl5-desktop-dev libqt5svg5-dev libqt5x11extras5-dev libraw-dev libtiff-dev libxcb-util0-dev libxcb1-dev libxi-dev pkg-config pkg-kde-tools pyqt5-dev python3-dev python3-pyqt5 python3-sip-dev qtbase5-dev qtdeclarative5-dev qtmultimedia5-dev vc-dev zlib1g-dev libqt5sql5-sqlite libquazip5-devGhostwriter
My favorite type writer for Pepper&Carrot scenarios in markdown, It has a PPA but for a single package that doesn't have often updates anyway it's faster to grab it this way:
wget https://launchpad.net/~wereturtle/+archive/ubuntu/ppa/+files/ghostwriter_1.8.0+ds1-0ppa1~eoan1_amd64.deb
sudo dpkg -i ghostwriter_1.8.0+ds1-0ppa1~eoan1_amd64.deb
If you prefer the PPA way:
sudo add-apt-repository ppa:wereturtle/ppa
sudo apt update
sudo apt install ghostwriter
Youtube-dl
A tool to download videos on Youtube; useful to quote other CC-By video production or other videos with compatible license:
sudo curl -L https://yt-dl.org/downloads/latest/youtube-dl -o /usr/local/bin/youtube-dl
sudo chmod a+rx /usr/local/bin/youtube-dl
To update it later:
sudo youtube-dl -UWeb development
I'm a bit old school for my web development (I learned in 2000), all I needs is PHP and modules like XML handling, Image Manipulation (GD) and URL rewriting. My website here https://www.davidrevoy.com and https://www.peppercarrot.com still use only that. So the guide under is very specific to my needs but it might inspire other users.
Install the LAMP stack
sudo apt install apache2
echo "ServerName localhost" | sudo tee /etc/apache2/conf-available/fqdn.conf
sudo a2enconf fqdn
sudo a2enmod rewrite
sudo apt install php libapache2-mod-php php-gd php-xml php-mbstring
sudo systemctl reload apache2
Symlinks custom folders
By default, the local server use directory /var/www/html but I prefer to work on my home directory. It ease my backup and comfort to edit files. Here is what I do with symlinks, as an example. I start to remove the default file in www/html, then I recreate it:
sudo rm -r /var/www/html
sudo mkdir /var/www/html
After that, I link from this place my web development directories:
sudo ln -s ~/www/peppercarrot/ /var/www/html/peppercarrot
sudo ln -s ~/www/.test.peppercarrot/ /var/www/html/peppercarrot-test
sudo ln -s ~/www/davidrevoy /var/www/html/davidrevoy
Permissions
To allows URL rewrite and .htaccess on local folders:
sudo micro /etc/apache2/sites-available/000-default.confAdd the following to the end of the file :
<Directory "/var/www/html">
  AllowOverride All
</Directory>
If you often tweak files created via apache/php; a good tip is to add your user to the www-data group, for my user 'deevad' it looks like that:
sudo usermod -a -G www-data deevad
id deevad
groups deevad
Restart and enjoy
sudo systemctl restart apache2It's now good, you can connect with your web-browser to your folders with this type of address [http://localhost/davidrevoy/]. When the website are ready; I upload changes with Filezilla to my distant server via sFTP. But I also automatized that with time using a rsync script over SSH that help at doing the synchronization. If you want to know more about this method; look at the upload script on Pepper&Carrot tool repository.
Other, Misc
Disable Apport crash report dialog:
By default all Ubuntu derivatives comes with a tool to report bugs. In theory, the idea is very good. In practice, you'll have a dialog pop-up that appear each time a software exit a bit abruptly or each crashes you have (and with the software I have, crashes are something you'll experience from time to time unfortunately). The report are often useless for the developer and so this dialog reports too many false positives that interrupt work and takes very long to display. To deactivate it:
sudo micro /etc/default/apportEdit manually 'enabled=1' to 'enabled=0' and Ctrl+S to save, Ctrl+Q to quit.
Fix Imagemagick memory limit.
By default, Imagemagick, a command line tool to manipulate raster images, is installed with a very low tolerance to large files. That's a bit sad because I remember when they changed it and then I had an issue with it I took hours to solve. If we want to convert 300ppi PNG or JPG, convert to CMYK this faulty default will return errors. To level up the possibilities of this fantastic library:
sudo micro /etc/ImageMagick-6/policy.xml Scroll the lines and upgrade the limit manually with the text editor. My setup use that:
<policy domain="resource" name="memory" value="4GiB"/>
<policy domain="resource" name="map" value="4GiB"/>
<policy domain="resource" name="width" value="128KP"/>
<policy domain="resource" name="height" value="128KP"/>
<policy domain="resource" name="area" value="4GiB"/>
<policy domain="resource" name="disk" value="6GiB"/>
also, allow PDF read/write, it is useful, find
<policy domain="coder" rights="none" pattern="PDF" />and change it to
<policy domain="coder" rights="read | write" pattern="PDF" />Ctrl+S to save, Ctrl+Q to quit.
Fix issue with sleep/suspend/hibernate mode
No idea what happened, but on this release my computer (an old Dell Vostro 430 from 2009) can't go to sleep, when it does it shut totally and no way to wake it up. I have to press 6 sec on the shutdown button or remove the power, wait... and start again as a regular boot. This tip looks like working around this type of issue:
sudo micro /etc/systemd/sleep.confThen add in it:
[Sleep]
SuspendState=freeze
References & links:
- Kubuntu official website
- My previous guides from 2011 to now.
- A previous guide never listed: Ubuntu GNOME 14.04 LTS.
- Reinstall youtube-dl on Ubuntu 18.04 https://andjey.info/reinstall-youtube-dl-on-ubuntu/
- Wiki Archlinux: XDG user directories - https://wiki.archlinux.org/index.php/XDG_user_directories
- Kickoff resize issue: https://forum.kde.org/viewtopic.php?t=128771
- Sleep mode issue: https://askubuntu.com/questions/1183716/ubuntu-19-10-on-dell-xps-13-2-in-1-7390-suspend-problem/1184109
I hope you liked this article! Here is to end a quick inspired Kubuntu artwork to thanks the Kubuntu team!

