


Lenovo Yoga 370 on GNU/Linux: technical companion article
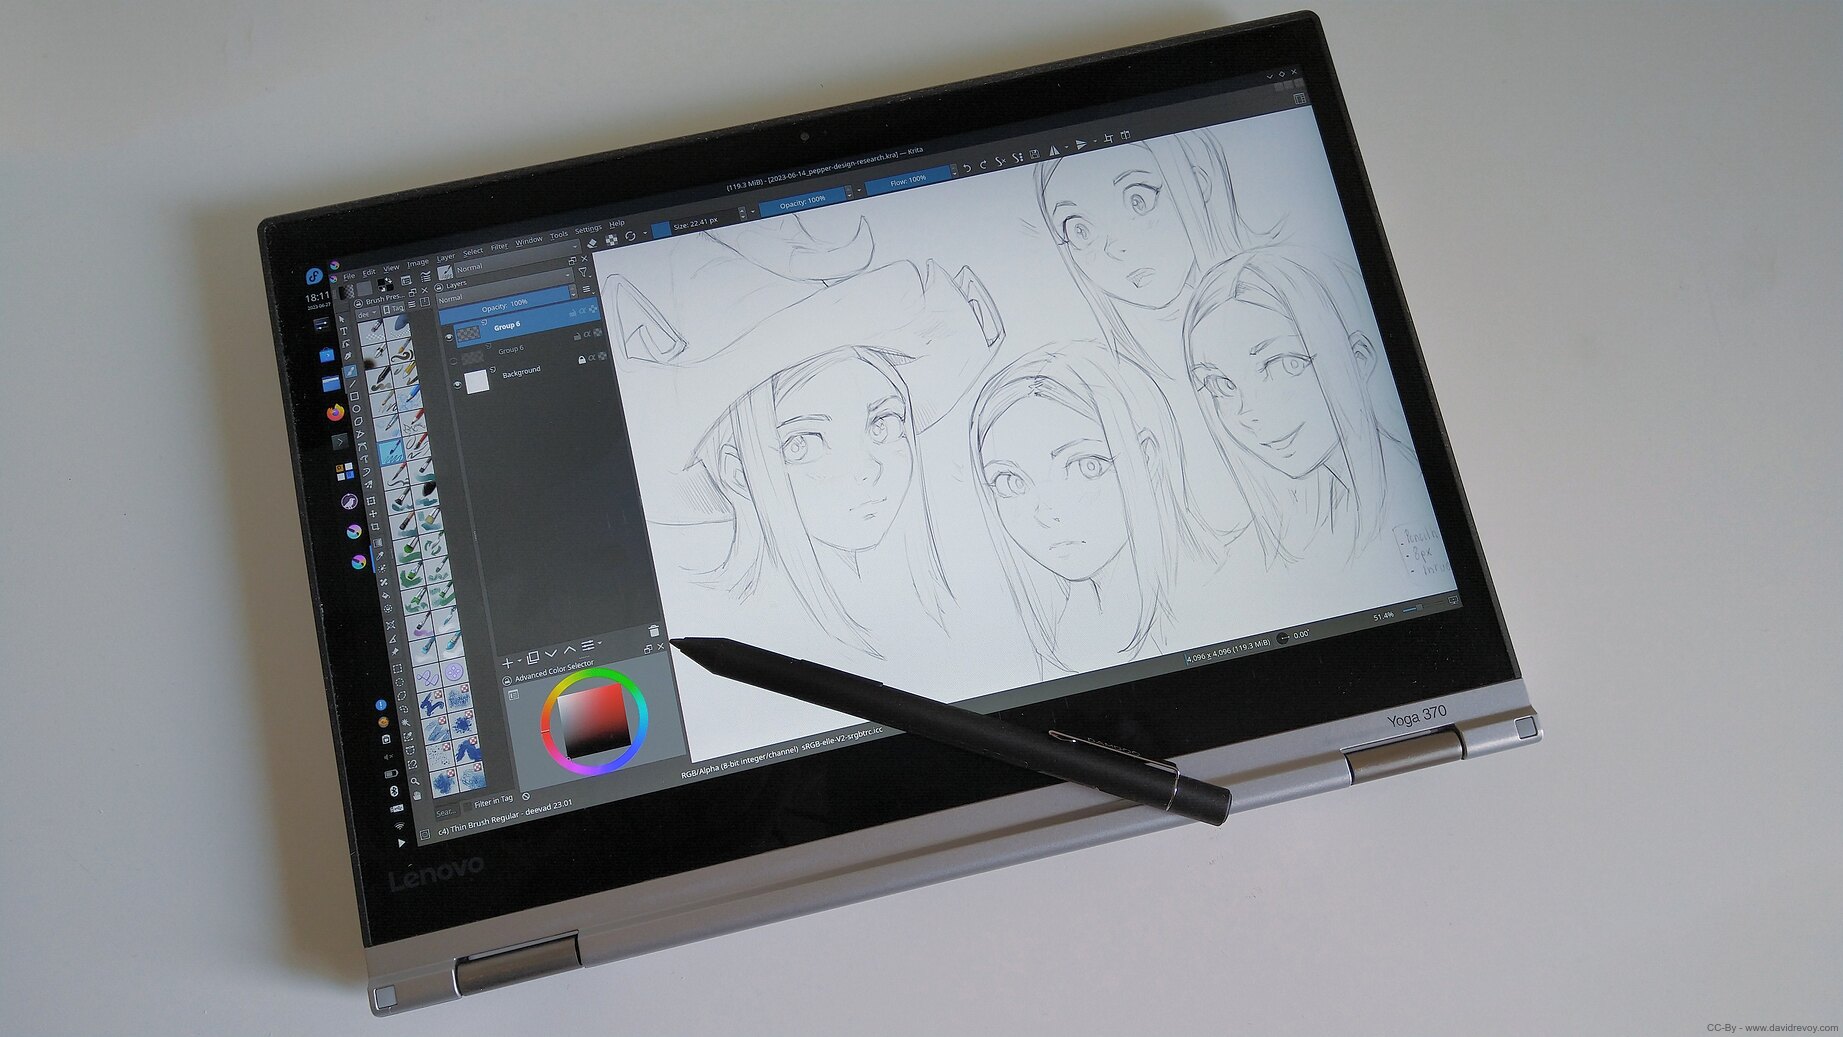
Table of Contents
Update:
This blog-post was released in 2023-06, so, before starting, here is a list of update... Because the world keeps changing :)
2026-03: CPU and refurbished prices:
While you can find this Lenovo Yoga 370 right now for ~250€ on the refurbished market, I would recommend to pick a better device and CPU. In fact, the 370 quickly show it's limit: its Intel i5-7300U @ 2.6GHz (3622pt on CPUmark, 1880pt the single core) will lag painting on pictures larger than 2K pixels. Might be even more if you attempt being connected to an external HDMI, during a demo, and forget screen recording or video streaming at the same time... A newer model like the Lenovo ThinkBook 14S Yoga, maybe twice or third the price on refurbished market now, but can embed a Intel Core i7-1165G7 @ 2.80GHz, and that's 9,822pt on CPUmark (2731pt single).
I'm showing the single core points, because many process on Krita are still rellying on the raw power of single core, and not parallelized. So, it worth searching for a unit with a solid single CPU clock speed. Check the www.cpubenchmark.net score for the single thread. And if you don't mind the thickness and weight, I often see the Lenovo ThinkPad P15 G1 with its Core i7-10850H (11,567pt CPUmark (2667 single), with a discrete GPU, NVIDIA Quadro T2000 - 7287 GPUmark, often at a good price too.
2025-04: I prefer external pluggin an tablet to it:
After two years of owning this unit, and working with it from time to time during travel, holidays, and while demoing Krita on events, I started to prefer connecting to it a non-display medium tablet. You can find more info and a photo about "my setup in the train" at the end of this article.
2024-06: Fedora, Krita and Wayland:
This article recommended Fedora KDE 37 but at Fedora 40 and after, they decided to remove the X11 session. Therefore, making it not compatible with digital painting because Krita is still not a Wayland native application and has many bugs on Wayland. It will be solved after the release of Krita 6.0 in March 2026. You can read more about why and what I use now on my recent GNU/Linux install article here.
Intro video
This blog post is a technical companion to the video I released last month: "My solution for Mobile digital-painting on GNU/Linux"
or you can also watch this video directly on:
- Peertube: https://peertube.touhoppai.moe/w/oU74hKW7xGuAfVjrL4Kkoi
- Youtube: https://youtu.be/bIJ0yYDOHrw
I'm going to give you my installation tips here to save you some time:
Linux distro: Fedora KDE Spin (Plasma)
I tested the device on three KDE distros in April: Debian KDE Bullseye, Kubuntu 22.04 LTS and Fedora KDE 37. I ended up sticking with Fedora KDE spin because it gave me better performance and support for the hardware out of the box.
Also, the newer Plasma KDE had some interesting features and bug fix for a better touchscreen experience in general. In this respect, the Debian and Kubuntu packages were really old (in April).
Pity, I really wanted to install something more 'long term' on this machine and with less updates. But I prefered to keep the setup where I had the best fluidity while painting. Perhaps the latest Debian Bookworm, Kubuntu 23.04, which has been released since then, has filled the gap I experienced in April. I wish I could test this for you, but it takes a lot of time and I'm not really motivated to change distros now that everything works on this machine.
The drivers of the device were all really "plug and play" on Fedora KDE. Everything works except the fingerprint reader, and probably accelerometer and ambiant light sensor. But I don't use this features so I don't miss them.
For those who like to tweak, the ArchLinux wiki proposes solutions for that.
How-to install Fedora KDE spin?
First you need to download the ISO file of Fedora KDE here. Then, you need to write this ISO to a USB pendrive. You can read the Fedora documentation to get an idea of the process.
Once you have the USB pen drive ready, connect it to your computer (off), then press the power button and when the Lenovo logo appears, press F12. You'll see a 'boot menu' where you can select your USB pen drive. Fedora will then start in 'live mode' without installing anything, just for testing. The desktop will get a shortcut "Install to Hard Drive" to an application to install this system to your hard drive.
You can follow instructions on the Fedora doc for using the installer.
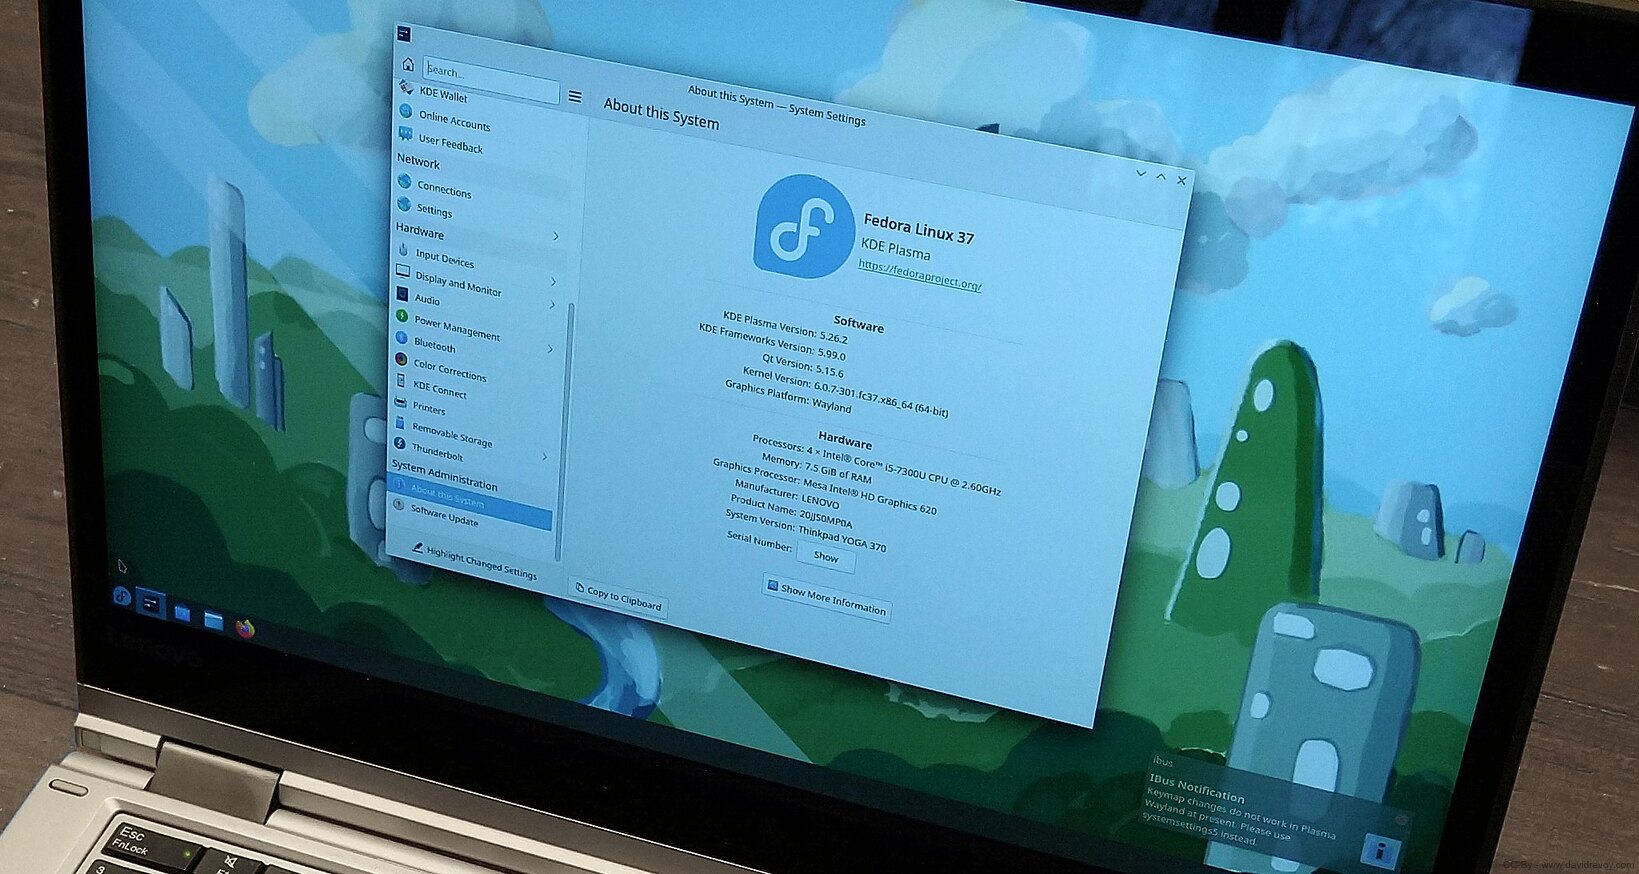
Fedora KDE 37 in live session mode with the "About system" windows (the device was upgraded to 38 since this).
X11, not Wayland
Why not Wayland? I spent some time with it as it was the default session. On the plus side, it has much better touch and gesture support than X11, an on-screen keyboard that works pretty well by default on KDE Plasma, and similar performance when painting if I compare it to X11. Unfortunately, you can't calibrate colours or apply ICC colour calibration, and the option for managing the behaviour of the stylus mapping and buttons of the tablet are super limited and not enough featured to create professional art.
The Wayland session is still a no-go for artists, but it is getting closer. Shame, I really liked the better on-screen keyboard and touch support, but I'm not ready to trade bad colors/gamma and a non configurable stylus to that.
How-to ?
To use X11, just log-out your session after the first install, and on the login screen locate the menu on the bottom of the screen to select in what type of session you want to login. Set it to X11 only once, and then login: the greeter of KDE should remember this for all the next login.
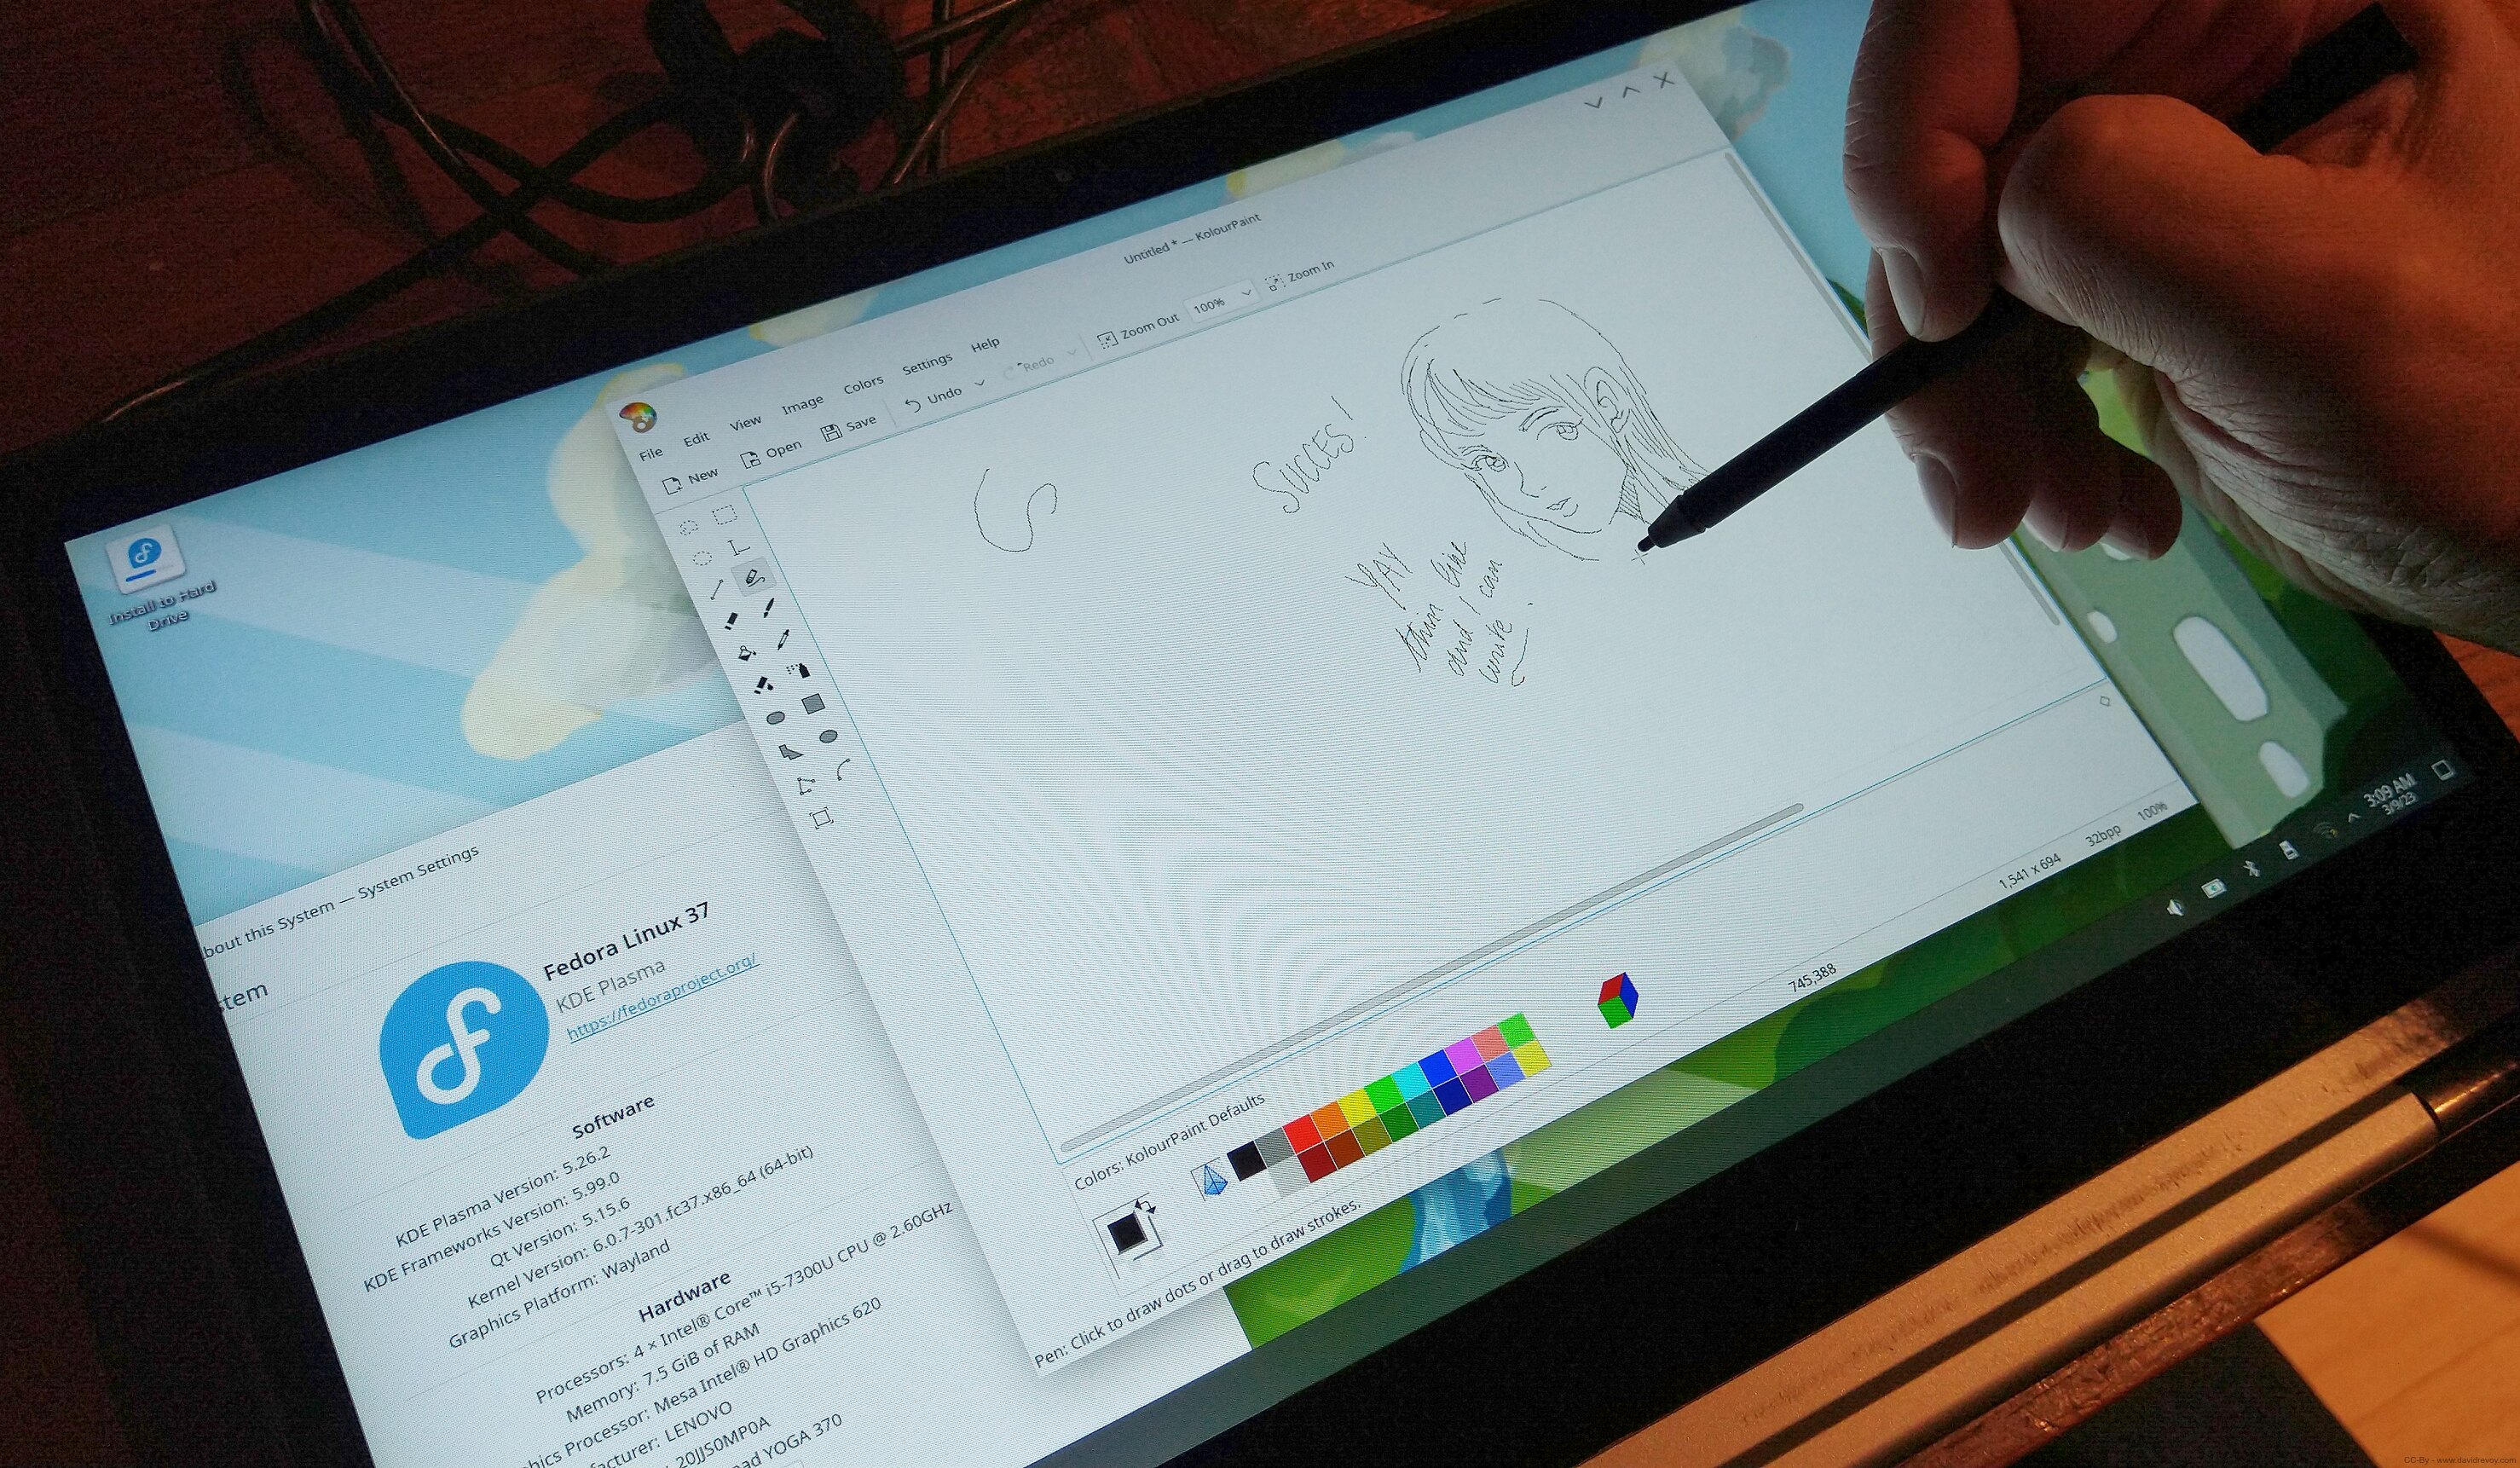
Photo just after receiving the unit and starting a live session on Fedora 37 KDE Spin. I grabbed the built-in mini pen and quickly installed KolourPaint to check the lag, precision and parallax. I was happy to see that everything was working fine.
Keyboard: Onboard
The default plasma and touch experience on X11 requires workarounds. You'll need to use Onboard, set it up, and trigger the virtual keyboard manually with an icon you pin to your taskbar. It will serve you well for the occasional search while browsing the web, or for naming a file when you need to save to Krita. But don't expect to be able to use it to enter keyboard shortcuts while painting, or to comfortably type up an article.
To install onboard, open a terminal and type this (or Ctrl+C this, and Ctrl+Shift+V this in the terminal):
sudo dnf install onboard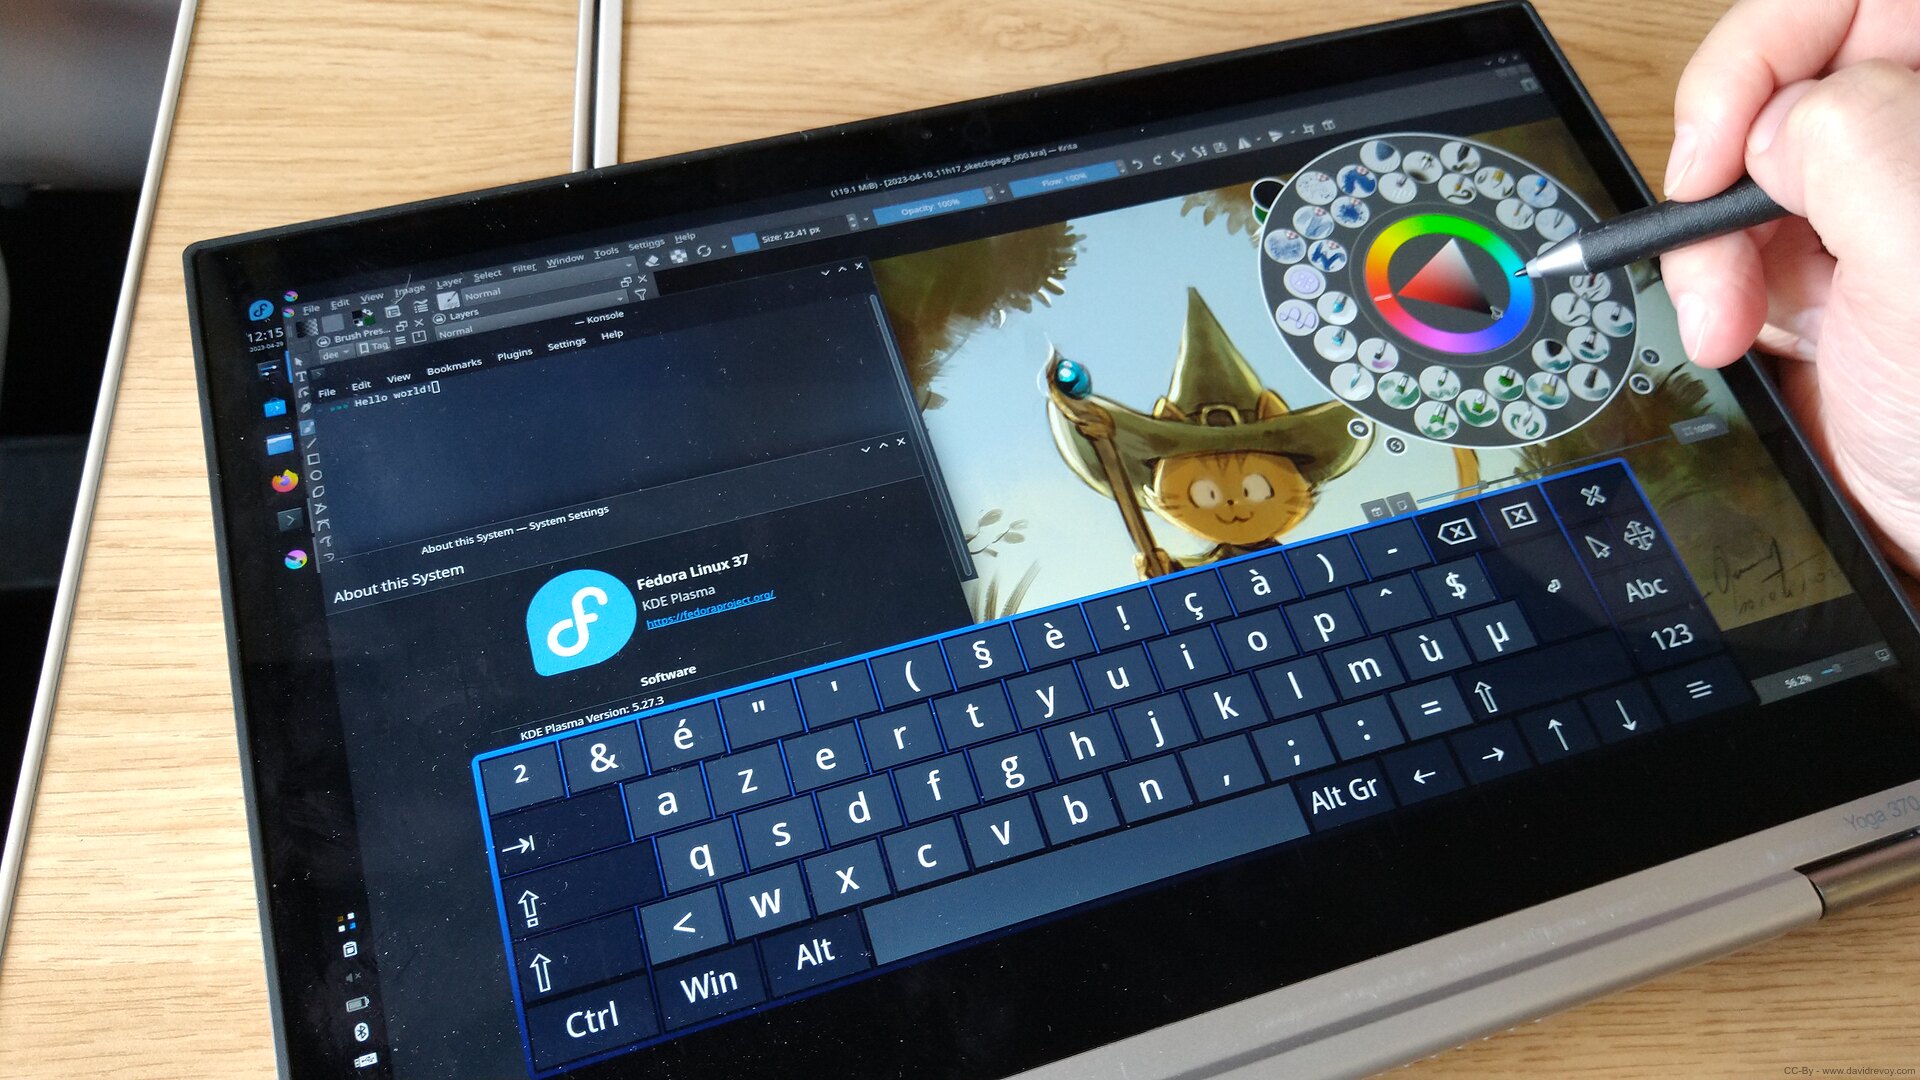
Onboard display keyboard in action with the theme I tweaked. Typing "Hello world!" into a terminal. Shot on the train.
Installing Krita 5.1.5 as Appimage only
First, using the appimage for Krita on Linux is currently the only way to install Krita. Krita has reached such complexity in it's dependencies, library patches and framework that no distribution packager can package it correctly at the moment. The same goes for Flatpak and Snap.
So, use the appimage provided by krita.org.
You'll have to do some manual post-installation. Add your own menu entry launcher with the editor of the KDE Plasma menu, find a PNG for an icon, go to your file browser and right click on all your images, Kra files, to get the "open with" Krita appimage. It's a pain, but you'll avoid a lot of crashes, bugs and get better performance this way.
How-to?
Download the appimage provided by krita.org. The file (appimage) should now be on your Download directory. Move it to a place you prefer (I made a directory "sources" to store my software), and right-click on the appimage file. Go to Properties, then on the new panel "Permissions" tab, and we will check "Is Executable" checkbox. Double-click on it, Krita runs!
For more convenience, we will make a launcher. On your system menu (a Fedora logo), right-click. Select "Edit Applications". Unfold the "Graphics" category, and click on the top toolbar "New Item", Name it "Krita (appimage)", then you'll click at the end of the line of Program to select the appimage file to execute. You can also add a custom icon (search online for a good Krita logo PNG you'll save it along your appimage). Done.
For file association, right click on your image in the Dolphin file browser, then go to "Properties". In front of "Open with" you can press the "Change..." button and add your fresh menu entry Krita(appimage) to your list. Repeat this for your PNG, JPG, Krita files.
Yes, we are in 2023 and you are not dreaming, this long series of action is still the only good method to install Krita on GNU/Linux.
Happy Carrot to get finally the appimage installed correctly
Setting-up Krita
Krita has a lot of default settings for touch that gave me a really bad time when I first tested my device: I had Krita randomly go to full screen (with no button to exit in tablet mode), or do a lot of 'undo' every time I put the palm of my hand on the device. The pop-up widget would blink at times, and random paint splotches would appear here and there on the canvas in places I didn't want.
Disable default gestures
All this is set up by default in Krita. You have to disable them. In Input (1, picture below); remove all the gestures in (2). Ironically, you'll need access to a 'right click' because the menu to delete a line is hidden if you don't right click on the line (3).
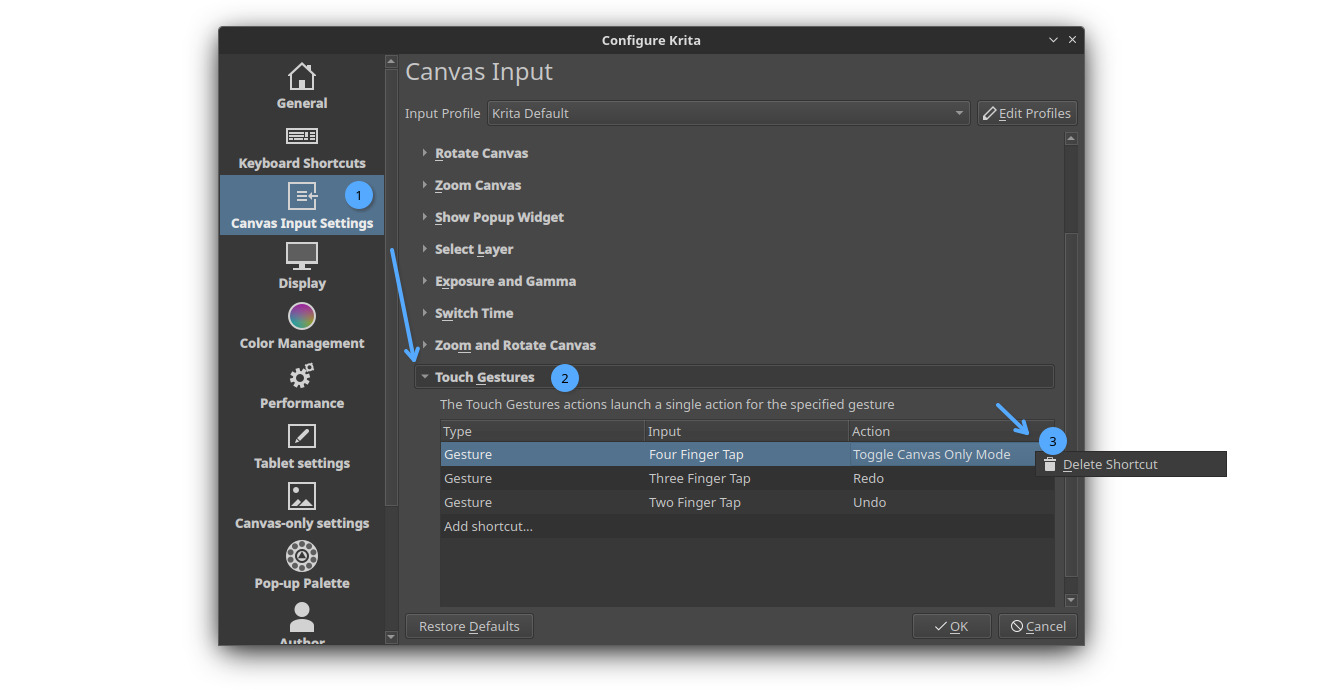
How to disable the default gesture in Krita: it is hidden and the default settings are dangerous.
Disable Touch Painting
Then in General (1, image below), in the Tools tab (2), you can uncheck Enable Touch Painting (3), this option enabled makes a lot of dots under my palm and it's not clear when I try to zoom.
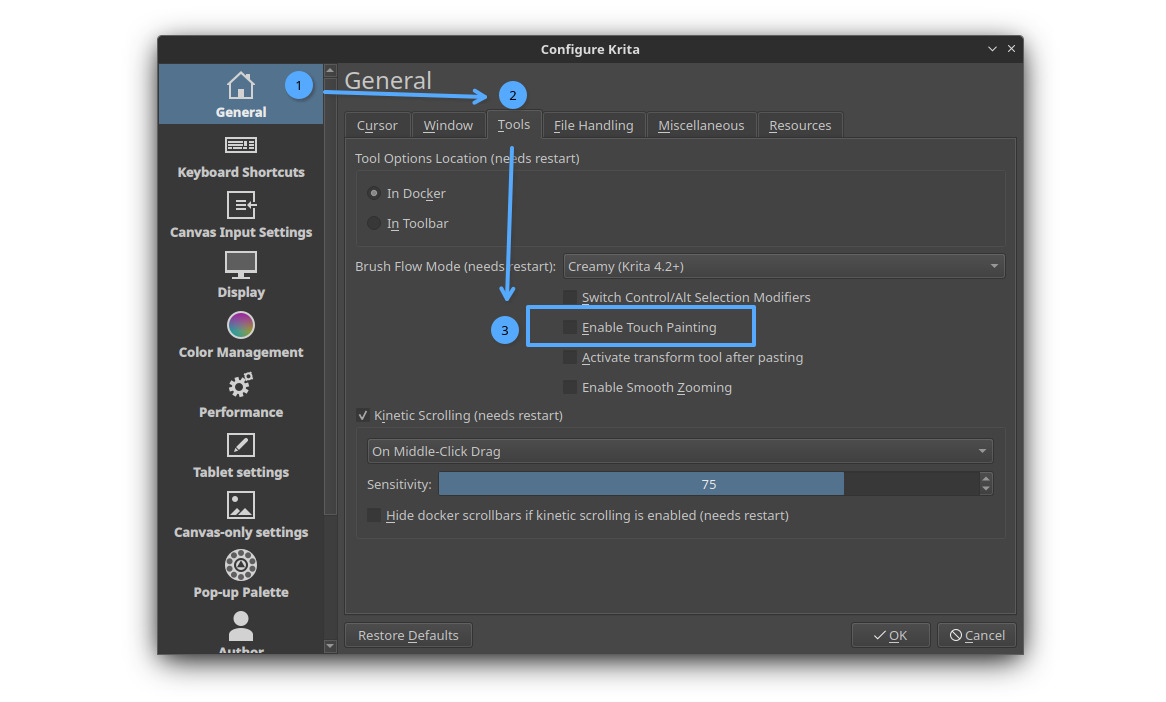
Disabling the 'Touch Painting', so your finger are used only to zoom/pinch and not paint anything.
After that you should have a much better experience.
Notes about Performances
The machine is not a powerhouse, so be careful with the new canvas size and keep drawing on canvases of around A4 at 300ppi maximum. For example, sketching in black and white feels good at large size. You can tweak your brushes by reducing the precision slider, adding a tiny bit of spacing and simplifying some dynamics. This will speed up Krita considerably. Also, of course, keep your document 8bit/RGBa: adding more channels or bit depth is a bad idea if you want more performance.
I do my quick painting with large brush strokes on an even smaller canvas, and when I'm happy with the result and want to get into the details, I can still upscale the canvas (changing its size). Detailing with a small brush on a very large canvas at a higher zoom level usually doesn't lag. The big impact is usually with large (complex) brushes on a large document zoomed back a lot. "Upscaling on the fly" was a common process before 2010 to match the power of the computers of the time. I started painting digitally long before that, so I'm used to managing the performance of my canvas in this way.
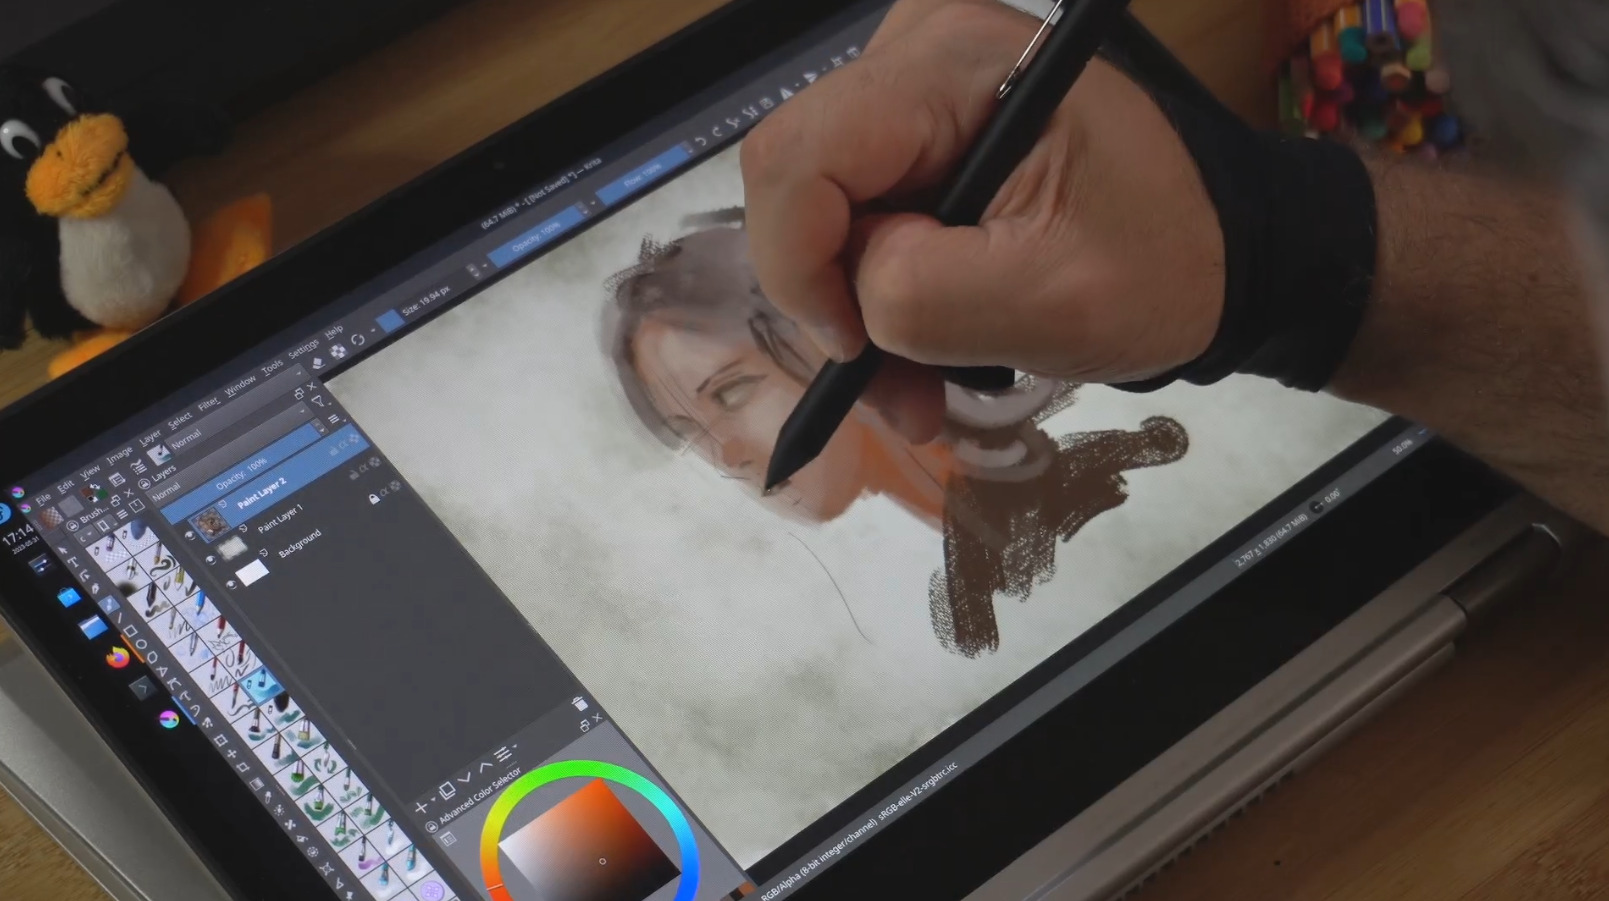
A quick painting I did on the train, a "small" 2640x1485px size
Artwork: Sources and full resolution hosted here.
Layout suggestions
Moving the entire panel to the opposite side of the palm is a good idea. The device has palm rejection, but there are minor problems here and there. It is better to avoid accidentally selecting an option or the 'wrong layer' when painting. Customizing the toolbar at the top is a good idea for quick access to Krita's functions. You can do this in Settings → Configure Toolbars.
Stylus
An "active" stylus
The device has a Wacom AES digitiser (which means "active", with a battery). The quality of the drawing is not comparable to the better Wacom EMR digitizer (electromagnetic technology, battery less and with less input lag). EMR is a technology found on Cintiqs and Intuos. But on this Thinkpad, the pen has been designed for business people who need to sign PDF documents: you have two buttons, the first of which isn't really a button, it's a trigger that puts the tip of your device in eraser mode. The second, at the top, is a real button, set by default to a middle-click pan action.
Wacom's Bamboo Ink pen
You'll also need to buy a stylus; the standard one that comes with the device is the size of a toothpick and not comfortable for drawing or painting. I bought Wacom's Bamboo Ink pen, but to my surprise, the pen was poorly designed. I had to put some textured tape on it to stop it slipping out of my hand, I removed the metal wire at the end of the pen holder, and I thickened the buttons with drops of varnish for nail (because I kept clicking them wrong without feeling them). I had only white color for this tweak but it was effective.
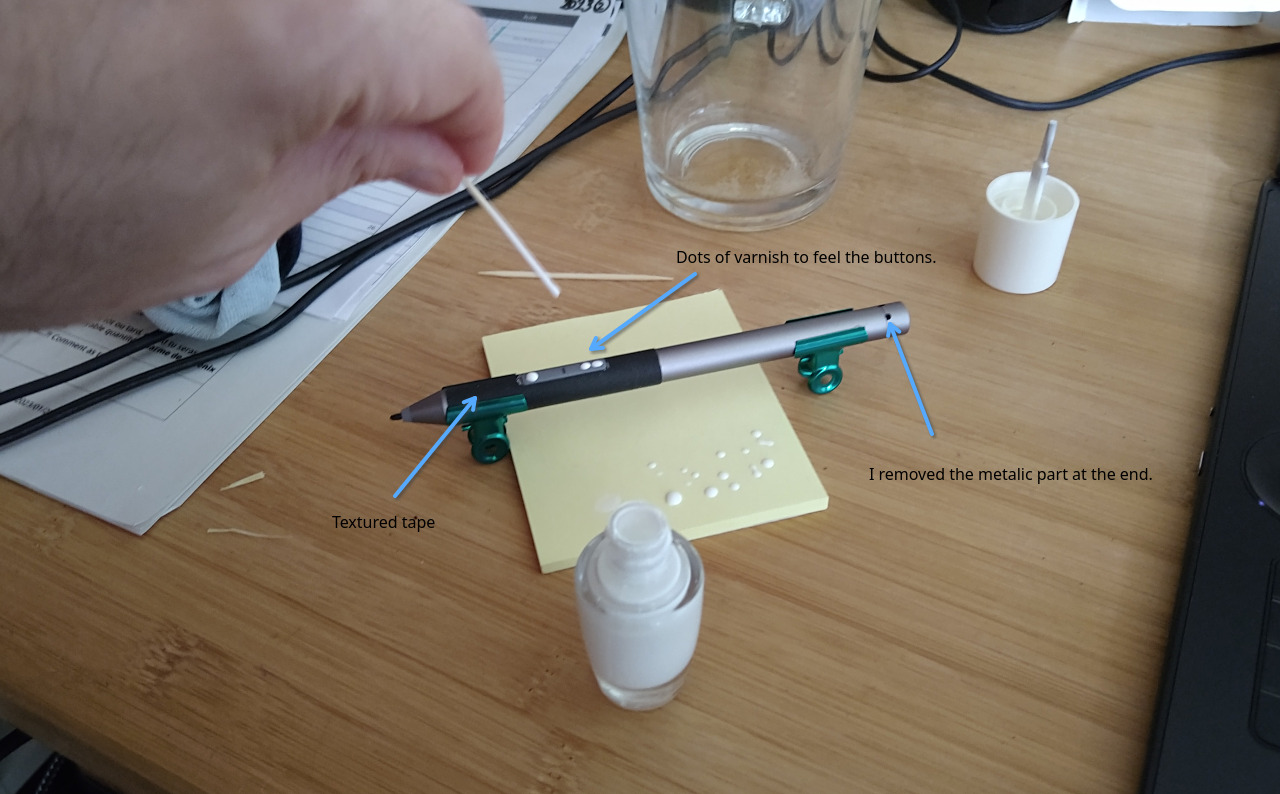
DIY on the Wacom's Bamboo Ink, second gen.
But I soon got tired of changing the battery. One battery would only last 2 weeks. They are also rare AAAA. I can't find them in any shops here, so I have to buy them online. Of course, there came a time when I needed my device to draw something and all the batteries at home were dead.
😱😱😱
Wacom's Bamboo Ink 'Plus' pen
That's why I bought another pen: the Wacom Bamboo Ink 'Plus' pen, the latest generation, the one that charges via a USB-C connector on the side.
The battery is still very weak and discharge as quickly (and takes forever to charge up) but at least I can charge it before any critical use (e.g. workshop/teaching/demo).
The stylus I use in the video is the Bamboo Ink Plus. I bought black varnish to also put dots on the buttons so I can better feel them. I haven't been able to remove the metalic part. The body is improved and the grip, better. I'll not put tape on this one.
I only managed to customise the buttons using the xsetwacom command line, so that the first one can select a colour (control key) and the second one triggers the pop-up widget.
The xsetwacom script
Here is a how-to. I create a new text file (using Kwrite or Kate) and save it to a directory I name "scripts", I name the file wacom-Thinkpad-Yoga-370.sh. I copy paste the content bellow. Then I right click on the file, go to "Properties", "Permissions" tab and add the "is executable" permission. I then create a launcher in my Plasma menu (good to quickly launch it after a change). You can find how to do it in my previous chapter about the Krita appimage.
#! /bin/bash
# License: WTFPL/CC-0/Public-Domain license
# author: Deevad / www.peppercarrot.com

# ------------------------
# THINKPAD YOGA 370 STYLUS
# ------------------------

# Tablet identifiers
YogaStylus="Wacom Pen and multitouch sensor Pen stylus"
YogaFinger="Wacom Pen and multitouch sensor Finger touch"
YogaEraser="Wacom Pen and multitouch sensor Pen eraser"

xsetwacom --set "$YogaStylus" MapToOutput "eDP-1"
xsetwacom --set "$YogaFinger" MapToOutput "eDP-1"

# Stylus buttons:
xsetwacom --set "$YogaStylus" Button 2 Button 3
xsetwacom --set "$YogaEraser" Button 1 "key +ctrl button 1 key -ctrl" # color picker

# Stylus event filtering:
xsetwacom --set "$YogaStylus" Suppress 2 # data pt.s filtered, default is 2, 0-100
xsetwacom --set "$YogaStylus" RawSample 4 # data pt.s trimmed, default is 4, 1-20

# Pressure sensitivity curve
# The tablet has a large range, I tend to soften the curve
# See : https://linuxwacom.github.io/bezier.html
# slight Sigmoid "S" curve
# xsetwacom --set "$YogaStylus" PressureCurve 45 100 20 100
# A little bit firmer
# xsetwacom --set "$YogaStylus" PressureCurve 15 0 100 100
# Slightly firm
#xsetwacom --set "$YogaStylus" PressureCurve 50 0 100 100
# super firm
#xsetwacom --set "$YogaStylus" PressureCurve 50 0 100 50
I also create a start-up rule. Open the System-Settings, and go to "Startup and Shutdown", then on "Autostart" and on this panel you can add (+Add button) a shortcut to your script.
About the script:
Getting the second button to right-click was easy, just move button2 to button3. On the other hand, cheating with the first button's 'eraser mode' was tricky. As I said in the video, the bottom button is not really a 'button' on this type of device, but a mode switch. Pressing it changes the address of the tip to the address of an eraser (a bit like flipping the eraser side of a normal Wacom pen; it's a different device).
Fortunately, the xsetwacom syntax allows a workaround: "key +ctrl button 1 key -ctrl", a series of three actions, i.e. hold down ctrl, click on the tip and release the hold on the tip. The action is really fast; and Krita will still show the eraser tool if you hold it down. But you can check your colour picker: it does not paint, it picks a colour.
I also map the finger and stylus device to output "eDP-1"; the built-in screen. If you don't do this, you'll be in for a surprise when you connect an external device to your tablet to draw on a HDMI projector (bad default: the active area is stretched across both displays, making it impossible to draw).
At the end of the script, you'll find a lot of lines commented starting with a # character. This line are not for the computer, it skips them, and useful to add comment on the code for other human, or to deactivate the effect of a line of code. You'll find a lot of settings to tweak the curve firmness of the stylus, they are commented by default.
Colour calibration
The display is very good. It's a pleasure to see the colour after calibration. Without calibration... err... A little too gamma-bright and slightly greenish/blueish. It will mess up your colour values and tones if you leave it like that.
I use a XRite ColorMunki Smile USB device (you can find them for cheap on the second hand market) and the ArgyllCMS command line. In a terminal:
sudo dnf install argyllcmsYou can also install DisplayCal via Flatpak if you prefer an interface. But I kept using the terminal because 'it just works' where always tools like that had period of being unmaintained and broken.
Below is an example of lines I use to generate my ICC. I used the "auto" one to get more cd/m² (this device screen has a lot of light).
# Whitepoint: As mesured
# White level: Custom, 160 cd/m²
# Tone curve: Gamma 2.2
# Calibration speed : High

dispcal -d 1 -t 6500 -b 160 -g 2.2 -yl -v -o outputfilename

# or auto
dispcal -d 1 -yl -v -o outputfilename
Once I have my ICC, I store it on my 'scripts' directory and load it with dispwin command line at startup. (see the Stylus xsetwacom script 'how to' to know how to add a script at startup).
dispwin -d 1 /home/username/path/to/myfresh.icc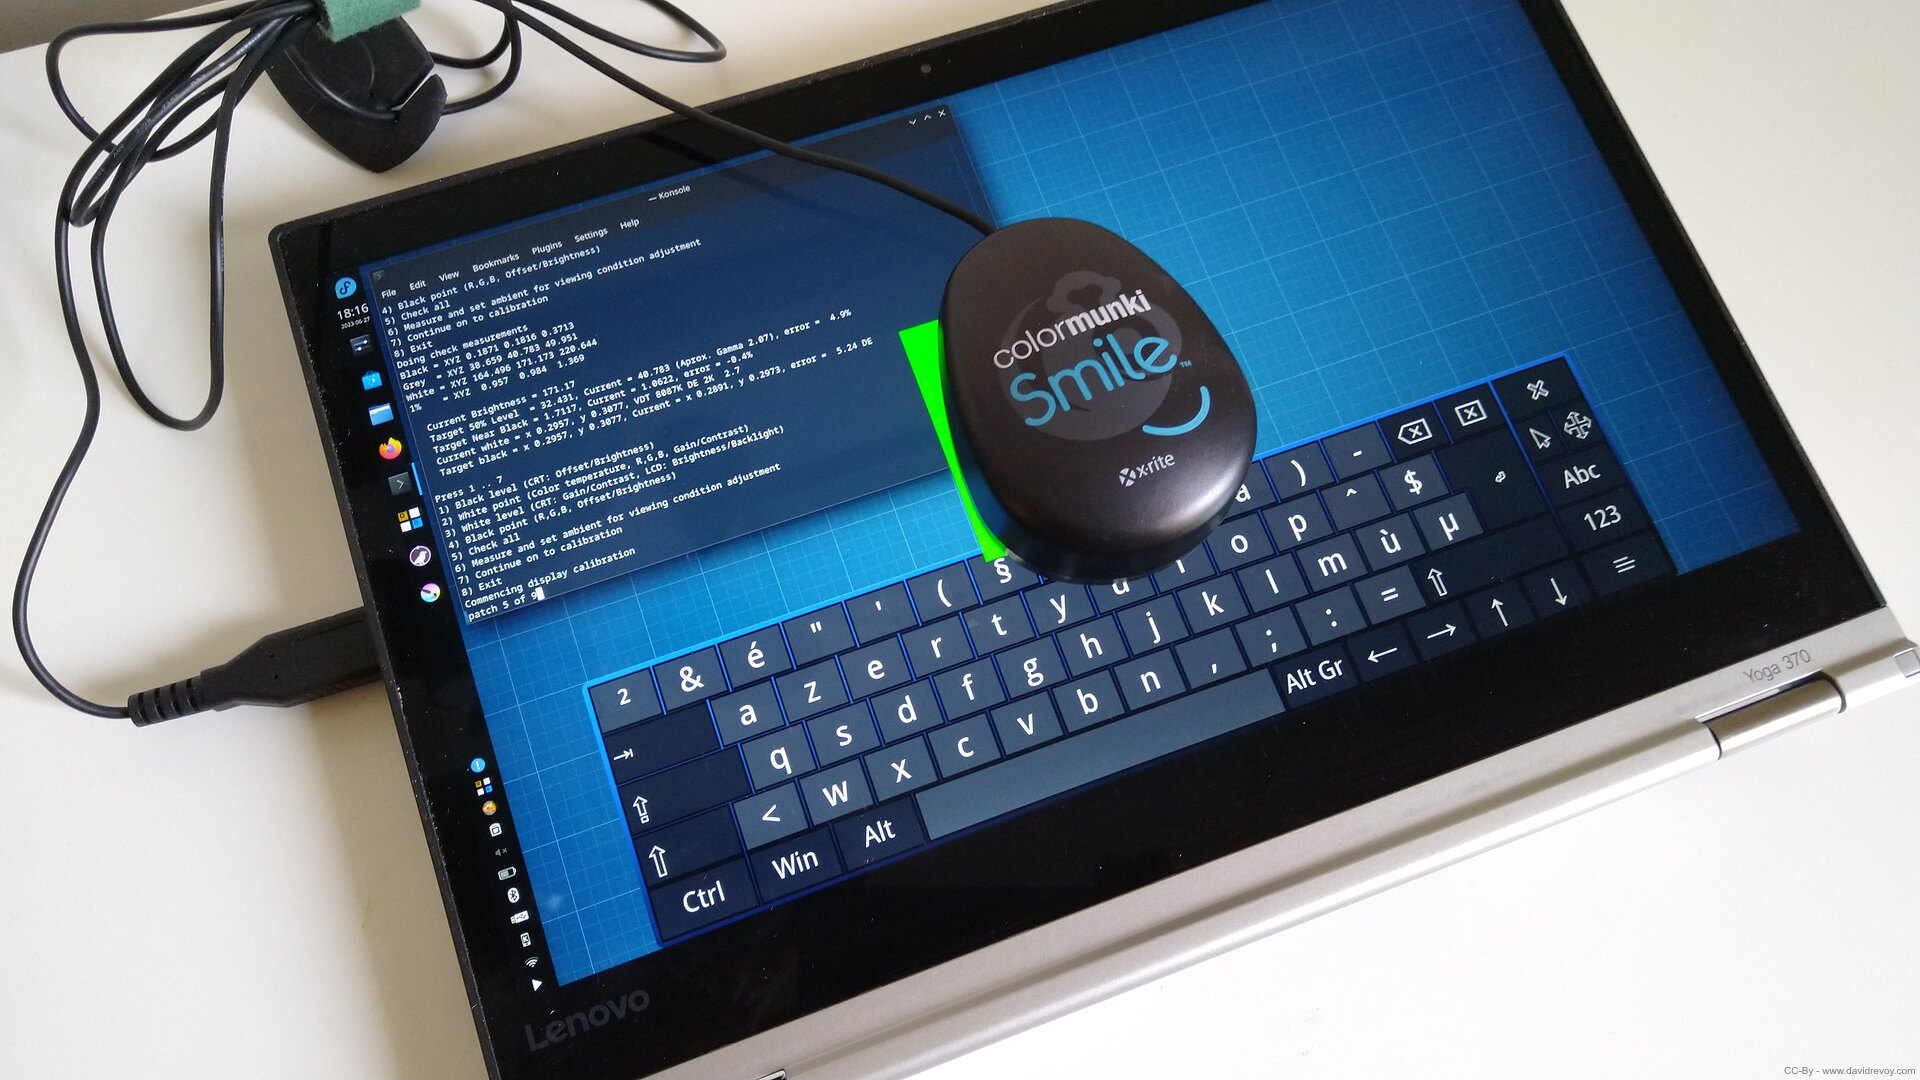
Color calibration with dispcal on Linux in process with my XRite ColorMunki Smile.
Update: a device for keyboard shortcuts
A few month later, I made a small device to get more keyboard shortcuts available from a numpad. You can find all info about this DIY on my article "How to customise a USB numeric keypad under GNU/Linux?".
Disable fully the multitouch sensor
If you want to only use your stylus to interact with the device, and disable totally the multitouch (eg. to avoid bad palm rejection issues, and random clicks), you can put those line on a startup script:
#! /bin/bash
# Disable touch
xinput set-prop "Wacom Pen and multitouch sensor Finger touch" "Device Enabled" 0
xinput disable "Wacom Pen and multitouch sensor Finger touch"
Conclusion
That's all for the base building block of transforming this machine into a digital painting machine.
With these recommendations, you should be able to have a good mobile painting GNU/Linux device for not super expensive. For my part, I have already travelled a lot with it and I love it. 😻
I have already used this laptop for many events and artistic creations. It has a very easy compatibility with any HDMI projectors thanks to the 1080p 16/9 ratio and that makes it a beast for presentations, conferences and demos. It's also very light to carry around in my bag.
My favourite: last month at the GeekFaeries 2023 festival, where I was able to use it outside to paint on the 10 metre high wall of a castle in front of a crowd of people. I just set up a black canvas, Krita in full screen and drew pictures with a thin white brush. To access the shortcuts, I kept the backlit keyboard. Here is my digital graffiti on the theme of 'Dracula'.
Photo of my setup during the GeekFaeries 2023 festival, connected to a powerful projector outside at night.
Photo of my digital graffiti on the theme of 'Dracula', on a 10 metre high wall of castle, with vines trees in foregrounds.
2025 update
Almost two years later, I still use it as my main laptop when I travel. I've rarely had a laptop that I liked so much, I think I'm falling in love with the Thinkpad line like this one. It's durable, effective and full of ports and options.
The comfort of digital painting with it is still limited: the stylus battery requires constant attention to charge it before a trip, the poor palm rejection under X11 made me completely disable the touch capability of the device, and the reflective surface overlay with the stylus having almost no friction on it felt a bit meh for digital painting.
Recently, I've been traveling with it paired with an XpPen Deco01V3, and this really transforms it into a small, full-featured digital painting setup. I love the keyboard access for shortcuts and having a battery-free pen with this level of precision and tilt at my disposal.

Finishing an artwork with the Deco in the train.
Useful links and sources
Top ones:
- Youtube video: Wacom Bamboo Ink Plus Pen Review, MobileTechReview
- Youtube video:Lenovo ThinkPad Yoga 370 Review, MobileTechReview
- ArchLinux wiki: Lenovo ThinkPad Yoga 370
Other:
- ArchLinux wiki: Laptop/Lenovo big compatibility table
- Youtube video: Wacom Cintiq Lite! - Review Lenovo Thinkpad Yoga 370, Teknosias Reviews
- Youtube video: Lenovo Yoga artist review and drawing demo, Michael Clarida Arts
- Reddit comment with a goldmine of info about AES digitizers
- Wacom article on AES digitizer and EMR digitizers
- Lenovo PDF manual Yoga 370, Hardware Maintainance
 259 -
259 -  469
469
24 comments
Thanks for this detailed write-up, David. My Yoga 370 arrived today complete with its little toothpick of a pen and the power supply and it looks like new.
The computer shipped with Windows 10, which seemed very clunky and hard to use. So I promptly installed my favorite Linux distro, PopOS on it. I'm used to GNOME you see.
Amazing is that the pen works out of the box. The screen rotates when you turn the computer on a side, which is nice. It even automatically brightens and darkens the screen based on ambient light.
Your notes on configuring Krita are appreciated too. Especially the right-click trick to delete the gestures.
I totally agree with you about Wayland/X11. I don't use my little Wacom tablet much, (I'm no artist) but the lack of configuration under Wayland was a show stopper. Unfortunately, using XOrg on Ubuntu (23.04), Gnome would crash immediately after boot and the last messages were related to the Wacom. It would then start OK the second time. I could live with that that but Gnome would crash intermittently later on. So I switched back to Wayland and gritted my teeth. However, after a few upgrades X11/XOrg seems to be fixed and I've gone back to XOrg.
"First, using the appimage for Krita on Linux is currently the only way to install Krita."
Is that true? I can install Krita 5.1.5 on my Archlinux with pacman without a problem.
Btw, what is the response time of this laptop? Can you do fast strokes and still feel like you are drawing on a paper?
Oh sure, you can install it. But you are exposed to random crashes way more than on the appimage.
I had a full room of ArchLinux computers at a workshop in May, the Krita Arch package was turning all computers to kernel panic in less than 20 minute paintings. Using the appimage solved it. Reason: Arch compile Krita against latest Qt framework and so always get extra bug on the way due to framework being too fresh, unpatched with recent bugfixes and other compatibility issue.
> Btw, what is the response time of this laptop? Can you do fast strokes and still feel like you are drawing on a paper?
Check the video, you'll see realtime brush stroke. I link also to other video on the footer of this article. No hardware has the "drawing on paper" feeling. It's always a bit of parallax, drawing on a glass, reflectivity of light, backlight in the face, etc... It lags, but in a acceptable way (I also have a Surface Pro 3, with a unusable digitizer; lagging too much. I describe on the type of performances you can get on the 'Performance' chapter.
😍
alexmorse@mastodon.social
love this
★fell@ma.fellr.net
"In this respect, the Debian and Kubuntu packages were really old"
Yeah, #Debian is nice and stable, but I usually prefer it to be more cutting edge too.
"The Wayland session is still a no-go for artists"
Yep, same. #Wayland feels like the better idea, but is still incomplete. I hope that will change soon.
★ArneBab@rollenspiel.social
thank you!
★rgarciag@fosstodon.org
Lovely writing, as always, and a great source of information for newcomers too! I will be looking for the display calibration device (second hand, as you said) :blobcatcheer: :blobcatfingergun:
★tompurl@dads.cool
I really enjoyed this article and it gave me a lot of ideas for reusing some older hardware. Thank you for sharing!
★wikiyu@thoughts.tf
@davidrevoy@framapiaf.org
★I do not have this hardware
I do not have ANY artistic parts in my soul
I do really like this article ... just as a nerd that like to tinker with stuff
Very good DIY tutorial :D
davidrevoy
@wikiyu Thanks! 😊
★wikiyu@thoughts.tf
@davidrevoy@framapiaf.org it is sick...
★Since my comment i have read it (your post) second time, then i realised that it doesnt matter that i would NOT use it in your - artistic - way, but it would be great tool to make notes in my homeoffice.
Now these laptops used can be found for about 250€ so - for me - it is better option then (for example) reMarkable - for ONLY homeOffice use. AND without any other subscriptions and closed software shit.
...
yes. I have ordered one used Lenovo...
Thank you!
davidrevoy
@wikiyu 🙂 Oh nice, thanks for the feedback. They are good machines!
2 ★wikiyu@thoughts.tf
@davidrevoy@framapiaf.org i hope so... it will be our... 5? 6? or even 7th Lenovo computer in our home.
★Some of them have been transfered into family but all of them are working still with us.
rival@mastodon.social
Amazing. Thanks a lot for sharing! <3
★ni_nad@mastodon.social
thank you for writing this up! I have a device a couple of years down in the same brand, will dual boot now with these notes
★m0bi13@pol.social
cc @mr_zvbr
★arek@mastodon.internet-czas-dzialac.pl
a nice patent with varnish dots :)
★elfi@pixie.town
I've got an old surface pro I've been meaning to take the battery out of and use as a dedicated drawing tablet, so this might be a useful point of reference for userland after I deal with the finicky bits
davidrevoy
@elfi Thanks. I also have a Surface Pro 3 here, but be careful: the N-Trigger (not sure if I spell it) tech of the stylus is super laggy and slow. That was one of my fail test on Linux , along with a Samsung tab Pro. Device with a stylus well built-in for low input lag are actually rare. A lot of devices with "toy styluses" around.
I hope yours is a model that will have a good support!
torbuntu@fosstodon.org
What is wrong with https://flathub.org/apps/org.kde.krita ?
davidrevoy
@torbuntu It's not maintained by Krita team, and big libs and frameworks using it are not patched to fix specific issues. It's not as stable as the appimage...
3 ★remi_suinot@mastodon.suinot.org
★Oh! THANKS. I was looking for this kind of computer for my daughter, but didn't know if linux (debian for me) would pass.
Post a reply
The comments are synchronised every 12h with the replies to this post on Mastodon:How to use this? (click here to unfold)
Open a new Mastodon account on the server of your choice. Then, Copy/Paste the adress above in your Mastodon 'Search' field. The post will appear and you'll be able to fully interact with it. You'll have full control of your posts: edit, remove, etc. After that, your message will appear here.
Just please note that it may take up to 12 hours for your changes to be reflected here.