


Video timelapse and Krita tips: «Flying around Komona»
Direct link to watch it on Youtube
High-res final lossless 6400x3600px artwork link : on DeviantArt ( the download button on the right column )
Introduction :
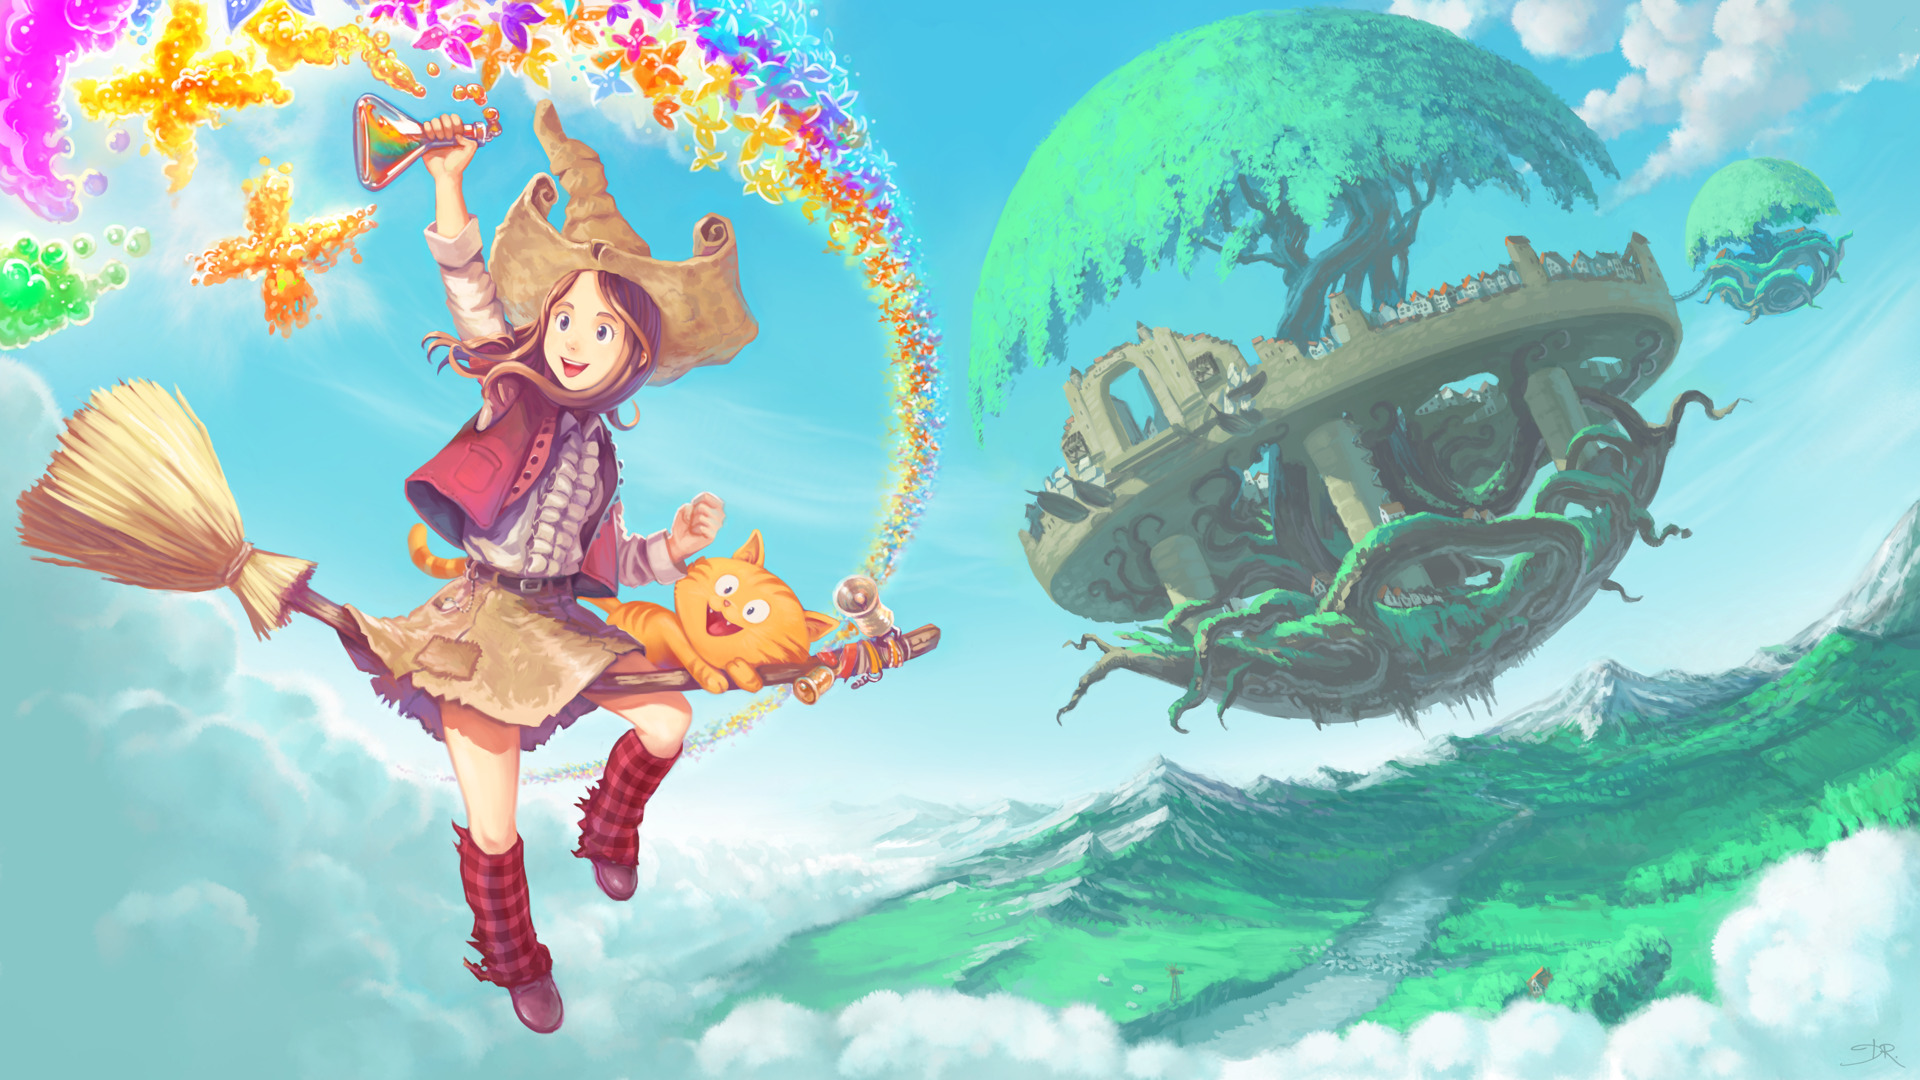
The artwork "Flying around Komona" is a large illustration for the future www.peppercarrot.com website. I also recorded a timelapse video of the process ( video on top ). The artwork took me around 16h and I decided to accelerate it to a 10min final video. The resulting timelapse is an descriptive document about my actual workflow to paint this style but I wanted to add more informations. I thought at first of adding a voice over, but I dislike other Youtube video with lazy voices over. Also, I'm french, and talking in english over a video double the difficulty of this practise. So, I decided to create something else, and write this 'companion making-of tips'. I hope they'll do a nice addition to the video, and also the reverse ; the video will illustrate the tips in live.
This tutorial, video timelapse and high-res illustration is a free bonus for my Patreons. Join them if you want to support the creation of more webcomics, tutorials with open license and without any paywalls.
License :
Artwork, video timelapse, article are licensed under a Creative Commons Attribution license to "David Revoy, www.davidrevoy.com".
Software used in the video :
Krita 2.9beta compiled from sources on a Linux Mint Cinnamon 17.1 desktop with a Plank docker on left. It was screenrecorder with SimpleScreenRecorder, batch encoded with mencoder, and video-edited with Kdenlive. Krita 2.9 will be released for end February.
Brush presets used in the video :
My next brush kit for Krita 2.9beta is also ... still in beta. So nothing finished yet. But I would say 90% final ; you can download it already here : https://github.com/Deevad/deevad-krita-brushpresets/archive/master.zip
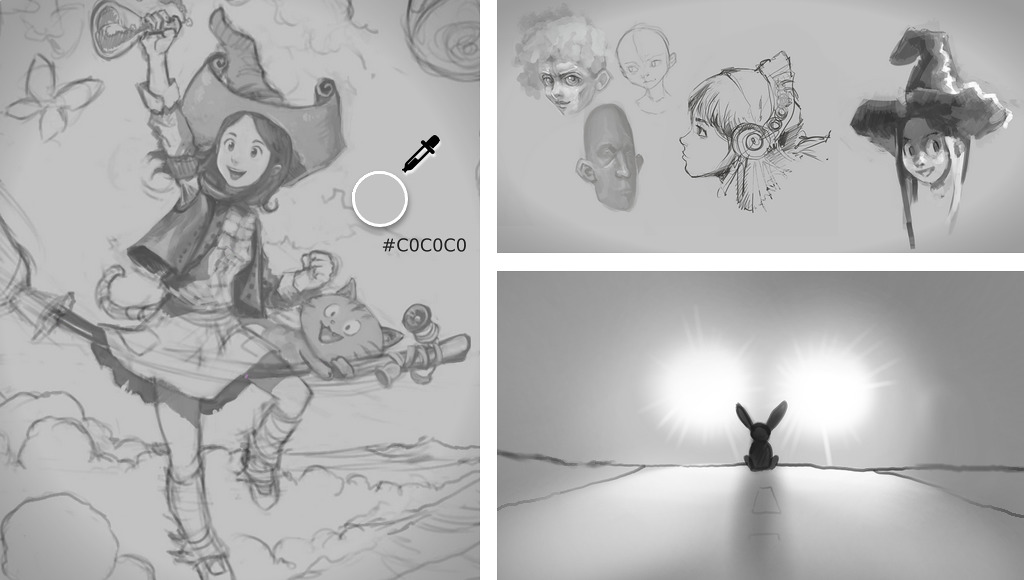
1. The Coco background
When I start an artwork from scratch with digital, I often start on a light-grey background value. I name it the "Coco background" because the Hexadecimal color code I use is easy to remember #C0C0C0 ( C zero C zero C zero ). When I draw, I spend hours focusing the screen and using a pure white background is too aggressive for my eyes on newer LCD screens. I feel like a rabbit in the headlight of a car ! So I found it a good habit to draw over this grey background. Another benefit : You can also add bright values while sketching. An evident con : it looks a bit sad and greyish...
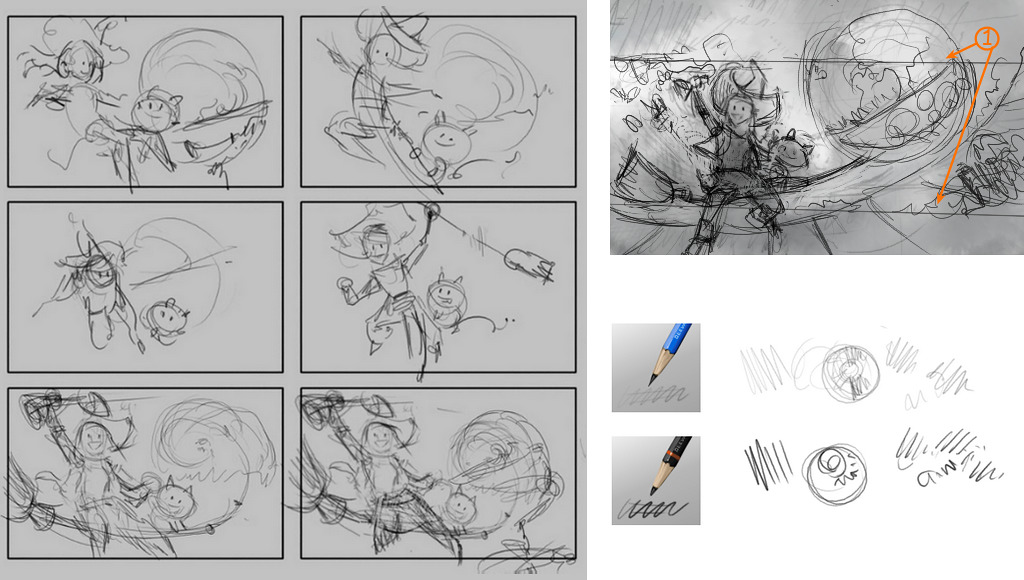
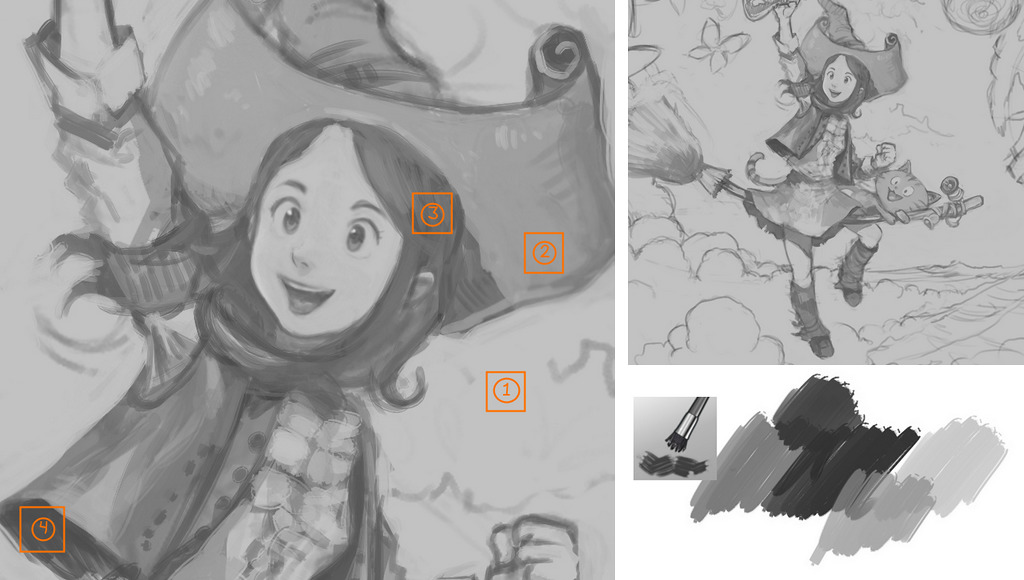
2. Thumbnails
The thumbnail step is not only useful for setting up a good composition. It's a real brainstorming time, where you can focus on ideas and the concept of your picture. On this picture I wanted to represents a lot of elements and in a predefined way. I wanted the picture to get a ratio of 16:9 for being a wallpaper, and also I wanted to be able to crop a very wide landscape in it for a website header (1) and still see main elements ( my character Pepper, her cat Carrot and a floating city in background. ). Pose of the character, main curves of the artworks, composition and feeling are all linked together. Doing multiple attempt is necessary if you have something in mind and want a result not too far away from your first vision.
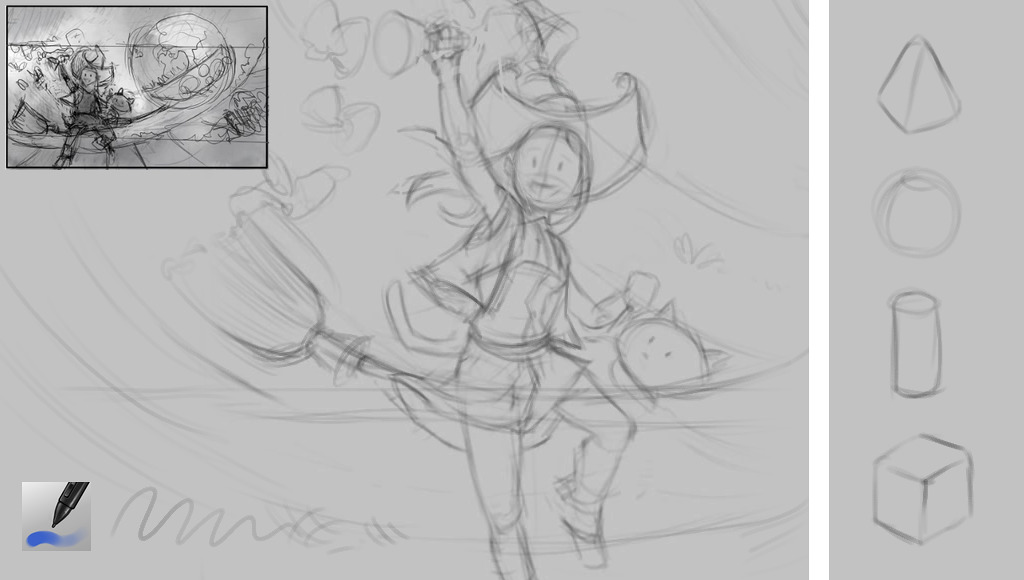
3. Structure : redraw thumbnails
I tried during years to enlarge my thumbnails and paint-over them directly. My main issue with this workflow was always the same : inherit of a bad pose, flat and bad proportions from the thumbnail and spend a lot of time fixing it during the painting. Nowadays, I prefer to redraw my thumbnails using simple geometric shapes and focus on volumes and proportion. It's easy to cut this drawing without regrets, transform ( Krita 2.9 has excellent tools to tweak this ) and move things around at this step. Building a better base and take time at this step is like saving many hours on later steps.
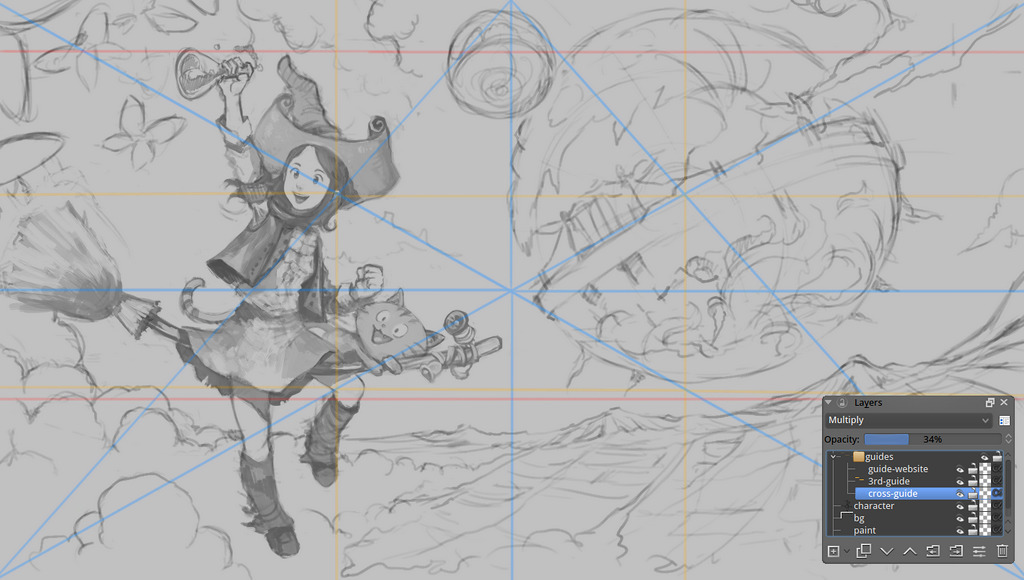
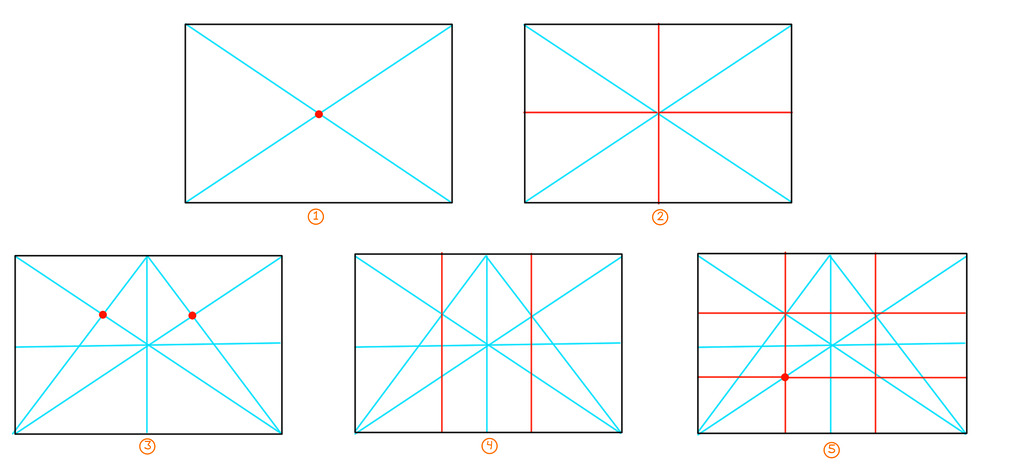
4.Composition guides
I like to keep an eye on central lines, diagonals and third. If you like composition theory ; getting this type of guidelines is just a big basic ( note: I like also the golden ratio, and the golden spiral ; but they are too hard for me to trace them on the fly). I pasted under a little step by step in (5) steps with my technic to trace them with the line tool. It's just basic geometry tips. But it's good to know it ; because this way you can subdivide a square even if this one is in perspective.
5. Drawing with values
When I use the expression 'drawing with value', I don't mean with 'correct values of grey'. It's just something I found to be faster than just drawing with line-art or outlines. With large brush and values, I can shape really quickly volumes and mass ( eg. hair ) , and split a bit the artwork in areas. I like to use for this step a brush with a linear opacity and with dirty edges rendering.
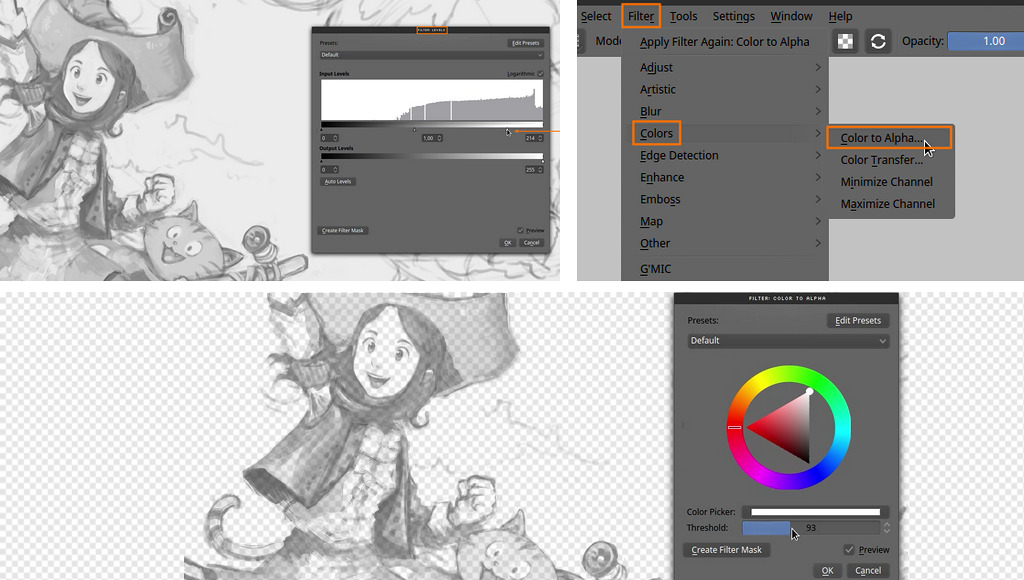
6. Cleaning the grey
Cleaning the grey background and replace it with white is easy with the level editor filter ( Ctrl + L ). Then when the background is white, I like to also convert the white to alpha with the filter 'Color to Alpha'. Now the canvas is ready to paint under this sketch.
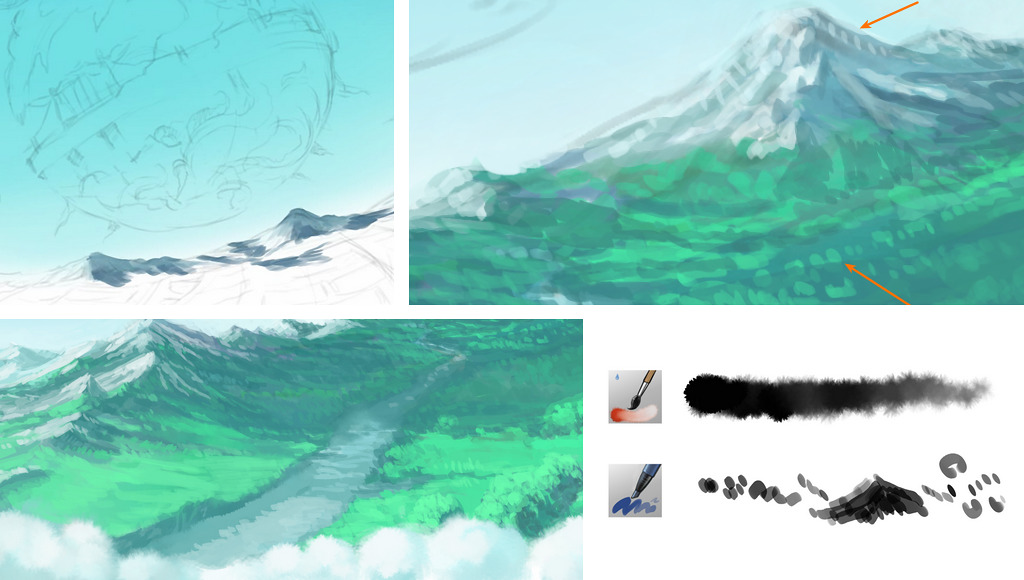
7. Background painting
I like to start with the background, because it's a relaxing part and also it does a good starting point to have an idea of the lighting setup of the scene and the general ambiant. I keep large stroke, and I try to not do too long lines of painting. Usually little dots works better than lines to describe object in the distance. For the clouds, I use a sort-of-watercolor brush I made. Krita 2.9 can now mimic the preset I made for Mypaint. I'm happy to can use this type of effect back.
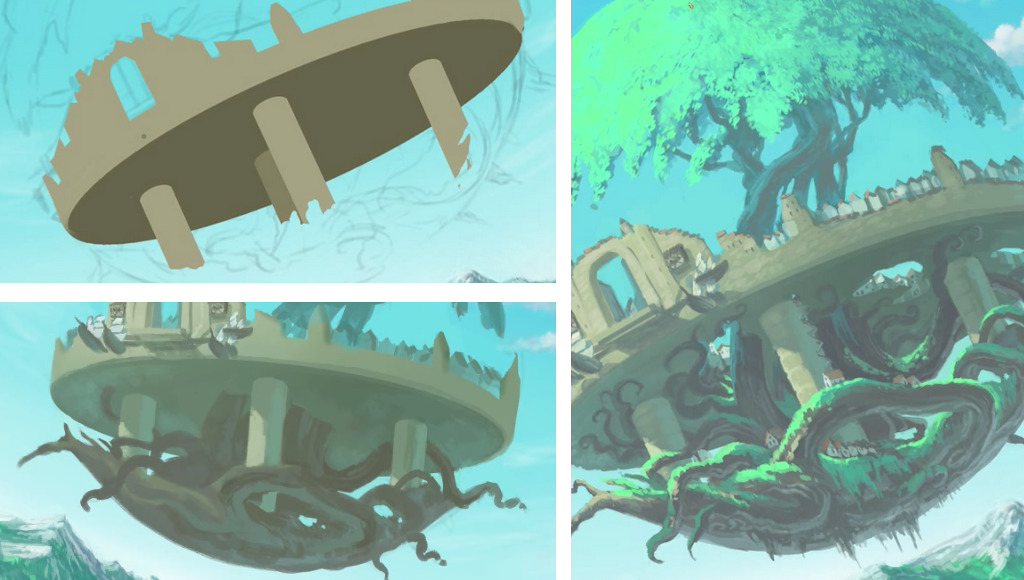
8. Komona painting
For the flying city of Komona, I built it in a very logical way, step by step. Big volumes with hard edges first, then big mass, then progressively I added thin details. It was possible to handle this complex element this way because I already got many sketches about this place. So, I only had to follow the concept-art I made.
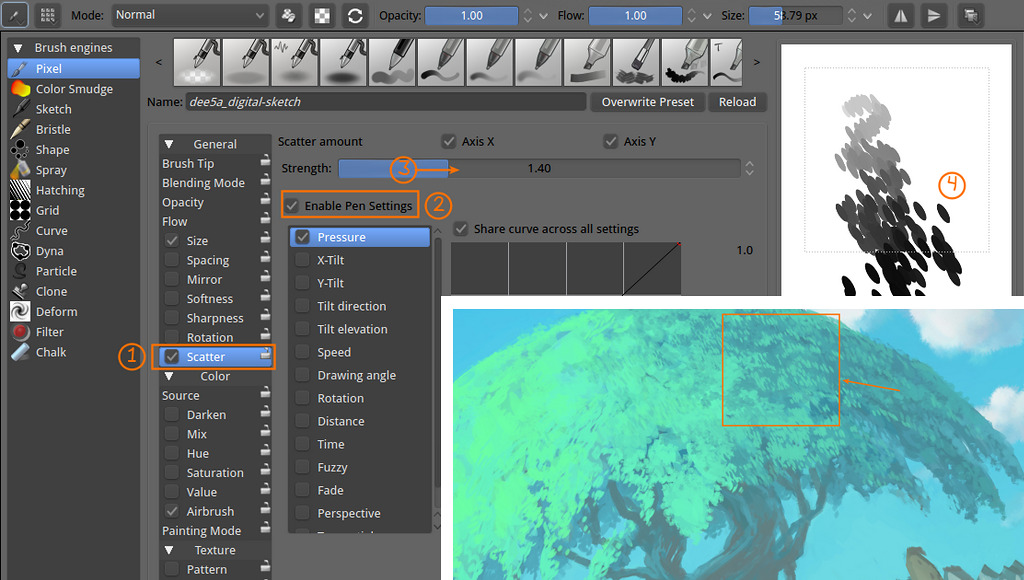
9. Scatter brush
Painting hundreds of little dots can be a pain. Krita can help if you know the right option to check. Here in the brush editor I show how to activate the Scatter effect (1) , and how I enable it (2) with a variable strength (3). You can also adapt the spacing of in the 'Brush Tip' if you want less dots. Digital brushes like this one helps a lot to fill large zone, but never forget to do manual retouch at the end with a single dot brush ; a good brush shortcut like this one happens only when you can't guess a trick was used.
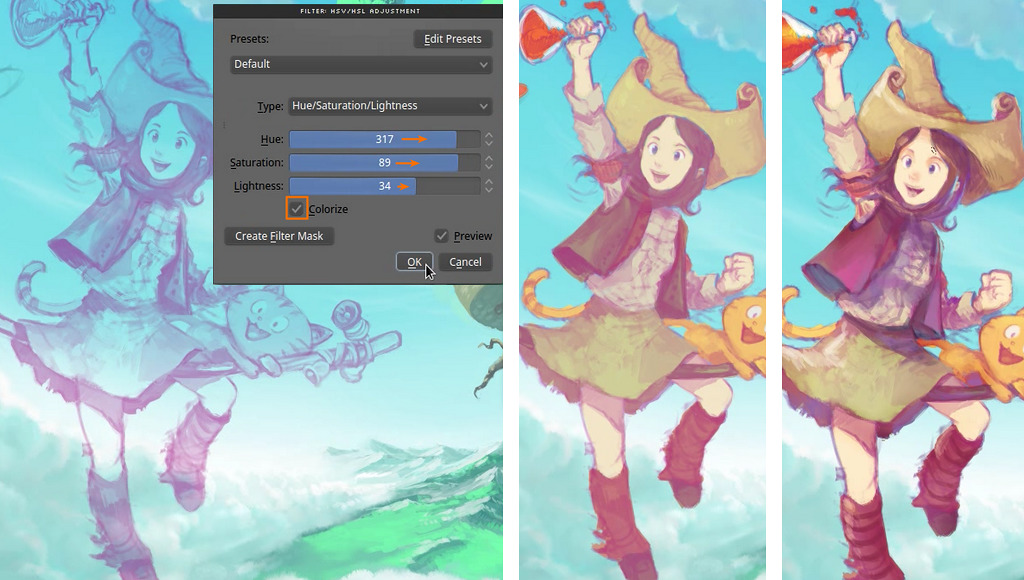
10. Colored sketch
I turn my sketch to a violet color with the HSV/HSL Adjustment filter ( Ctrl + U ), this is only a stylistic choice as I don't want to get too much black shading into my colors. It helps me to get setup colored shadows. I usually pick blue, violet, red, or brown for this , it depends the ambient of the artwork.
11. Using two viewports to detail
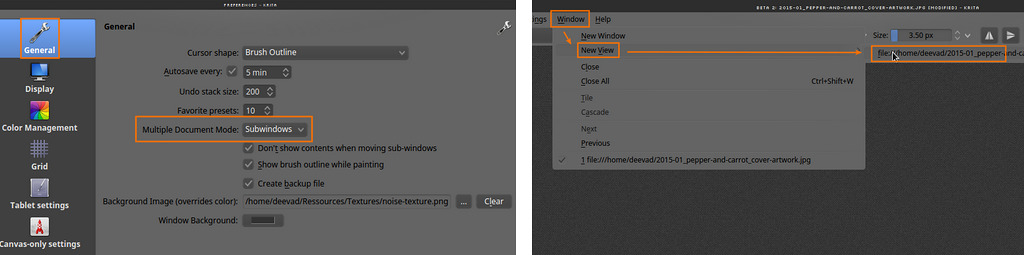
One of the top feature of the upcoming Krita 2.9 is the possibilities to setup multi-viewports and works with multiple documents open. Zooming and painting little details is a dangerous exercise where you can break the overall look of your artwork. But with another viewport it is now possible to control the overall at the same time, and even jump between the two viewports.
 The image under shows how to activate multiviewport. You need to first go into the preferences and activate the 'subwindows' mode ( by default Krita open tabs ). Then go to Windows > New View > and select your windows already open. ( Note : it's often far on the right of the drop-down panel, a bit hard to do with a stylus )
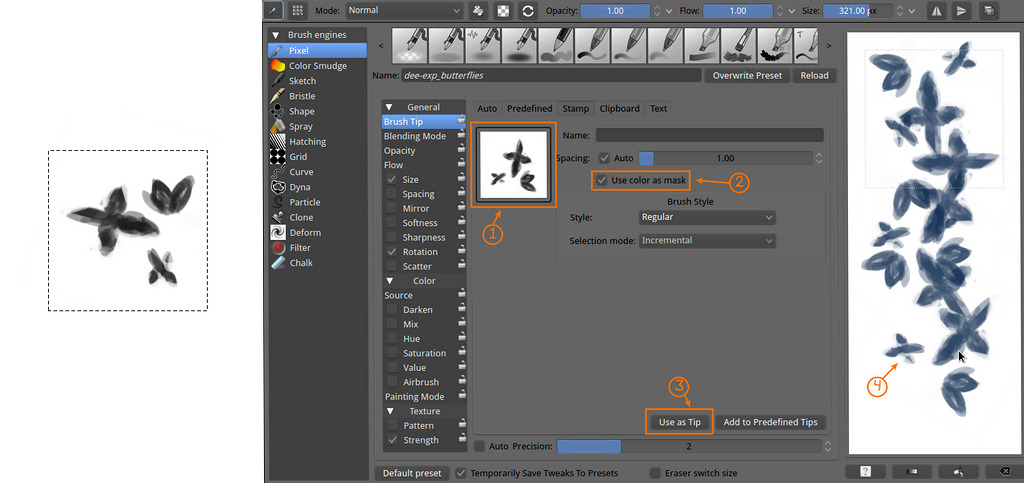
12. The butterflies brush preset
While painting the artwork I made another brush preset on the fly to preview an effect. I started to paint with black on a white square background little strokes as if they were distant butterflies. I kept them painterly and dirty to not get a clipart or vector cold effect. I select them and press Ctrl + Shift + C , to copy visible , then in the brush editor , under Brush Tip > Stamp the brush should appear as a preview (1) ( if the brush doesn't appear , or if you decide to change it , you can refresh it with (3) 'Use as Tip' ). Checking 'Use color as mask' is a good idea ; this way the white will become transparent, and the black will paint with the selected color. You can use the Scratchpad (4) on the left of the brush editor to test your brush.
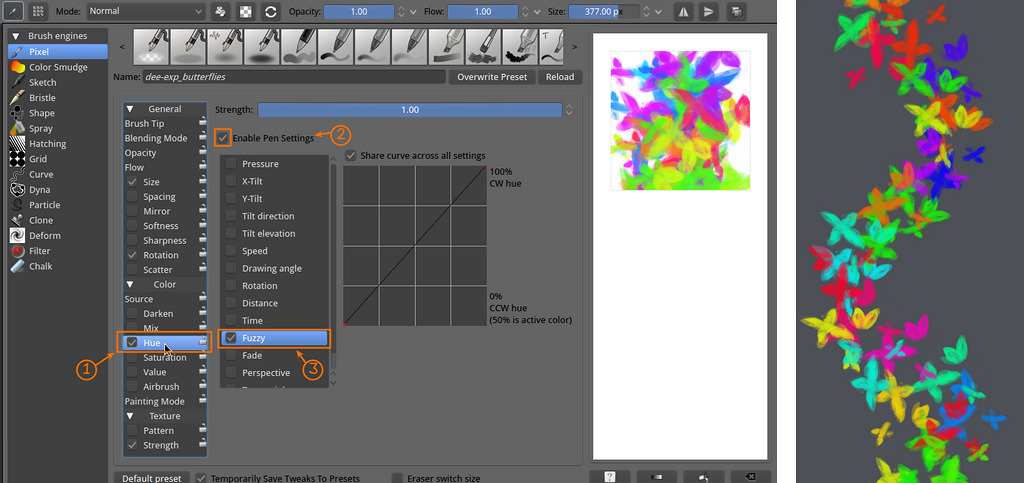
An interresting effect for this Fx brush is to activate the 'Hue' (1) Enable the sensor (2) and choose a Fuzzy sensor (3) . Fuzzy is similar to Random ; this way we obtain a brush with random Hue. Ideal for painting rainbows of any particules.
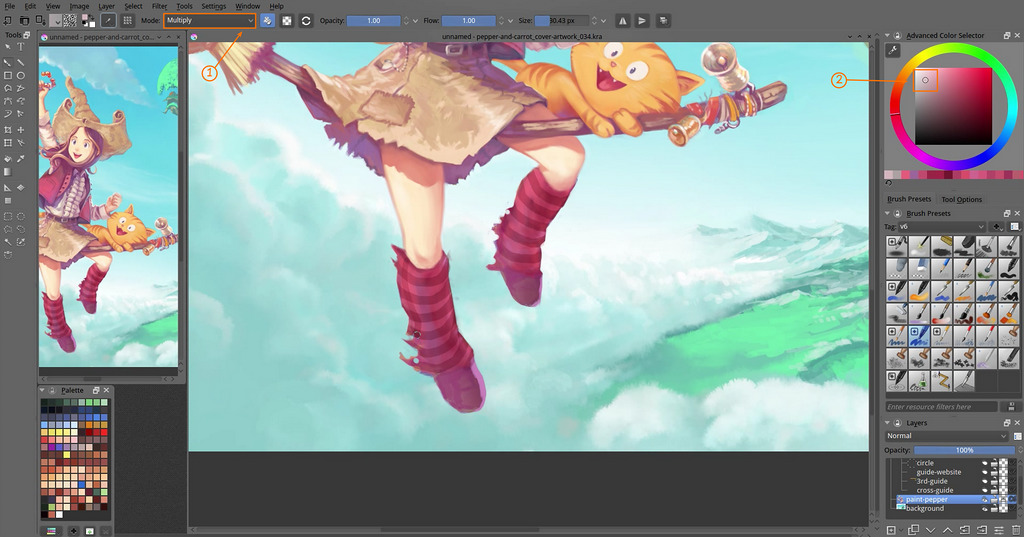
13. Patterns on socks
Just an easy basic tips : when all details are painted, it's fun to add pattern with a Multiply blending mode and a light desaturated color. It's acting like a glazing pass.
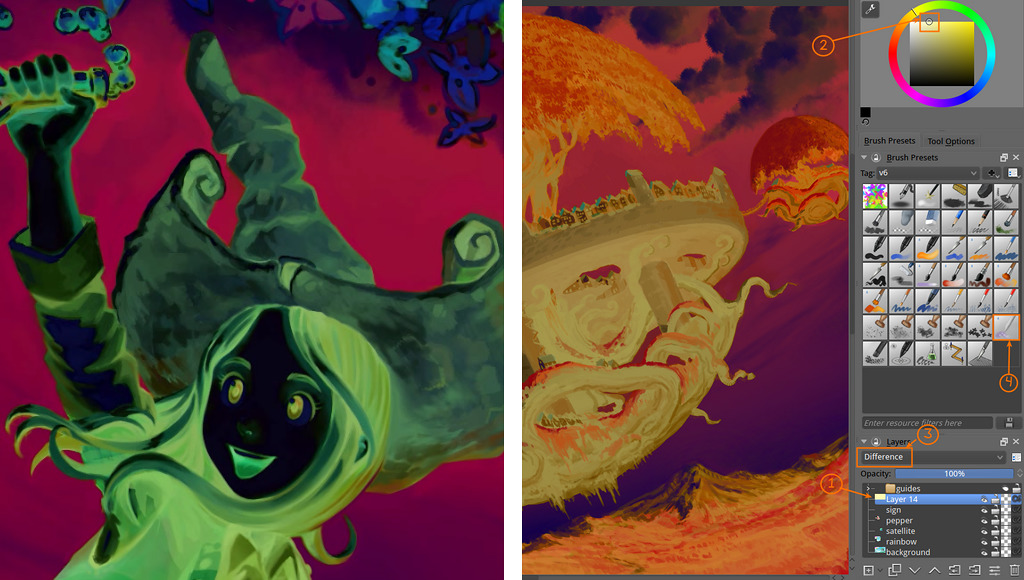
14. The negative check
I always do this when polishing large artworks with large bright sky: Create a layer on the top of your stack (1) , fill it with a bright yellow (2) and setup the blending mode to Difference (3) . The color of the sky will appears under a new contrast and you'll see better how to clean the little artifacts. I smudge them with a smudge preset (4).
Final artwork
The final artwork is a high colored energetic piece as I wanted ( maybe a bit too 'smoothed' and flat , I must admit ) for the header of the future dedicated www.peppercarrot.com website. The final flat file is a badass 20MB png , 6400x3600px available on DeviantArt . You can also download here the 1080p wallpaper version

32 comments
Gorgeus work David :) I will read with cure this wonderful article!
A question about color profiles management: are you using Linux Mint 17.1 with Cinammon DE? If yes, was it enough for you to load icc profiles in the cinammon settings, color ?
I'd like to setup the OS evironment you use... (for krita I'm able to compile it, I red you old guide 'for cats' :P )
Thanks a lot for the info you can provide about your OS color setup.
/Saverio
Merci David pour ce partage de tes techniques et de ton workflow !
Really great workflow tips. thanks for the great help you provide to the new artists and proffessionals also. any advice i priceless!
=^.^=
thank you for sharing this wonderful process. the final outcome is marvelous
At last a Pepper & Carrot wallpaper! By the way, Are you using Linux Mint now?
Super David, merci pour ce partage
Thank you for sharing the video. How do you get the canvas to rotate the way you do?
Many thanks for this great post! It's a pleasure to know (and see) your workflow and an excellent opportunity to learn from your tips.
I love the new multi-viewports, I often use the 'overview' for keeping an eye in the overall look but that doesn't work at all for large images.
Simply amazing, really well done. I was also just impressed with how efficiently you completed it, very talented.
I feel good viewing your website, art, and actions of intentional sharing. I hope others recognise also, there is something here valuable, not easy to find on the WWW. It is a skillful and particularly generous approach David. I appreciate these things:
* your artistic talent; the subjects, techniques.. sophisticated, accomplished, nuanced (beautiful)
* that you are mostly self taught (inspiring)
* that you make sharing and helping others shine, offering great tutorials, illustrative explainations of theory, technique, tools, process and flow (abundant, generous)
* that you use and advocate for Open Source Software (a big encouragement)
* the communication in the comments between you and others is appreciative, intelligent, positive (dignified)
It reminds me of an old web, and new web, and the careful tending, and energy given to creativity.. of the best parts of being human.
Thank you David
[Se il vous plaît pardonnez cette traduction en français de la machine]
Je me sens bien l'affichage de votre site web, l'art, et les actions de partage intentionnel. Je espère que d'autres reconnaissent également, il ya quelque chose ici précieuse, pas facile à trouver sur le Web. Ce est un David habile et notamment approche généreuse. Je apprécie ces choses:
* Votre talent artistique; Les sujets, techniques .. sophistiqué, réalisé, nuancé (belle)
* Que vous êtes essentiellement autodidacte (inspirer)
* Que vous faites partager et aider les autres brillent, offrant des tutoriels, des explications d'illustration de la théorie, la technique, les outils, les processus et flux (abondante, généreuse)
* Que vous utilisez et défenseur des logiciels Open Source (un grand encouragement de)
* La communication dans les commentaires entre vous et les autres est reconnaissant, intelligent, positif (dignité)
Cela me rappelle un vieux web, et la nouvelle web, et soins attentifs et énergie donnée à la créativité .. des meilleures parties de l'être humain.
Merci
Magnifique, beau travail, on reconnait les heures de travail sur la vidéo. Bravo.
J'ai appris que Miyazaki prennait sa retraite. L'arbre volant, une référence?
Bravo. question à quand le stage de formation, créé par le maitre des sorcières et des chats?
milles mercis pour montrer l'exemple des possibles créations.
Continuez s'il vous plait.
Gorgeous as always, David. Thank you for using the Creative Commons Attribution licence. Remember to promote your Patreon so we can support your work!
Hi, David!
Thanks for the in-depth tutorial!
You mentioned a new Krita brushset, still in beta (as is Krita itself). Do you (and the developers team) plan to integrate your new brushes into Krita 2.9 default installation on final release?
@Saverio & @Ayaskull : : Hi Saverio, sorry for late reply :) Hey Ayaskull, yes, I'm using Mint right now.
Linux Mint 17.1 with Cinammon DE is 'ok' to work with ; The ICC profiles works, and calibration of dual screen too ; but mini bug happens ( sometime windows blink, cursor are not color-managed ).
What I really like : Nemo file manager, with colored folders, the 4 corner windows placement, the systray bar and the customisation options : not too little, not to big amount.
I think it's a really good OS , but better can be done. Eg. The bottom or top bar is taking room on screen ; Unity is still better for managing this waste of pixels ; and I can do something more slim with XFCE.
Wacom support is equal to what was Gnome on 3.8 ; half featured, nothing exiting. So I use a xsetwacom script at startup. In overall an easy desktop. A good experience, but I miss something.
I'll distro jump soon. ( KDE , XFCE, back to Arch ? I don't know ... )
@Celiel : Thank you a lot for your comment ! you are true. I'm nostalgic from the first WWW: the web of mankind, utopy... of Wikipedia, science papers and Free Software. I'm really in love for this vision of the Internet, and I hope I can maintain a little part of it.
@Julien : Merci ! Oui, j'adore le travail de Miyazaki et tout mon travail transpire de cette admiration , même à mon insu. Pour des formations, je ne pense pas organiser des choses moi-même, mais je refuse rarement les invitation d'organisateurs :-)
@Chris Sakkas : Thank YOU because you are the one who influenced me the most to use an open-source license for Pepper&Carrot. I do not regret, managing a project this way is ten time more epic !
@doozza : Hi Doozza, my brushkit 6 , (yes , still in beta) will be released around the same date as Krita 2.9, but not shipped in it.
Animtim still maintain the default brush kit of Krita since a bunch of releases. Krita 2.9 will have an easy way to install brush bundles. I'll also do a bundle So, my brushkit will be only one-click away :)
Impressive!!!
I will do all my best to reach this level of painting...
Excellent, David :)
Your stuff is awesome, David. Do you do this for a living ? And how long did it take for you to master this digital painting ? Right now I just do abstract stuff with the mouse. Never used a draw pad.
Instead of step 6 could you with a C0C0C0 layer underneath and sketch on a transparent layer over the top of it? Then you could just delete the lower layer.
@Brendan : Hi Brendan, true ; it would be possible to also work the way you suggest. When I paint values, I often prefer to simplify everything and flat all into a single layer to just darken and lighten zone. That's why I need to reconvert in Step 6 my flat grey values to something a bit more transparent.
@David :
Hi ( nice name :-D ) Thank you!
>> Do you do this for a living ?
Yes, doing freelance artwork is my full time job since 2002.
>> And how long did it take for you to master this digital painting ?
I'm 33 years old, and I'm learning slowly I think. I started to draw paint in intense mode at 11 years old.
@Abdulla Al-Farsi : Thank you ! I wish you'll reach this level faster than me.
You have a powerful graphics card. Does Krita or Blender use it do you know?
PS: Thanks for the build instructions for Krita
@Brendan : Oh thanks for the "Cat build guide" :-) Yes, the Krita canvas can use openGL ( Preferences > Display > OpenGL ) I don't think it's intensive for the Gfx card ; but it helps to get a good one. It's better with Blender, it use full power of it ; for Cycle rendering or sculpting with polygon ; I still geek a bit with it.
Yes, the cat build guide. I was stuck on 2.5.?? on my distro but desperately wanted the more recent version, so built Krita. It's not always clear when you don't have a dependency.
You said:
> When I paint values, I often prefer to simplify everything and flat all into a single layer to just darken and lighten zone.
Is this easier to paint on a flat layer? I have always just worked on a transparent layer with a background (usually white, but c0c0c0 sounds like a good idea).
@Brendan : :-) Nice. Yes, painting on a flat canvas is faster, because you don't do layer managements ; and also keep hardware ressources for a single layer. I often work with two flat layers ; a previous version, and the actual version ; to toogle and see my progress ( and also to erase a zone and go back to previous version ). I also save incremental files, to backup the progress. It's a bit like painting with oil ; I can remove the 'fresh' part , and backup to the dry part under in case of mistake. Time to time, I merge the top layer with bottom, and duplicate the image again.
Painting on single layer is more risky, less flexible , sure. But I like to paint strokes with direct responsibility on the result ( even if I keep a backup layer ). It helps me to focus in a way. But I think it's all related to my previous carreer as a traditionnal painter with oil and acrylics.
I still like to use layers for FX ( fog, light glow, etc... ) ; and sometimes I split characterVSbackground too. especially when I have to paint a pattern of big airbrushy cloud behind a character with a complex silhouette.
Maybe there's something to be said for being more risky.
If you use a pre-built version of Krita does that mean it doesn't use all of your cores? Do you need to build it yourself to use of all your cores? I am updating my computer atm, hence my qn about the graphics card.
@Brendan : All Krita ( built yourself, or pre-built ) should *logically* be the same in terms of performances. If you upgrade your computer ; the most important for Krita is probably the CPU frequency ; 4 core above 2,5Ghz does a good job ; and RAM, 8GB can stock big painting in memory. For graphic card, a good nvidia or a good Intel ( if on Linux, Intel driver are working well for Krita canvas ) ; good luck with the upgrade!
Thanks a lot for this tutorial! Brilliant insight.
I love your works David! :D :D :D
Do you have any tips on Maintaining perfect curves or shapes with respect to the outline?
Also how do you go about perfectly coloring within these outlines? There's a perfect boundary between different colors without any bleeding, smudge or blur.(eg. The face)
@bull500 : Thank you :) It's hard to maintain solid shapes and boundaries between different shape ; it's even harder when the two colors has a good contrast. To maintain the 'hard edge' limit and keep a good curve ; I haven't got many tips ; I usually paint all my edges a bit soft or blury, then I try to make them more firm around the end part when I detail.
This is so exciting to look at. ive learned so much already, thank you so much for sharing your process!
Professional tutorial. The tutorial provide great information. Thanks a lot.
Love your tutorials. Thank you for sharing!
Wow, thats amazing! Love your work!
How do you create Komona? On the first step you "create" the ring and the shape...but how!? :)
Thanks your shared!... I hope you will continue to have similar posts to share with everyone! I believe a lot of people will be surprised to read this article!
Post a reply
The comments on this article are archived and unfortunately not yet connected to a dedicated post on Mastodon. Feel free to continue the discussion on the social media of your choice. Link to this post:You can also quote my account so I'll get a notification.
(eg. @davidrevoy@framapiaf.org on my Mastodon profile.)