


Research: line-art automatic colorization, first beta-test and review with Gmic
Introduction :
This is an article dedicated to my research for using the next generation of computer-assisted tool for colorization image filter. I'll try to explain the Gmic filter 'colorize'. This filter was created by David Tschumperlé , project manager and main developer of Gmic and I see a lot of potential in it. The filter improved a lot on this Autumn 2014 ( and was started around spring 2013 ). I kept an eye on the filter development since the very beginning as a tester, but I got totally enthusiast about it only recently ; especially when filter became interactive and more user friendly. For sure, this type of auto-colorisation will grow everywhere in the coming years.
1) What kind of problems this filter will solve?
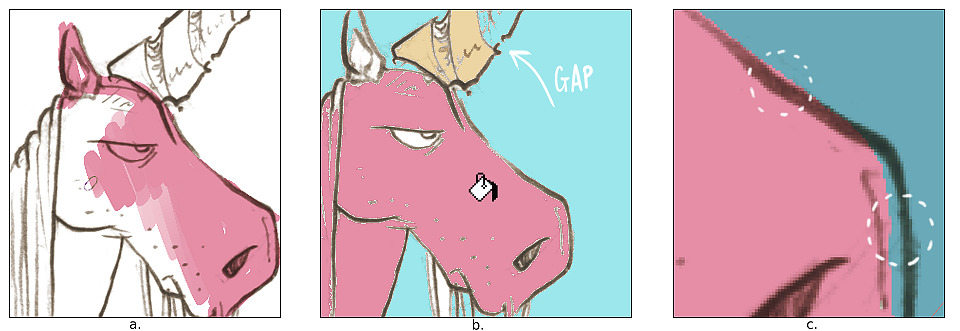
The first steps at colorizing a line-art is usually with flat zone. This process is a super long, annoying and robotic work. Here is two way of how artists handle this task since coloring comic in the digital era started (around the end of the 90's):
(illustration a.) Brush : simply take a brush and fill manually the color on a layer under
(illustration b.) Fill Bucket : use a fill bucket tool and click the area, then correct with brush
...of course, both methods (often used together) introduce quality problems (c.)
With practise and time, a lot of artist find their own recipes to reduce this step or improve quality (using lasso tools, vector shapes, etc). Also digital-painting software proposes often a set of features to make the life of artist less difficult around this two methods (eg. auto-enlarge fill bucket result, gap detection for fill bucket, better selection tools, filter to fill every zones with random colors) ...etc... Here I'm used to color my artworks with the brush method 'a.'. It's might not look obvious on the size of the little 'grumpy unicorn drawing' here, but I'm sure you can imagine the long time it represents repeating this on all the island of colors in a comic pages (and more in a episode, chapter or comic book). So, it is not surprising that even on the comic industry, 'preparing page with flat color zone' is a full time job.
2) What solution proposes this Gmic filter:
Gmic 'colorize' filter works a bit like a smart fill bucket tools on steroïd. First, this is an interactive tool and the task become suddenly a funnier part of the job because it has a little something of a videogame. Secondly, -and that's the most important- it produces a clean result.
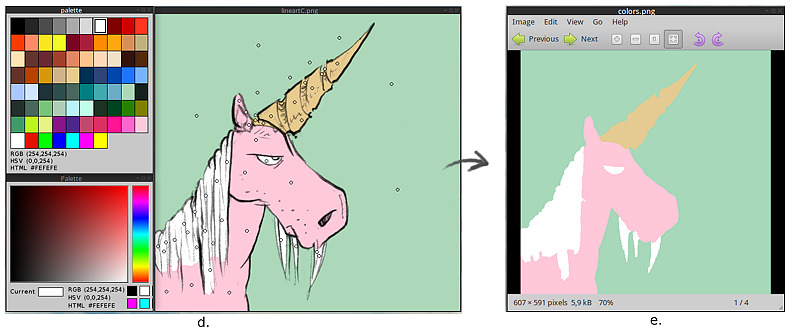
How does it works:
- Feed Gmic with a lineart ( eg. a b&w picture )
- Select colors and place color markers/tokens on the picture ( you can move them or delete them too )
- At any moment press <Space> to update the rendering and gmic will smartly fill the colors detecting edges (d.)
- Place more markers until the result is good and keep press <space> to update.
- Press Enter at the end ; Gmic will export a color map image as a result. (e.)
Gmic fills the gaps and doesn't care if the line are transparent, or sketchy.
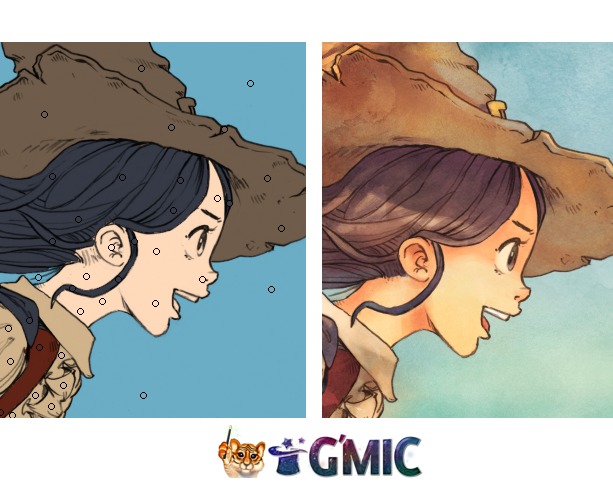
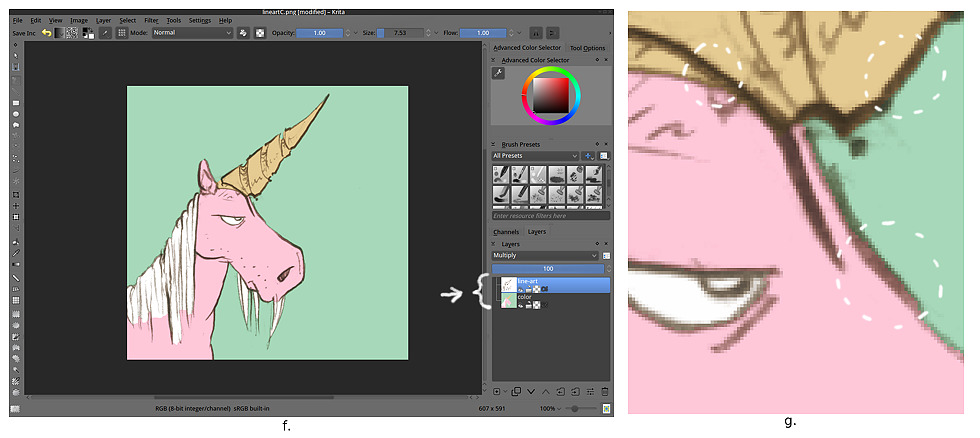
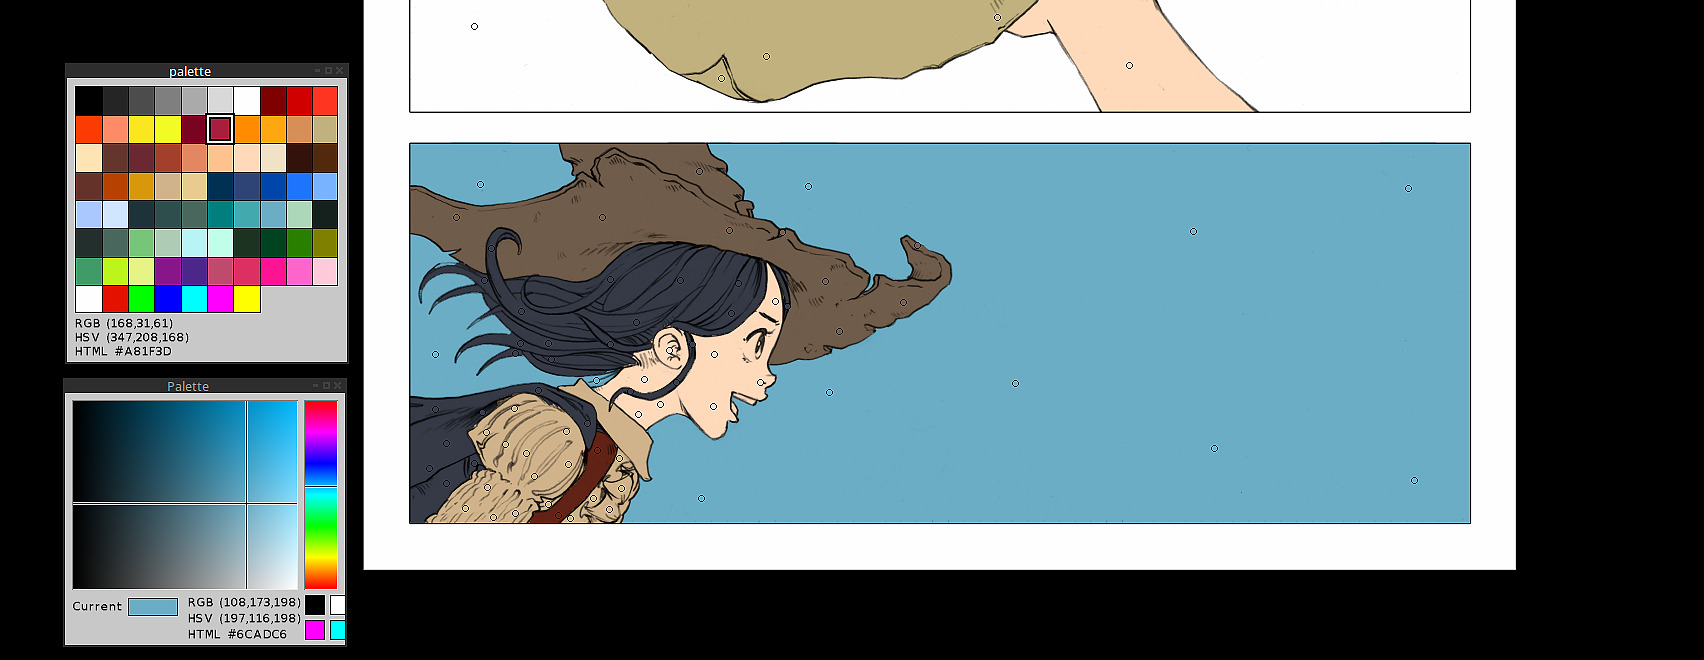
3) The result :
Once your color map loaded in Krita ; put your line-art on the top of your layer stack with the 'multiply' mode to see how the two layer are merging visually (f.) . You might be amazed by how the color-map is exact and clean ; even under transparent line-art (g.). For sure, you 'll meet minor issue here and there and will need to clean parts manually sometime, but the bigger part of the work is done for setting your flat zones, and it's done very quickly.
Real example inside a workflow :
In the upcoming Pepper&Carrot ep.3, an open webcomic I'm writing, I used the colorize filter to prepare my comic pages.
1) Setting area with clean edges
I don't use the filter 'colorize' to color all the little details (eg. the white of the eyes). The filter is able to do this for sure, but for my usage I prefer to obtain only large groups of color and leave details for later.
click to enlarge
2) In Krita
I reinject the colormap obtained by Gmic in my Krita *.kra files, and correct the areas if necessary. In this case, I had a glitch only on her hair ( still visible on the screenshot ) ; easy to correct with a brush with aliasing.

click to enlarge
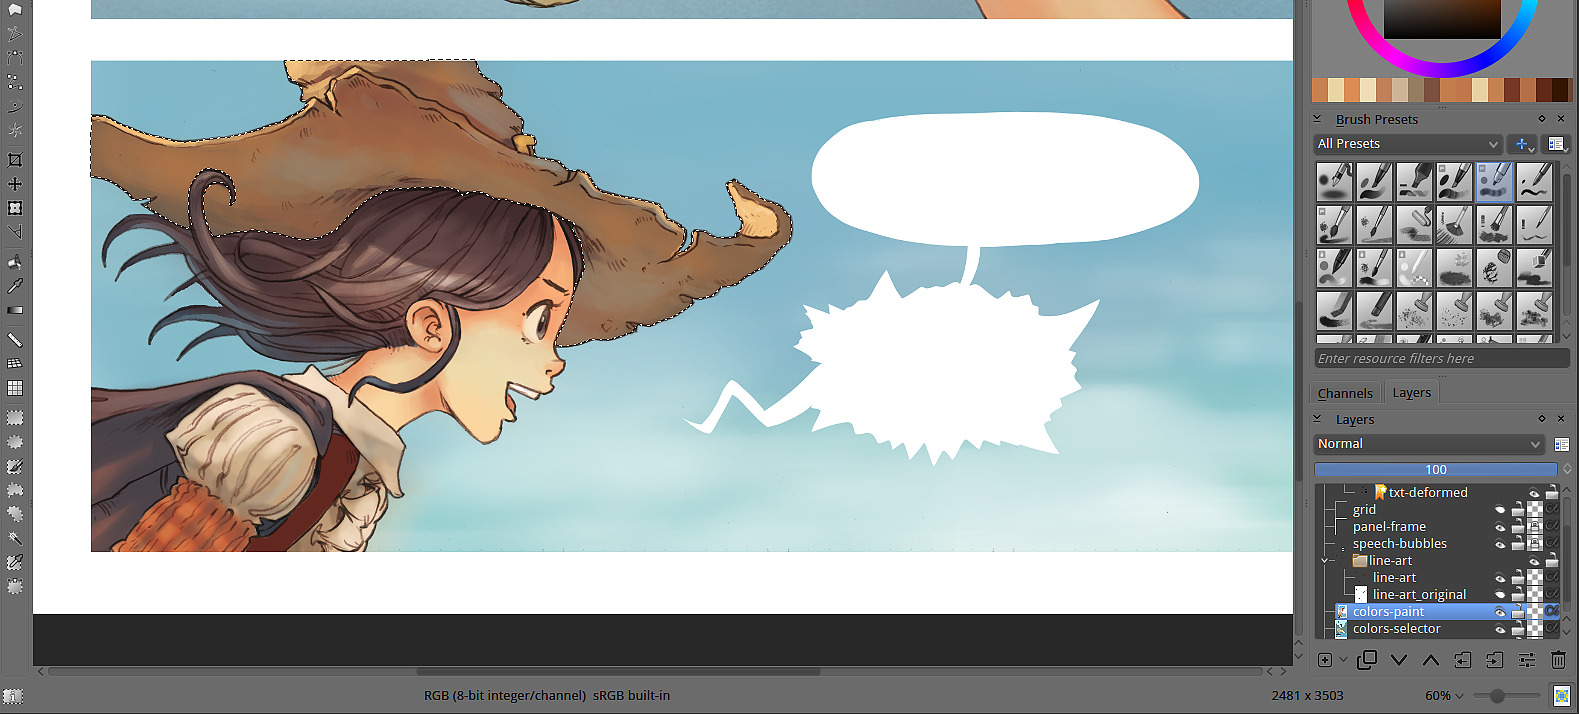
3) Painting within the limits of selected areas
Real fun start here; I keep the layer with Gmic result on the bottom of my stack and use it as a color-selector layer ; I use "magic wand" on it to select area of colors. Within this selections, I can paint freely while keeping really clean edges. It's really convenient for my style, because I like soft shading, and not shading with only hard edges as often used on comic, cartoon and anime.
click to enlarge
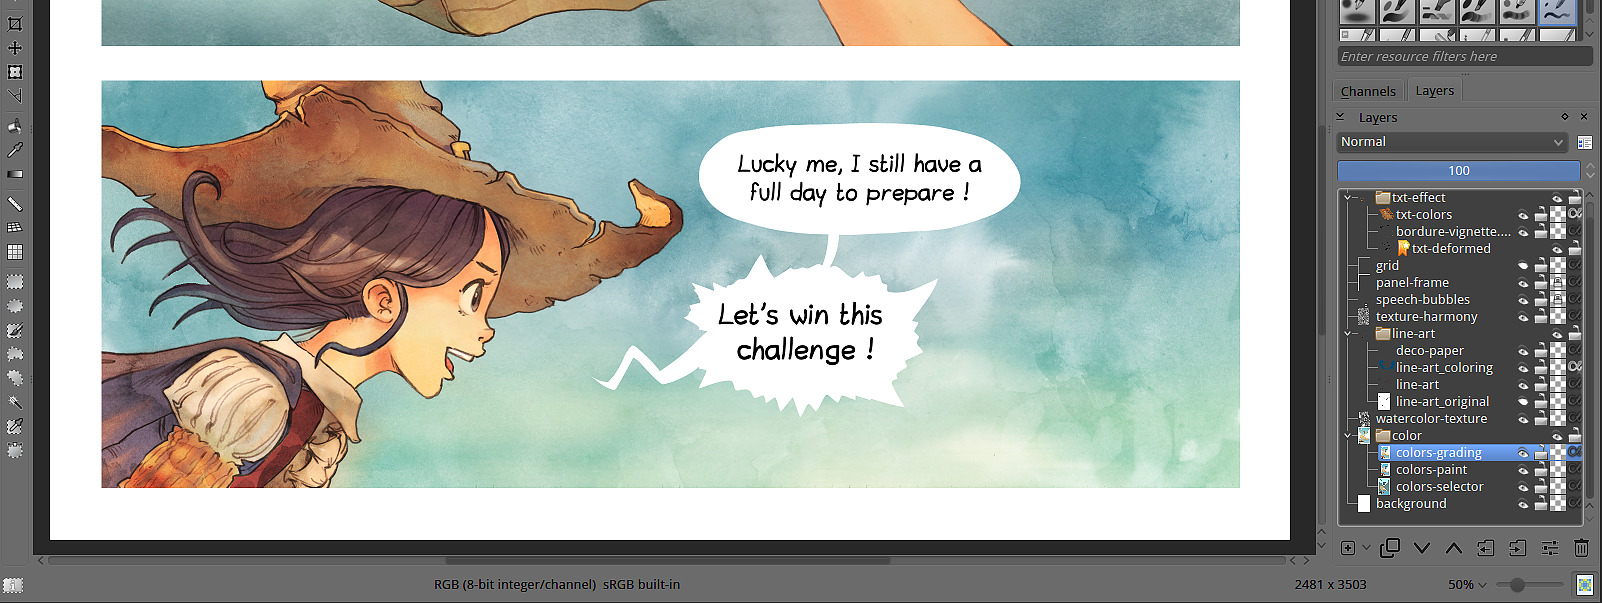
4) Post-production effects
I add a color-grading pass using often the adjustment curves, color-balance, and contrast/brightness curve. The final touch on the artwork is to texture my result for the watercolor effect.
click to enlarge
This filter is very recent in September 2014 and still beta. Package for mac, windows and Linux are available here on sourceforge on the sourceforge of the Gmic project. If you have already a version of Gmic better than 1.6.1 , then you don't need to install anything. Just refresh the filter database. This installation will install the gimp_gmic plugin as well. Notes for 'buntu Linux 14.04 , 64bit: you'll need libtiff4_3.9.7-2ubuntu1_amd64.deb , required dependencie, available here (from older repo). I installed gmic_1.6.*_beta_amd64.deb available here on sourceforge.
Tutorial
You'll need Gimp 2.8 installed, read the note above to know how to install it. In the future month, I'm sure the filter will be just part of Gmic. [edit 2015: GMIC filters are back in Krita]
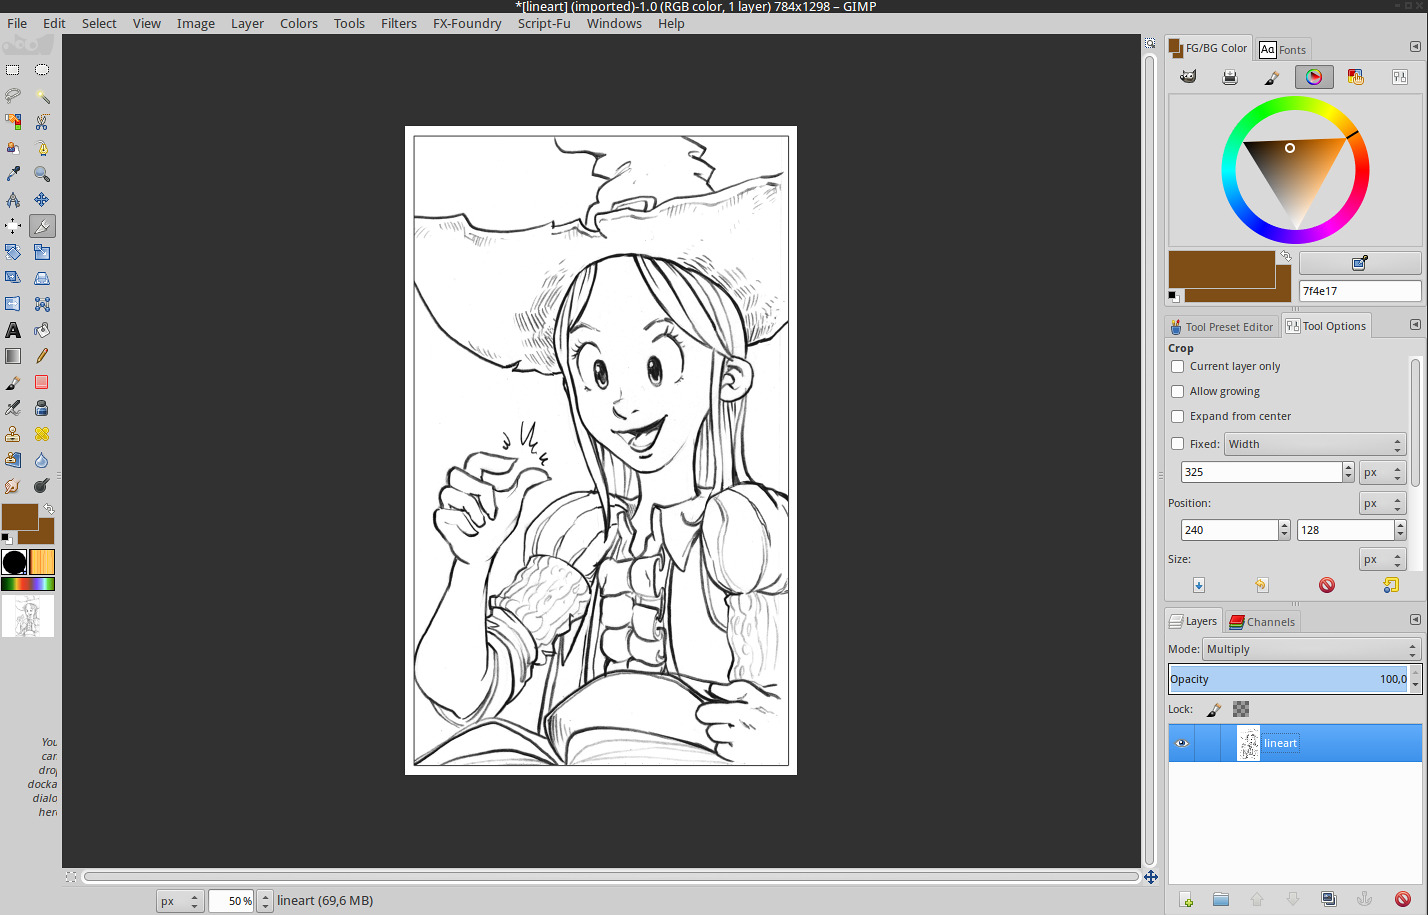
Open with Gimp your Line art
click to enlarge
The filter can be found on regular installation under the menu Filters > G'MIC
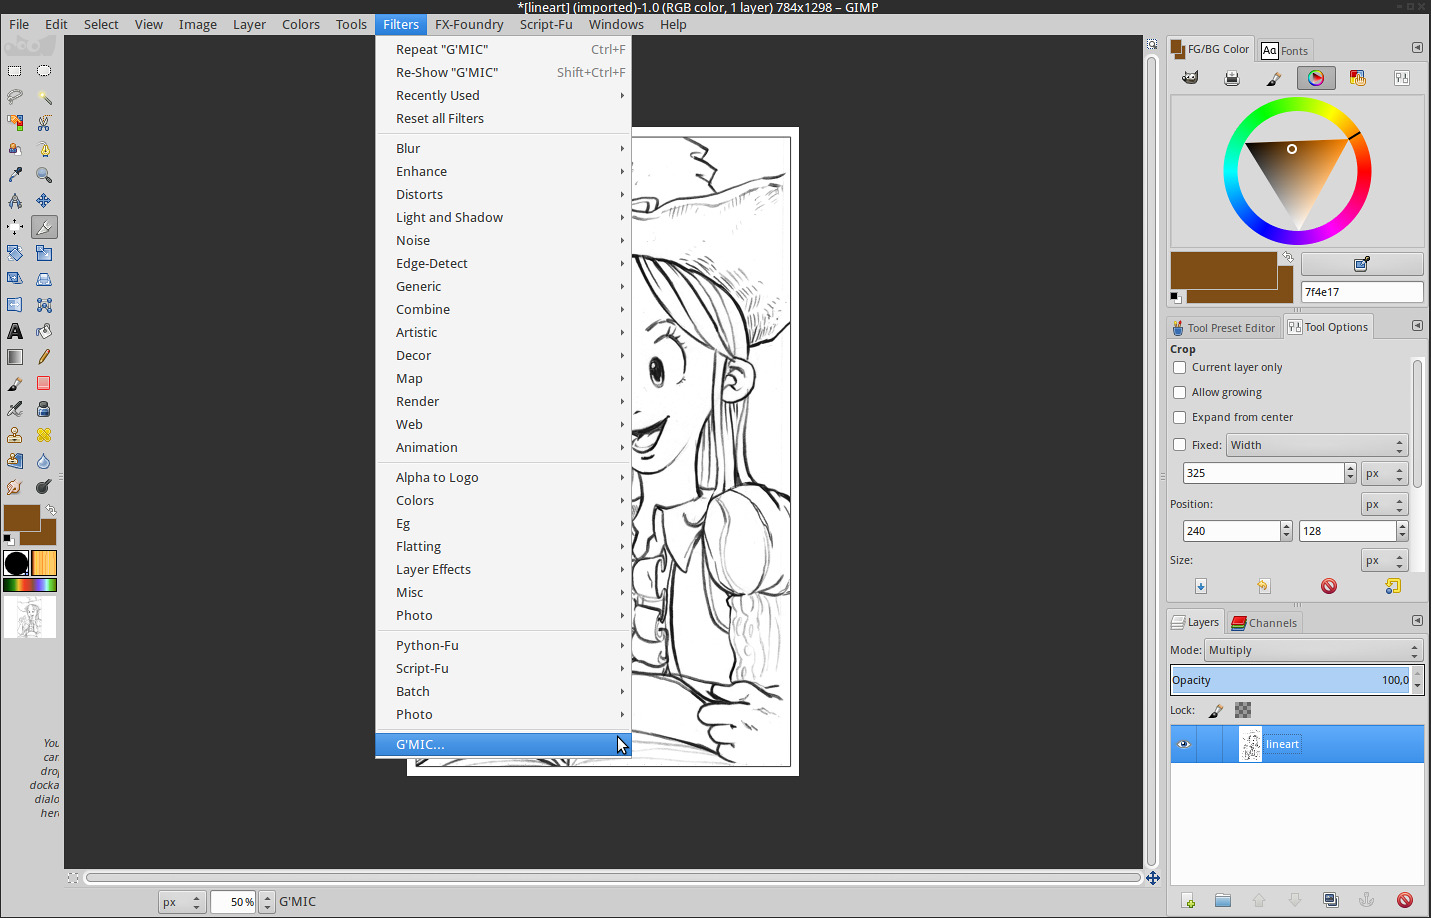
click to enlarge
Note : refresh your filter database ( press the button of a circular arrow at the bottom of the 'Available filters' list. it's between a '+' button to add the filter to your favorites, and a checkbox with 'internet' label, to benefit from the additional Internet filters update )
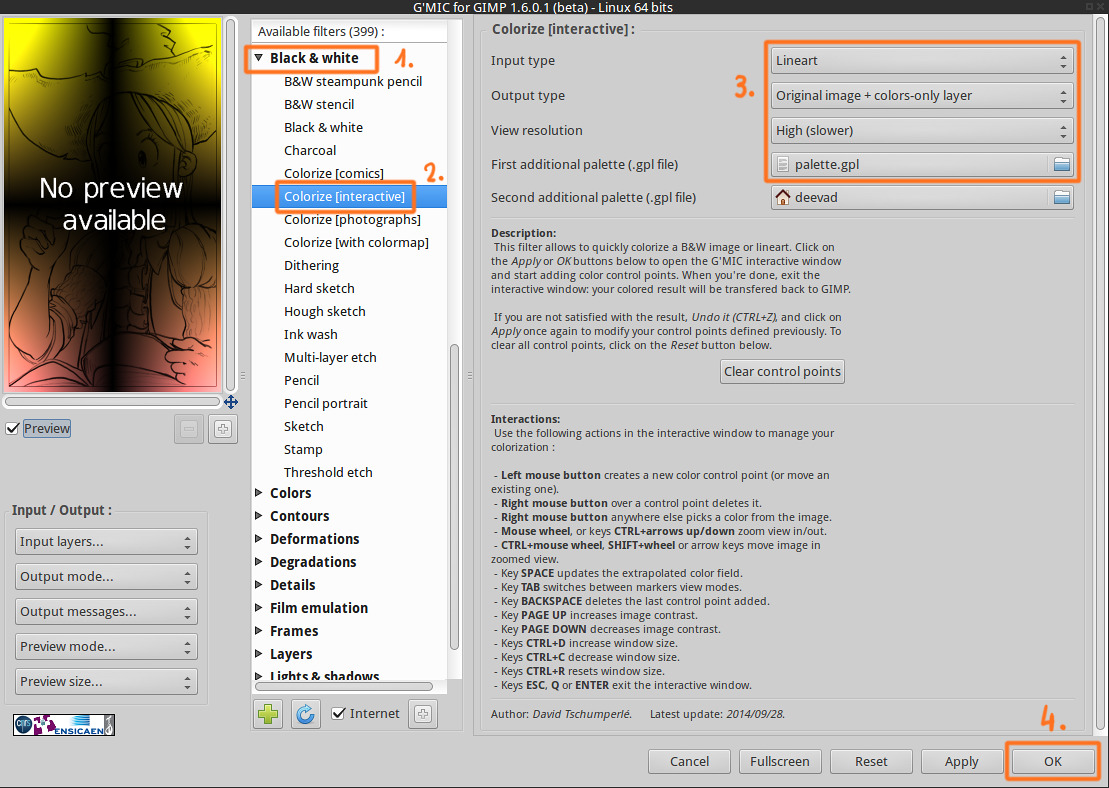
This is the harder part ; Select under the categories 'Black&White' (1.) the filter 'Colorize[interactive]' (2.) ; then on the right side, setup (3.) :
- Input type : Lineart ( we choose 'Lineart' here , exept if you want to recolorize an old black&white photo )
- Output type : Original image + color-only layer ( to get two resulting layers )
- View resolution : Choose a setting depending your hardware performance , this will affect the preview refresh time, and preview quality.
- Palettes : optionnal ; select on disk a palette ( *.gpl format )
Then when ready, press Ok (4.)
click to enlarge
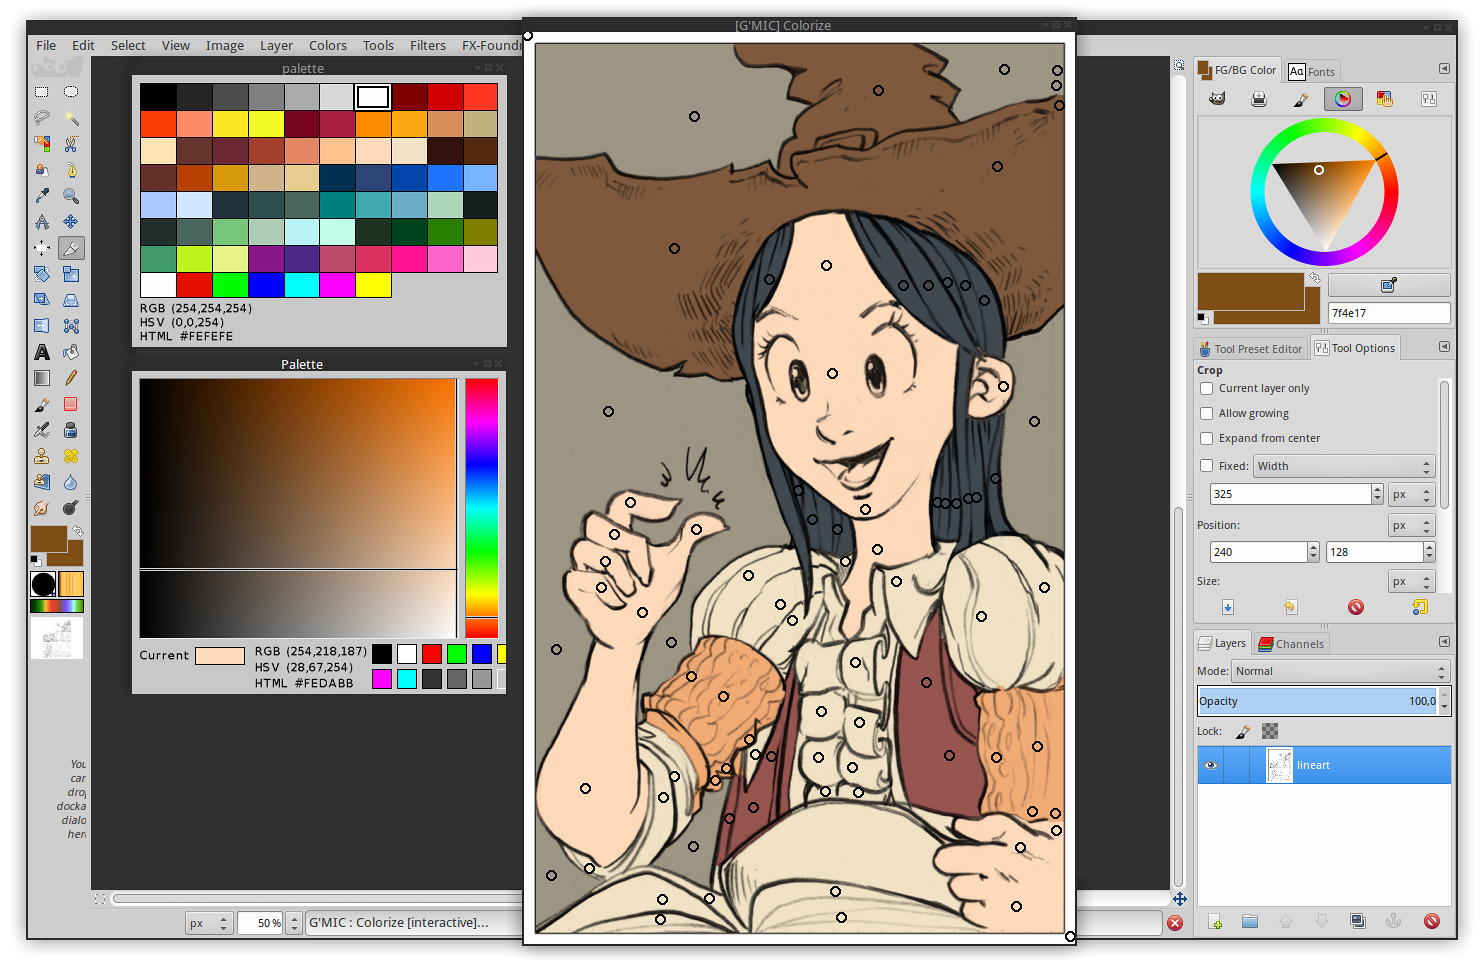
The dialog will appear on your desktop ( you'll probably need to reorganize the windows a bit to be more comfortable ). Mini how to use :
You can start to take a color from the palette , and place your markers on the canvas
Press <space> to update the filter, do it often.
Usefull : right click on a marker to delete it ; and right-click on a color on canvas to color-pick it.
When the work is done, press <Enter>
click to enlarge
Here are all the list of the keyboard commands so far :
- Left mouse button creates a new colored control point (or moves an existing one).
- Right mouse button over a control point deletes it.
- Right mouse button anywhere else picks a color from the image.
- Mouse wheel, or keys 'CTRL+arrows UP/DOWN' zoom view in/out.
- 'CTRL+mouse wheel', 'SHIFT+mouse wheel' or arrow keys move image in zoomed view.
- Key 'SPACE' updates the extrapolated color field.
- Key 'TAB' switches between markers view modes.
- Key 'BACKSPACE' deletes the last control point added.
- Key 'PAGE UP' increases image contrast.
- Key 'PAGE DOWN' decreases image contrast.
- Keys 'CTRL+D' increase window size.
- Keys 'CTRL+C' decrease window size.
- Keys 'CTRL+R' reset window size.
- Keys 'ESC', 'Q' or 'ENTER' exit the interactive window.
When you press <enter> the filter will export in your Gimp layer stack 2 layers ; the original line and the color-map.
You can then place your lines on the top (1.) and set the blending mode to multiply (2.) ( or using the Color > Color to Alpha to remove the white part of the image )
Just export this as a *.ora ( open raster ) if you want to continue to work your color on Krita or Mypaint :)

click to enlarge
That's all :-)
Tutorial : command line style
Start to update the filter , in a terminal :
gmic -update... to update and download all the recent filters. That's it. You have Gmic beta with last filters.
You can then launch Gmic 'colorize' filter this way :
Save your lineart in a folder ( eg. lineart.png ) and open a terminal into this folder, and copy or adapt :
gmic lineart.png -x_colorize 1,1024,1 -s c,{3-s} -o[-1] colors.pngHere is another variant if you save also in this folder a palette.gpl file to get an additional palette dialog.
gmic linear.png -input_gpl palette.gpl -x_colorize[0] 1,1024,1,[-1] -k[0] -s c,{3-s} -o[1] colors.pngIt will open a canvas with your artwork, and under or around a dialog with the palette.
The terminal will write you how to use the filter, and command to use. ( screenshot under )
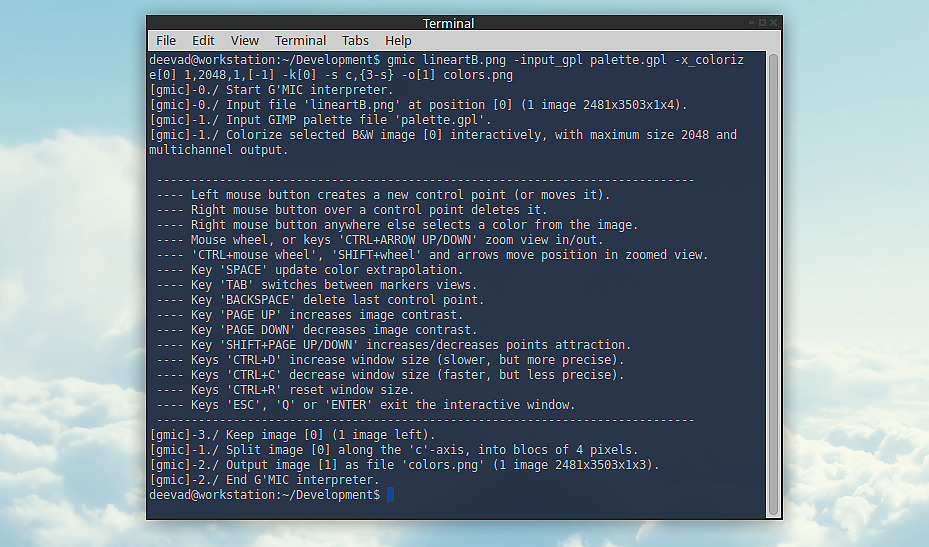
a Terminal windows , after a Gmic colorize filter done from command line
That's it, have a good coloring time
Video demo
Here is a demo video, by David Tschumperlé over a Pepper&Carrot line-art :-)
Conclusion :
I saw so many comic artist compromising their own line-art style by making all the area closed, all the lines pure black, etc... What's the meaning of all of that ? optimize the artwork to use non efficient tools as the fill-bucket? Yes. Most of line-art artworks are still under the slavery of outdated tools constrains. And most artist prefer change their own style for something more synthetic, robotic and predictable in order to win a bunch of painful hours of work. I don't blame, and I totally understand as I tried myself during many years to ink this way, to optimize my own workflow to make the fill-bucket tool easier to use. But I couldn't use pure black lines, use only big simple shapes and close all my line gaps ; I like the feeling to ink my comics with pencil , and my lines are full of grays shades, and I don't close always my lines and shapes. I even like to crosshatch a bit, and detail texture with messy lines here and there. A nightmare to colorize... But a filter like the Gmic 'colorize' is really bringing on the table an innovating answer to the problem. This will really improve my productivity, and the quality of my artworks as I can now invest more time on the shading and post-production. I even think it will help me to make more spontaneous pencil artworks, get more relax and ink more freely ; because I know they'll be simple to color... Next step ? Getting this directly plugged into the filter menu of Krita ? :-)
Many thanks to David Tschumperlé for all his work on Gmic and many thanks to Timothée GIET too for all the test he also made of this very cool tool.
[edit 2015: It was directly plugged in Krita]
[edit 2018: Now Krita made a native version of this filter: check the Colorize mask feature.]

43 comments
Great article! This filter looks really useful, and I didn't know about it before now. Also your explanation is really clear and easy to follow. Thank you!
Thanks David for all the testing you have done.
Some news about this filter : it will be available today directly in the G'MIC plug-in for GIMP as well, so people will be able to use it more easily (control points will be kept in memory and editable, even after the final color calculation has been done, and you will be able also to work on selections, which is convenient for full pages). Still a lot of work to do, but I'm almost done for a first usable version.
The development version of Krita already comes with g'mic 1.6. There's no support for interactively setting the points, though. Right now Lukas is working on showing a preview for g'mic filters; I guess that integrating the user interaction would be a nice next step.
@Dandy : Thanks !
@dtschump : Oh, good news ; when it will be ready, I'll update the article with the screenshot of the GUI version :)
@Boudewijn Rempt : This is also a super good news. Thanks ! ( Preview of filters for Gmic in Krita ), I use Gimp only to run Gmic nowaday ( and for other little specific task I rarely do ; Gif anim / Animated brush / proof opening tiff or psd ). I really like the color-grading tools in Gmic ; CMYK[Mixer] , LaB[Mixer] , Color-grading, Film Emulations, Boost Chromacity, Color temperature, Vignette frame.
Great work David, David and Thimothée !
I was testing this without success last friday because I missed a good manual, thanks a lot for this one, right on time !
Maybe one additional tool may be useful IMHO : a color picking tool, to select a color from a reference image (I know we can create a palette from an image, but it would be quickier, avoiding an additional step)... In my current work, it would be great.
In any way, it will save a lot of time... Thanks again !
@nylnook : Hey Camille, good feedback and ideas, thanks.
Is time to learn new things ...
This is a good and interesting plugin, thanks for the info.
Hello david
Cela fait plusieurs fois que je lis des tutos de vous. Vraiment, à chaque fois, j'apprends quelque chose d'interessant et d'exploitable. Mille fois merci de prendre le temps de présenter ces travaux avec tant de clarté et de pédagogie. Je connaissais (superficielement) ce pugin mais là vraiment quel gain de temps!
Encore merci.
I opened a bug report here, but I'm not sure it the right place :
https://sourceforge.net/p/gmic/bugs/39/
Thanks again !
It's fantastic ! thank you David!. We're waiting for another tut.
Thanks,Very detailed tutorial!
Also look forward to full screen eyedropper tool ^_^
Le travail est extraordinaire.
une question: quelle est la police utilisée pour la redaction des bulles?
merci
@all : Hey, thanks for the feedback !
@julien : La font est 'Lavi' . Elle est disponible sur Dafont ; et bien sur open-source et libre d'utilisation :-)
And Krita now has a new plugin to split up the g'mic generated colormap into separate, alpha-locked layers :-)
@Boudewijn Rempt : oh .... ! ! ! MANY THANKS !
/me will compile it asap ; http://quickgit.kde.org/?p=calligra.git&a=commit&h=9d669b972fed8206ee0a9e6d8a14e27ce65b7ecb
First of all: Thanx for this great tutorial, just absolutely awsome.
I use Win7 64bit and Gimp 2.8 with GPS and I have the problem that just this one filter (colorize[interactive]) of g'mic (tried 64 bit and 32 bit version) does not work and causes the plugin to crash. Has anyone else experinced this/knows a solution?
@jahjahgone : Thanks! unfortunately, I'm not using Windows ( only Linux ) and I don't know a lot about this operating system. Be sure your Gmic version is updated and good luck.
tttt
Nice article! I'm using it recolor some old black and whtice comics at the moment. Is there a way to keep the "markers" if you save the image and quit GIMP, to continue working on it later on?
@Narayaan : Oh, good usage. As far as I know this feature ( saving markers on disk ) is not existing.
Hi David, thanks for your quick response! This is really an awesome filter!
I filed an bug report/improvement request in G'mic. I don't know if this is something that is even possible within a plugin like g'mic, but you never know :).
The improvemnt request can be found here:
https://github.com/dtschump/gmic-community/issues/2
@Narayaan : Good job reporting it !
I don't know if this issue in G'mic ever will be fixed, but I read that the lazybrush functionality coming up in Krita should do the same thing. Might be interesting to do a comparison once it has been implemented!
Bonjour,
J'ai une question, les fichier palettes ".gpl" se crééent ils automatiquement? J'étais parvenu à en créer un temps en utilisant Krita via Linux (et je crois me souvenir d'un menu ou l'on parametrait le nombre de couleurs, de colonnes etc...).
Je tente de faire des colorisation mais je ne vois de fichiers ".gpl" créés nulle part (je precise que j'utilise actuellement Krita sous windows 7 mais je ne pense pas que ça devrait en changer le mode de fonctionnement).
@Olivier L. : Bonjour, Je pense qu'il y a confusion :
- Krita, Mypaint mais surtout Gimp peuvent créer des fichier *.gpl.
- Le fichier *.gpl est seulement lu et optionnel dans GMIC.
Donc normal si GMIC ne créer pas de fichier gpl ; c'est pas sa fonction.
Par ailleurs , c'est un format de fichier très simple et c'est possible de créer la palette dans un editeur de texte.
Voici un example de fichier palette que j'utilise, il renseigne sur la syntaxe ; http://www.pasteall.org/62663/text
Hi David,
I am trying to find out which community I should contact about a small problem I have with the interactive gmic line art colorization.
Currently I am using a Surface Pro 4 with Krita on Windows 10 and I love it (both Krita and the Surface)
My concern is about the gmic plugin. As there is no right Mousebutton on the Surface Pen directly I have to LONG press the Pen to the display.
Well this is far from optimal, as a slight movement with the pen is enough to not have an effect.
I was wondering if there might be any chance to get an enhancement in that lets me press CTRL or ALT or SHIFT and use the pen to simulate the right click.
Otherwise it is increasingly difficult to move or remove any pointers.
But I am not sure if the simulation should be done in the GMic Plugin or in Krita itself?
I would be happy to write an enhancement request, if I just knew to whom.
Many thanks and best regards,
CarsteN
Put it on the Githup Issue Tracker for G'Mic for now.
Let's see what happens.
Best regards,
CarsteN
Wow, David has already implemented the changes in G'Mic.
Pressing X now deletes a control point and with P you can select the color.
No right mouse button required anymore.
Now I just need to find a way to ask the Krita folks to update their G'Mic plugin.
Cheers,
CarsteN
Is there a way to use another (custom) better palette while using this filter in Gimp? This would make it easier to remember color codes..
@colorize : Yes, you can. The filter as a field where you can enter a path to a palette in the *.gpl format.
Hey, David!
I have been using this tool for quite a while now, thanks to you.
It is immensely helpful! I pair it up with GIMP.
But last month I've finally decided to give in to the (several months old) update warning and update GMIC.
Suddenly, my coloring started looking like this: http://i.imgur.com/MownpSG.png
I've updated GIMP as well, no improvement.
There is a partial remedy for that, which is placing more dots towards the borders, but I am quite sure it used to get the job done with less clicks.
I'm sending this message to you since you are a heavy user of the plugin, I want to confirm whether it's only me before reporting bugs and whatnot.
I'll also look for a version rollback if that's the case. :(
Hey Marco,
Wow, that's weird. I'm not using it since a long time ( probably 4 or 5 month ) . I'm experimenting coloring more 'direct' my artworks.
I just ran a test, and here I don't see big issue; but I trust your feeling. You should show it to the project maintainer.
the mini test I just made:
http://storage2.static.itmages.com/i/16/0707/h_1467914920_4321578_8c903960c0.png
Ah, yes, direct painting is truly liberating...
Sadly my project requires a more cel-shaded approach, so I'll keep digging into the issue for now!
Thanks for the prompt reply, for the quick test and HEY, for your all the work you do, really.
I just stalk you from the shadows but your philosophy is really inspiring. There's a special thanks to you on my website. Cheers! :)
Thanks!
I rarely use Gmic directly from the Gimp or Krita plugin ; I made a little script to have it on the right-click over a *.png files.
The command line I use to get the resolution I want ( to work over A4@300ppi with good precision ) :
gmic input.png -x_colorize[0] 1,2048,1,[-1] -k[0] -s c,{3-s} -o[1] output.png
So would you now recommend using the new smart coloring filter over this one?
Hey, 'yes' and 'no' :
[Colorize interactive] (old one with nodes)
- Does better job with crosshatching
- Does better job with pencil line-art ( rough lines )
- Worst for color-choice
- Dangerous because the process take long, and can't be saved while in 'interactive mode' ( eg. electricity cut ), user needs to do the full process.
[Smart Coloring] (new one)
- Works better for line-art without hole, or tiny hole
- line-art with a good/pure line quality
- Use tool of the painting app for color replacement (fill tool, palette, even color adjust filters )
- User can color half-way / save / comeback after.
When I try to start the tool, it gives an error: Command '-x_colorize': No display available.
Do you know what might be the problem?
I can not find adequate information. = (
Hi Abhay ; What operating system are you using?
J'ai beau chercher comment installer l'archive ZIP de G'mic pour Krita, je ne trouve pas l'information. Même le site de David ne dit rien à ce sujet. Faut-il mettre le contenu de G'mic décompressé dans un répertoire Filtres de Krita ?
Merci
Bonjour Claude,
GMIC devrait être préinstallé avec Krita. Si ce n'est pas le cas, il faut voir avec celui ou celle qui fait les paquets ( "packager") de la distribution ou du système d'exploitation que vous utilisez.
Nice, maybe I'll try one of this with Krita
Now we have AI assisted colourization tools like https://github.com/lllyasviel/style2paints
I quote this repo: "Please do not use our software for large-scale commercial or industrial publications without our approval.", and license is Apache.
Not sure if really compatible with Free/Libre and Open Source software and if "we" have anything here ;-)
The example are impressive; I wonder how it would work on drawings made with styles outside of the box of the experiment.
Right now, I can guess this AI would colorize anime bikini tones to any landscape a bit curvy xD
Post a reply
The comments on this article are archived and unfortunately not yet connected to a dedicated post on Mastodon. Feel free to continue the discussion on the social media of your choice. Link to this post:You can also quote my account so I'll get a notification.
(eg. @davidrevoy@framapiaf.org on my Mastodon profile.)