


Getting started with Krita (1/3)
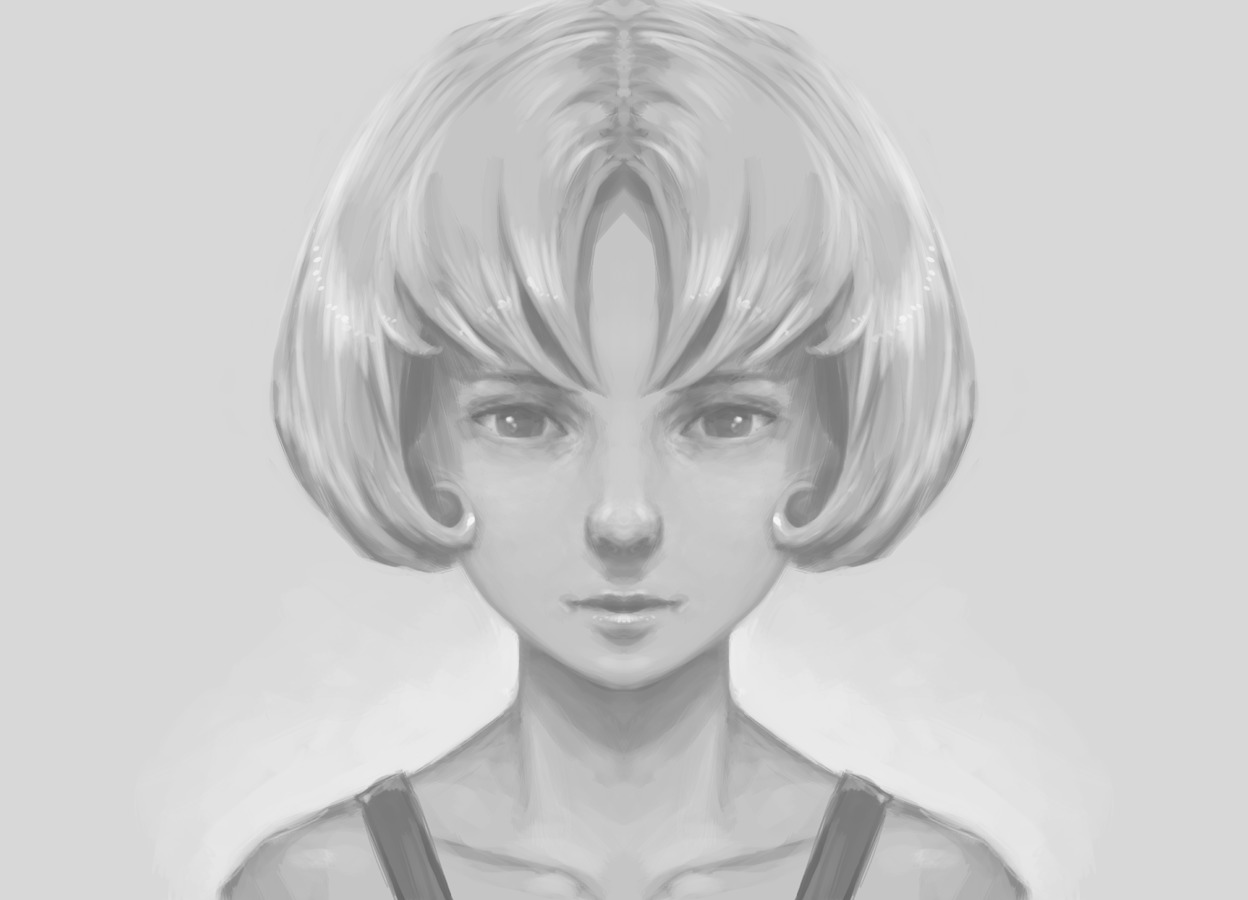
The result of this blog post tutorial exercise
"Getting started with Krita" is a tutorial series of three blog post. The tutorials were designed for Krita 2.7 in 2013 + my brushkit V3 . This brush were added in Krita's default brushes after Krita 2.8. Using a newer version of Krita ( eg. 2.9.7 ) you should have everything you need. I updated a bit the tutorial in september 2015. The screenshot are old and won't match your interface, but it's the best I can do at the moment to refresh this three post.
I hope you'll learn something with this series. My goal here is to share the passion I have for digital painting and help new talents to get faster rid of the technical aspect to do the essential : telling stories, sharing beautiful pictures, expressing an artistic soul, etc... My first tutorial will be a simple but rewarding one. 'Simple' because I'll write it as a step by step with all details to paint a symmetrical portrait, but without explaining the complex stuff underneath about theory ; and 'rewarding' because we will get a result quickly. It can be an ideal time investment if you have a first free afternoon to paint and want to learn basics of Krita while having fun.
Contents :
- Part 1. : black and white : setup and modeling ( you are here )
- Part 2. : colorize : layer stack of blending mode
- Part 3. : finalising : render, post effect
Let's paint !
Note :
- Save your document often during the process. I advice the 'Krita document' ( kra ) files.
- Click on the pictures of this blog post to enlarge them.
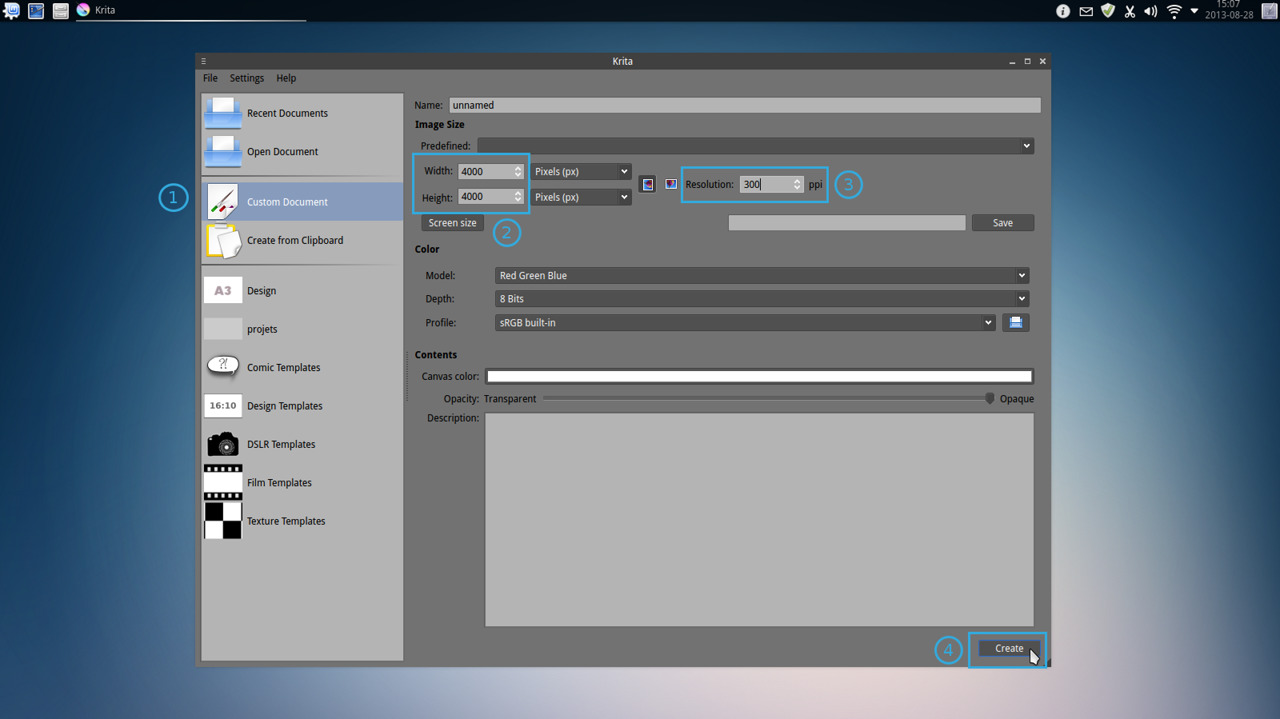
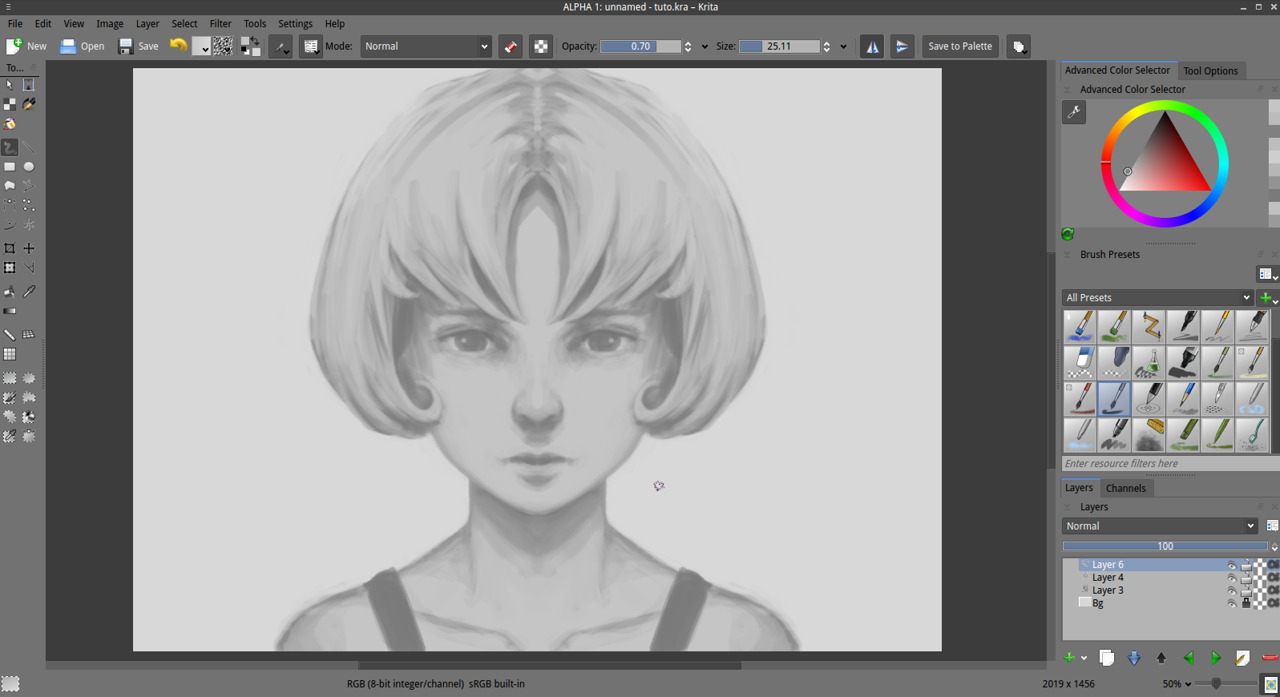
1. On Krita first startup go to File menu on top, then 'New'. A dialog will pop-up, select in it the tab on left "Custom Document"(1) and create a new canvas with Width and Height to 4000 (2) and set resolution to 300ppi (3) , as on the screenshot. Skip other field as Name or Image description , and press 'Create' (4).
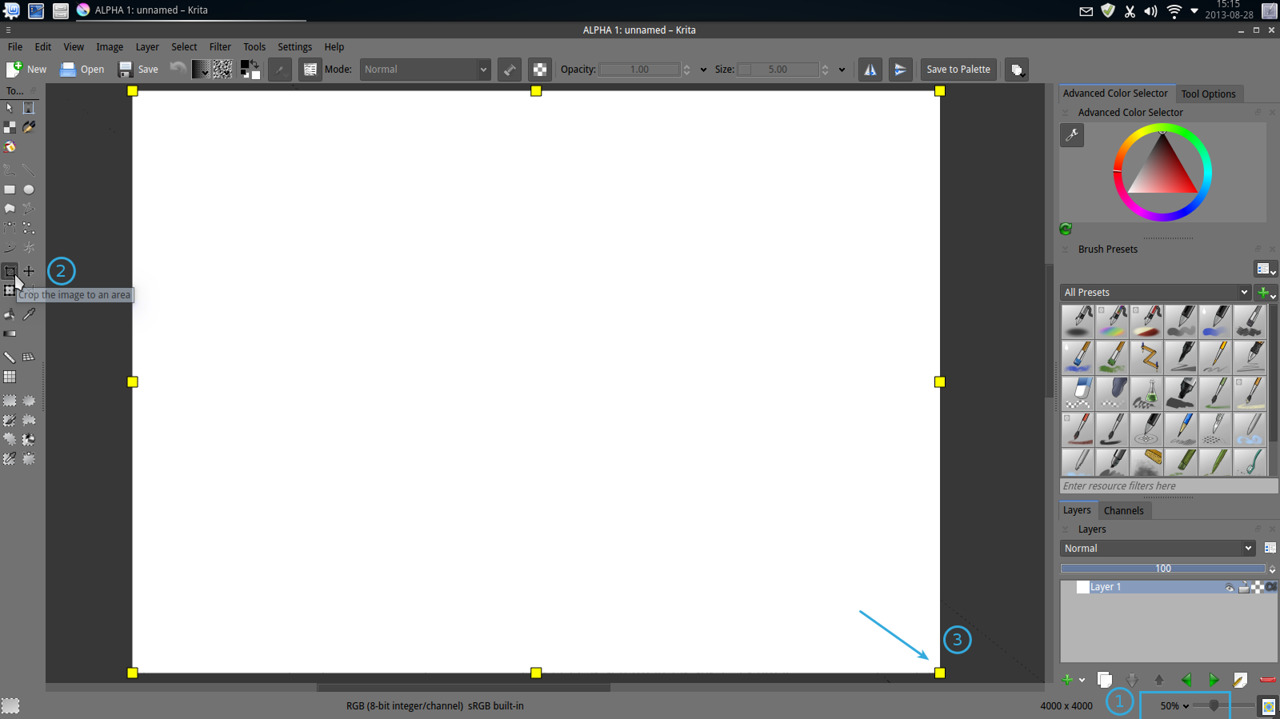
2. Maximize Krita Windows. Zoom your empty canvas to the 50% view (1) ( using '+' on keyboard or the mouse wheel ) . Take the crop tool (2) , and crop the visible canvas on your screen letting a border all around.
3. Click the little color square on the toolbar (1) ( the one under for the background color) step the value down to 216 (2) ( Hex: #D8D8D8 ) , then accept with the OK button (3) . Now press 'Backspace' over your canvas (4) , to fill this one with the grey background color.

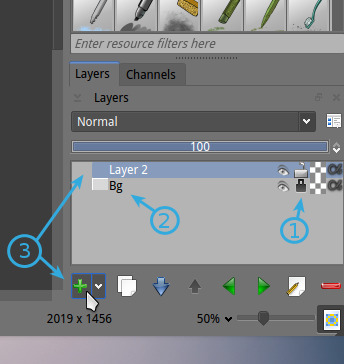
4. Lock your layer (1) and rename it ( double click on it ) to 'Bg' (2). Create a new empty "Paint layer" above (3) . Let the default name 'Layer 2'
5. Select the Freehand tool (1) and the default brush preset 'Bristtle_hairy' (2). On the 'advanced color selector' docker, select a dark mid-grey value (3) , and adjust the size with pressing shift+dragging the brush on the canvas to got a mid brush (4) ( check around 40px , on top 'size' slider )
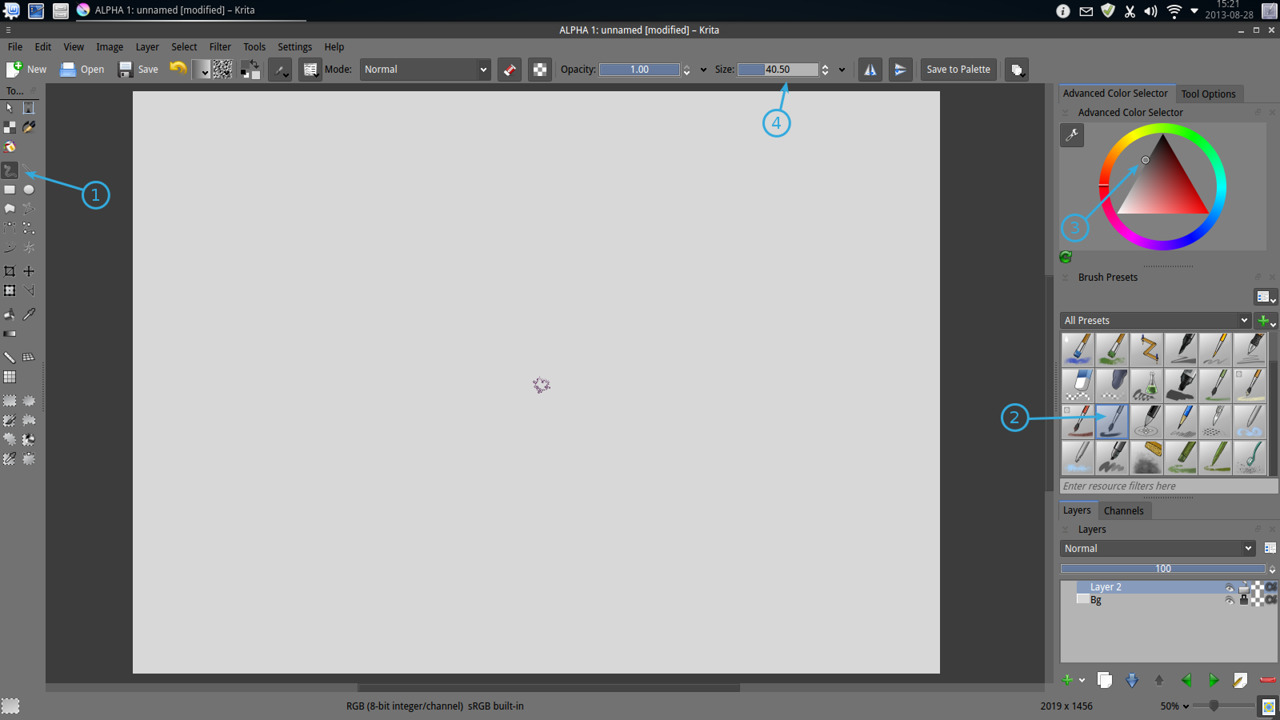
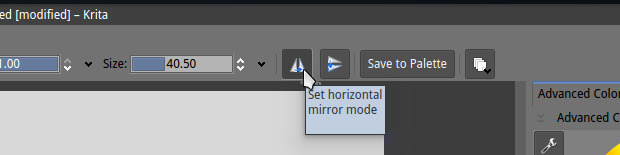
6. Activate the shortcut on the top tool bar to the horizontal mirror mode.
7. Start to draw on canvas large axes, with direct and simple line strokes. Shape the head, simple lines for the eyes , mouth, and nose, same for ears. 'E' key on the keyboard will switch your brush to erase instead of paint. Pressing it again will restore the behavior to paint. You can correct your stroke to get proportion you like. To delete all , in case you are not happy , press 'Delete' on the keyboard.
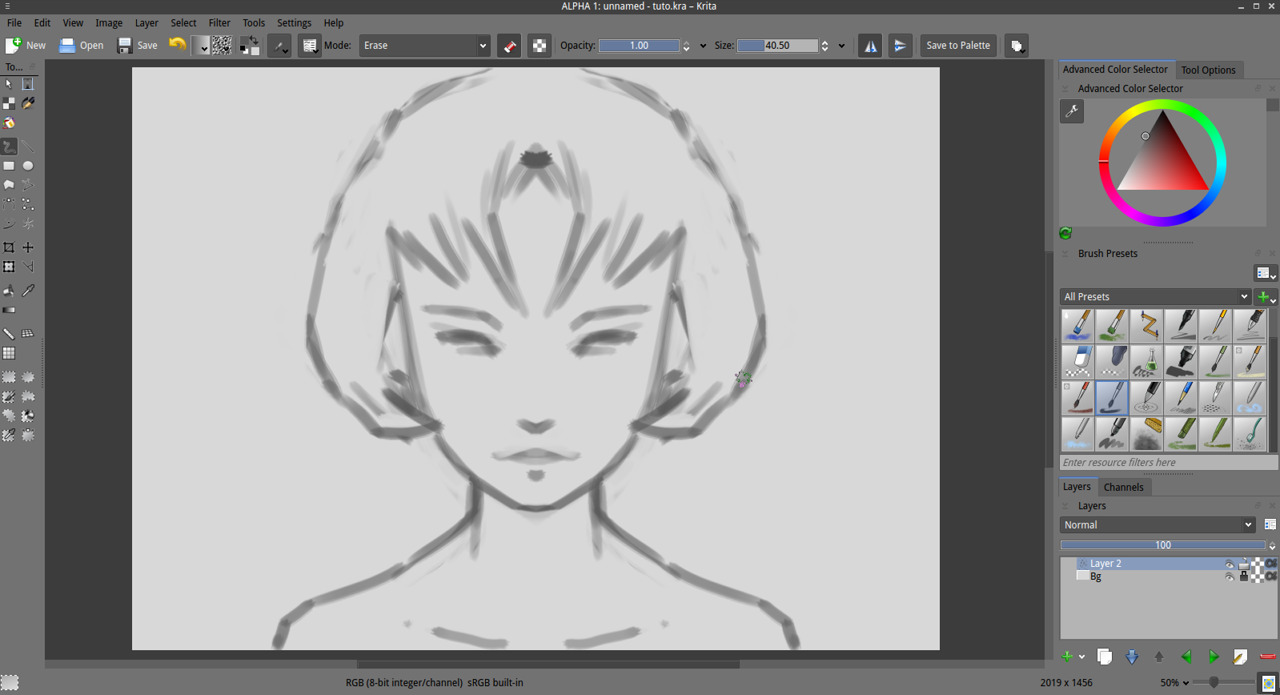
8. Block the shadows zone of your face , if you are not familiar with drawing or painting, this skill is relative to your capacity to abstract the 3D model of a face in your head , and know the volumes of it and guess the shadows cast by an abstract light source. If you begin, just try to paint the area under the eyebrows, and under the nose, volume for the hair, and for the neck. Again, use the eraser to enhance your modeling. Keep it simple : zone of light and zone of shadows.
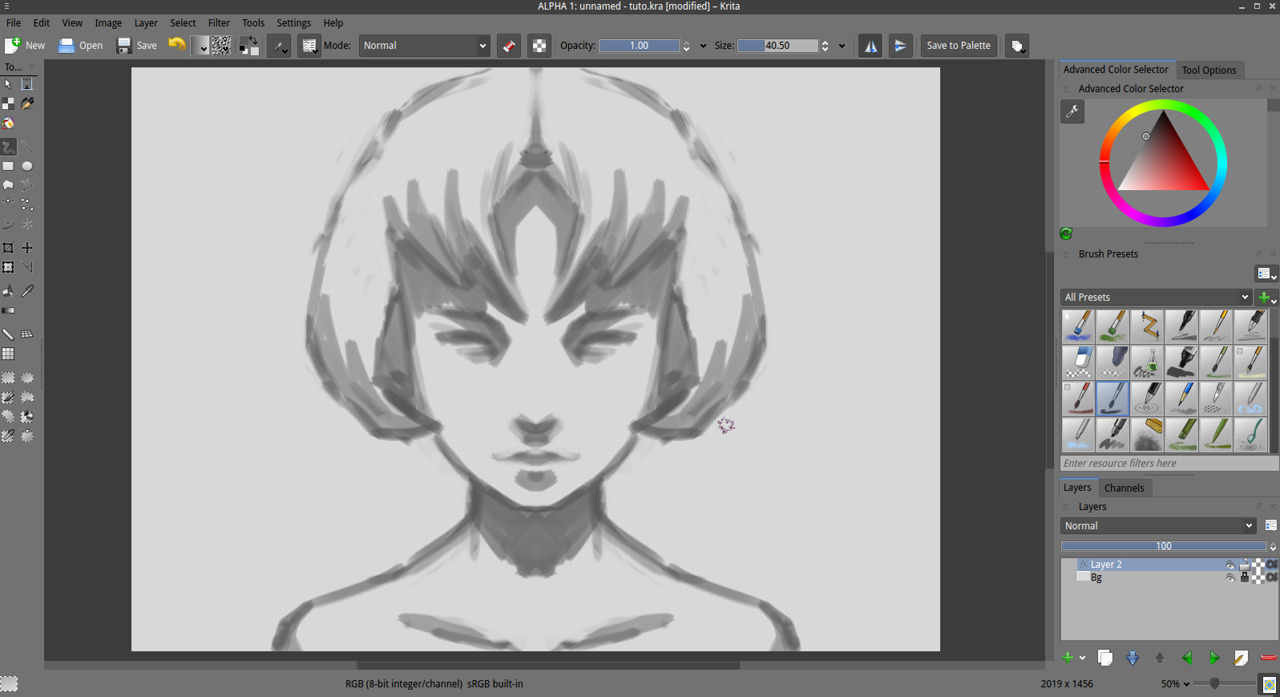
9. Create a new paint layer, and bring it between your blocked shadows, and the background. Select the default 'Fill_block' brush and fill the part inside the silhouette with a brighter grey ( brighter than your sketch , but darker than your background ).
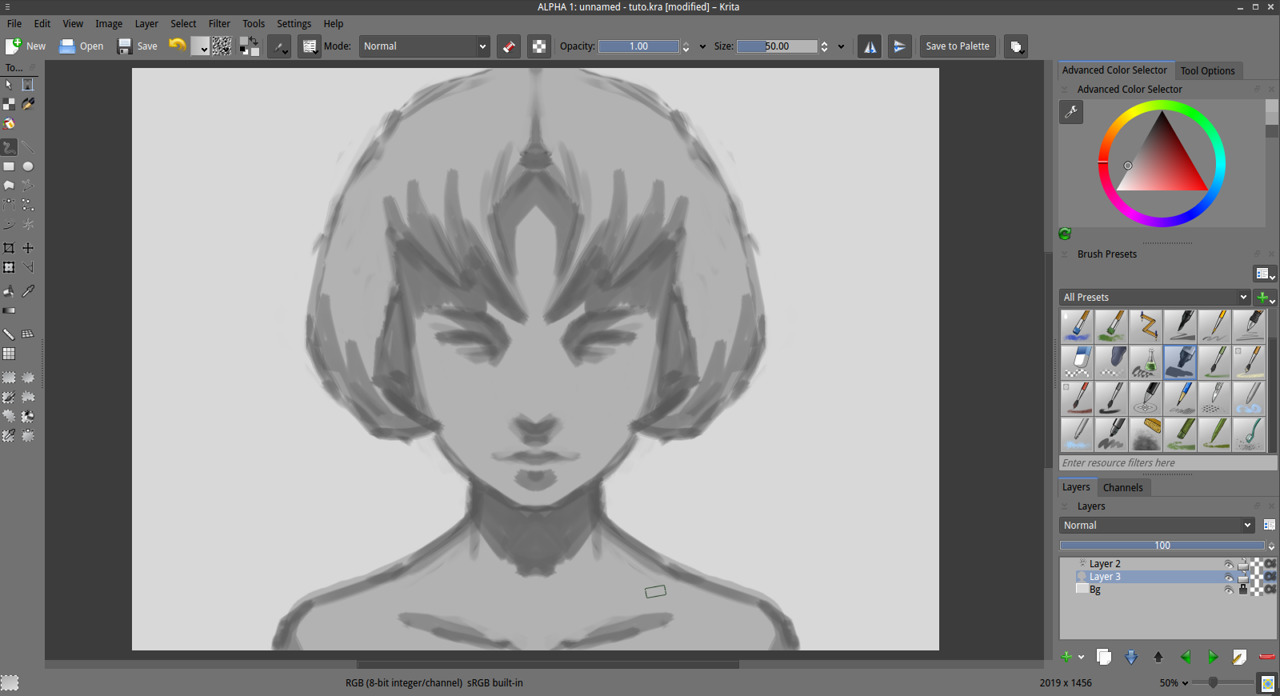
10. Select your layer with shadows, and 'merge it' with layer bellow with Ctrl+E , turn the opacity of the layer to 50%. Create a new 'paint layer'
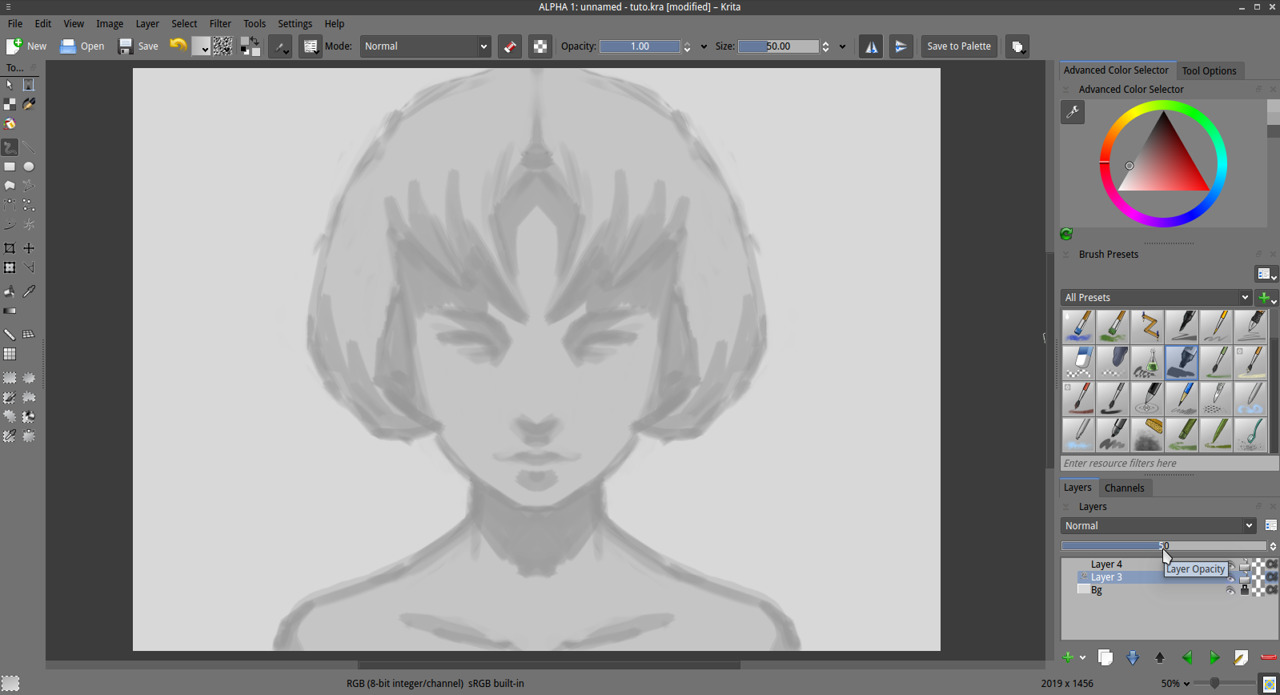
11. Select the Bristles_hairy brush again. Select a mid grey color in the Advanced color selector and start to draw more shadows by glazing successive strokes. Try to be subtle, play with the pressure of your stylus and erase when necessary.
12. Create a new paint layer. Increase your grey color a bit , to reach the same grey value than your background ( or hold 'Control' to pick the color on the canvas ) and keep working on your modeling as you would do on a three dimensional plaster object.
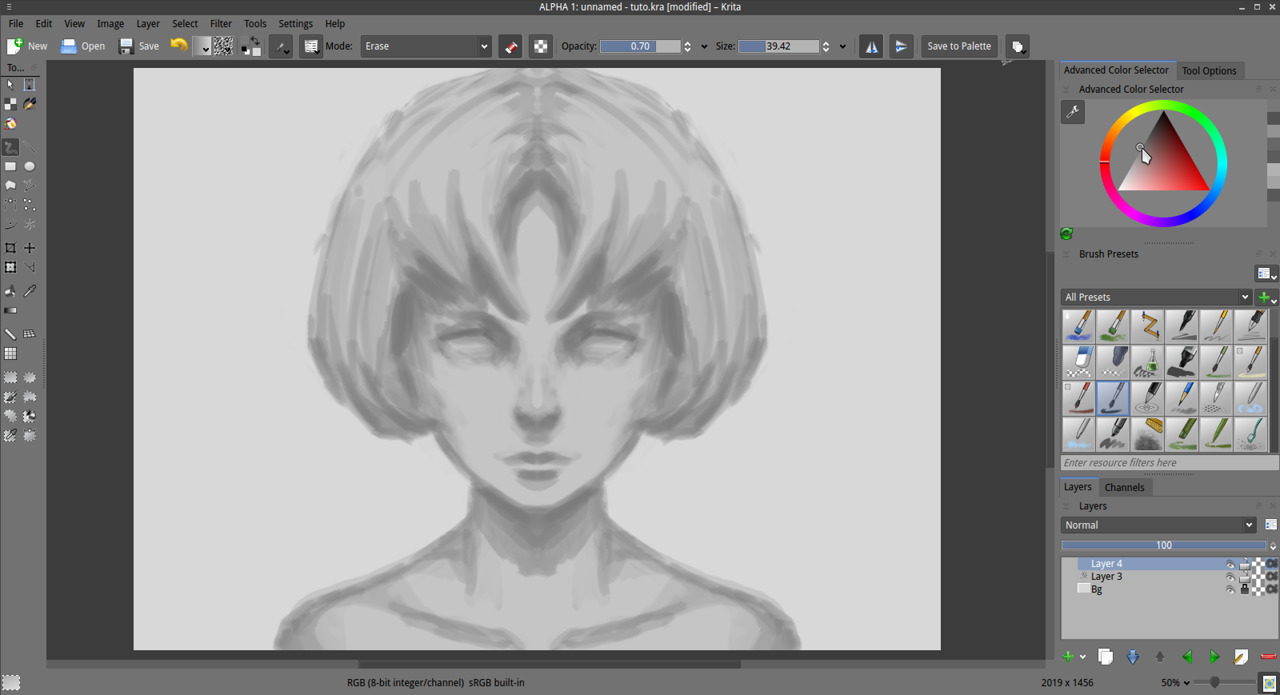
13. Merge layer with the layer bellow, use Layer > Merge with Bellow layer ( or Ctrl+E ). Create a new paint layer. Draw the facial features ( eyes / mouth / nose ) on the top of our volumes. Use only tones already present on the canvas with your brush opacity diminished to 0.70 , picking value holding Control + click on the canvas. Create hard edges where you can , clean silhouette contour, increase the spike aspect of some shapes. This part is ideal to fix things. Take your time and keep the bigger brush size you can, reduce only if it's necessary .
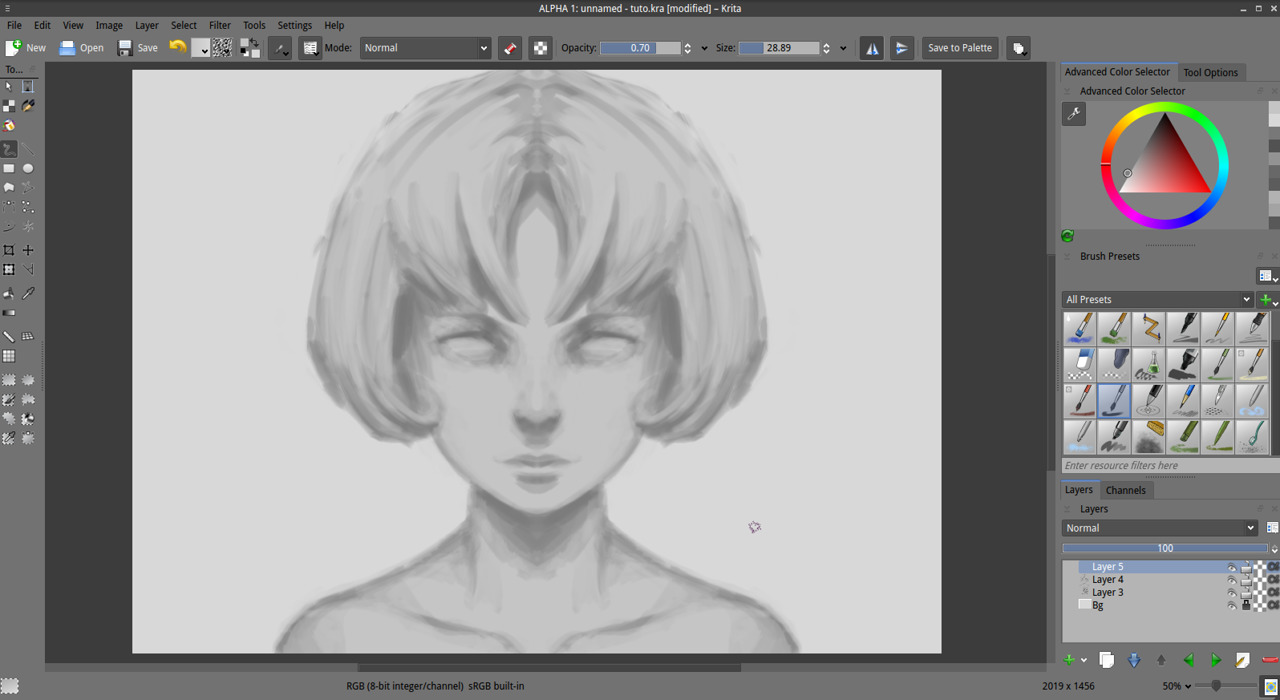
14. Create a new paint layer. With white and same brush but now 0.50 opacity paint now only the glossy parts of the face, and the hair : or the more smooth or greasy part ( or the area receiving naturally more light in this lighting setup ). Be also subtle here too.

15. Create a new paint layer. Add some definition and details with a hard thin brush as the default brush preset 'Layout_Oval' and start to bring harder details to your drawing. Especially for glossy point or materials. You can add glossy reflective points of light with very bright values, almost or white. Shadows can be also creased a bit ; but I advice you to keep in a restricted range of values and avoid usage of darker tones. Also add some low opacity white around the silhouette to boost the contrast a bit.
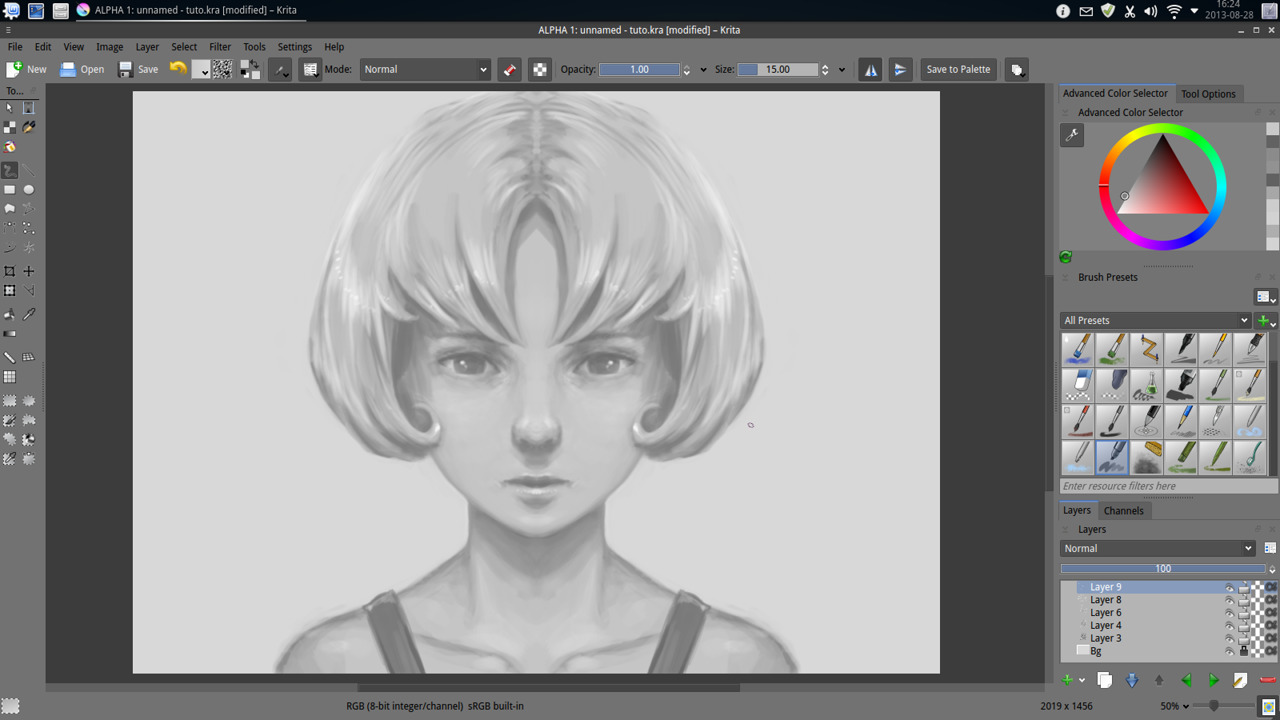
At the end , the young fictive person I drew from imagination look a bit mystic in her attitude and simplistic in the design. I'll not add more accessories or design to gears on her to keep the tutorial method clean , but feel free to keep painting and follow your imagination... I advice you to keep doodling with a standard viewport , 50% and without zooming ; and train your painting skill within a "compressed value space" ( from white to grey ). It's easier than to manage a limited range of grey than dealing with full blacks to white to get started.

This first part of this tutorial end here. Next part we will colorize it ! Go to the next part now
Repeat it again till you'll feel more confident with the steps to replicate without this page. Create monsters, girls, men or robot head this way with focusing on giving the illusion of volumes and the modeling/shading. The fun is really here : creation. Feel free to have a watch to my other mirrored portrait black and white speedpaintings .
A question ? Want to share the link of your results ? Discuss ? use the comments, I'll be around and participate too :-)

142 comments
thank you,
really helpfull
Every time amazing. Thanks david.
Wow! Thank you very much, love your posts about krita and paiting!
@All : Hey , thanks for the encouragements, it really helps for me to continue on the part 2 ( already written , I must do screen captures now and publishing work , should be posted by Wednesday ) .
I am going to use this as an excuse to return to art again. My still "unknown" neurological condition has stolen just about everything from me, including all my past efforts but hell David, you helped me get into it a few years ago but damn I want to try again. I have nothing but time now even if my muscles don't always do what they are told to.
You remain an inspiration to the FLOSS community as a whole and to me.
@Nathaniel Schultz : Awww.... Thanks ! All my encouragements for both your art practice and also your health. I should post the second part today after I finish my painting hours for clients. I written it already on Sunday afternoon , then did the screenshot yesterday. Things will probably start to be more interesting when I'll finish the part 3 ; I prepare a new serie already focused more on the art. This 'getting started' focus on the software.
I felt I should appolgize to both you and the community since when this really started to hit home I was working with you and others on the Argosian Mint project and some Wacom Tools, all of which ended when my cognitive skills took the nose dive. I really like the getting started with the program part for part one because I need that kind of basic thing. I have trouble learning still and it takes quite the effort to figure out things that came so easily before. So while I cannot contribute I can, I suppose, enjoy and try.
By the way is there a means by which we can donate to support your efforts? I look forward to the next part, though i am still trying to get things setup.
@Nathaniel Schultz : No need of apology ; the Argosian Mint and documentation you let was brilliant and the Mate solution was a real breath when the Gnome2 get deprecated to Gnome Shell / Unity hard transition happen to the Linux desktop ; I also learned a lot from it about bash. Without this skill I could never did the https://github.com/Deevad/compilscripts :-) Thanks ! This tutorial series just propose a path ; but as you can see , I work with layers by workflow 'step' and not by depth of the picture. It's a sort of security to can erase also the layer if I start to be destructive, or turn off/on layer visibility and ask to myself the question if the actual pass really enhance the picture... I also try to keep a single tool/preset as long as possible to just darken and shade . Then take one and enlight the overall ... etc... I feel more productive this way than working area after area.
About donation ; I prefer to not ask for ( you can't see *yet* any Paypal button on my website ) . I do this tutorials and effort on my free-time , after daily painting for money to my client. Maybe it can change one day ; but then I 'll ask it directly to the user under a kickstarter form or something to invest into a long open tutorial series, or for a documented project comic or wathever ( not planned, just random ideas based on what I already did with Sintel / Tears of Steel / Chaos and Evolutions / Blend&Paint ).
Real heros are Krita developers ; they work hard and if you have a donation to make, I encourage to give them a bit ; they have team member working almost full time on it thanks to the donations and that's why they can keep a wonderful amount of features and bug fixes each 6 months. I would love them to have more funding to assure the sit of talents. Just a idea :)
Ce que tu fais est magnifique je voudrais atteindre au moins 1% de ce que tu as!!!
mais Krita me deteste ou detste mon vieux pc ppa, Compilscripts, stable, rien ne fonctionne (ou fonctionne correctement)... alors aller sur irc parler anglais, avec mon niveau scolaire ;) ont a pas fini.
5 jour que je teste dans tous les sens, dommage j'avait vraiment envie de tester...
PS: Je sais bien que tu es pas une sav ;) mais si tu a une idéé je suis deja pret à formater, compiller (avec tuto) et plus si il le faut pour tester ce que tu viens de montrer sur ton blog
@regis : Merci pour le retour ! pour ton soucis d'installation, je te conseille de rester sur la version 'stable' de 2.7 ou 2.7.1 de Krita ; la version developpement est en cours de nombreux changements ; opengl2, Qt5 etc... qui la rende réellement difficille à suivre. Surtout sur les bases 'buntu de systême qui ont beaucoups de bricolage dans les paquets pour rafistoler les besoins d' Unity.
Si tu veux rester sur la base 'buntu ; le plus simple est Kubuntu 13.04 ; qui propose 2.7 dans les paquets et l'optimisation avec VC 0.7 pour etre plus rapide. En solution plus rapide et légère pour un vieux PC , je conseille Manjaro 8.7 ; Xfce , basé sur Ach Linux ; le gestionnaire de paquet est à jour et a Krita 2.7 installable facilement. Seul bémol avec Xfce : pas de panneaux de configuration pour Wacom ; mais si tu connais Xsetwacom et les script ; pas de soucis. Bon courage !
Bonjour et merci!!!!! Après plusieurs galere j'ai reussi!!! maintenant il faut que je me mette au travaille ;)
Kubuntu 13.04 => apres mise a jour et instalation krita 2.6.3
Manjaro 8.7 => apres mise a jour 2.7.2
en plus chez manjaro il y a une version openbox ;) mega leger!! et moi qui avais peur de passer sur Arch grand merci a toi!!!
je partage mon album screenshot!
Bon parcontre il me reste Xsetwacom :(
I have a question about first two steps. What for need to create 4k*4k res canvas and then crop it? It is better than create, for example, 2000*1500 px canvas from beginning?
@regis :
je suis aussi en train de passer a Manjaro. et openbox , awesome et xfce sans compositing sont les 3 DE avec les meilleures perf 2D. pour xsetwacom, j ai un mini guide sur un guide pour installer Linux Mint 11 sur ce blog. Chapitre Wacom .:)
@kot-barbos :
hi Kot, yes you can create also a canvas from scratch. My tip can do 2 things : 1) it produce a sort of infinite canvas where you can decide later to crop a sketch as a landscape or a portrait. sometime its hard to anticipate this at canvas creation. My second tip was to adapt a canvas to 50% any screen size. to be sure everyone would get same brush behavior, even on a small screen.
Hi! I got a question, I was fallowing the tutorial, and when I was doing the sketch of the face I used "E" to eraser and I continue the sketch, then I started to do the shadows after I finish, I made a new layer to use the fill brush and It didn´t work and I was like What Happened , so I realise that if I leave the cursor over the layer thumbnail I shows some marks, and those were the places were I used The eraser and I tried to paint again with the fill brush and I discover that I can only paint with the fill brush on the sections were I erased, I seems like a clipping mask, I can only paint if I make a layer on the top, but If I put the new layer between the layer 2 and Bg still apper to be like a clipping mask. I don´t really know how to fix this, can you help me?
@Kevin Caravaca : Hi Kevin. I think you accidentally presed this icon on the way http://i.imgur.com/7vhsUGJ.jpg ( the one next to the eraser ).
Thanks for the quick response, I think I dodn´t really know if I presed that button, In fact I used the "E" on the keboard, and I dont see that Icon besides to the eraser on my version, is 2.8 pre-alpha. I took a screen capture , the yellow marks in the face are places were I erased, tha cap shows the layer config and an example of what happened if paint with the fill brush, the question Is do I have to make the sketch again or There´s something else that I can do? here is the screen cap http://i.imgur.com/FH2PUU9.jpg
@Kevin Caravaca : Hey, now I get it. It 's not about the icon I mentionned before. From what I saw of your screenshot , everything is normal ; you just filled all the background of the layer with a solid color ( a grey ) ; E erased some opaque part of it ( the tooltip over the Krita layer, show in bright yellow the part transparent , erased ) , so it's normal if you paint under ( here crimson strokes ) that you can see only threw those 'holes' created on the top layer. That's how work the layer stack.
Now I get it, Thank you! so much. Have a nice day!
I've always wanted to draw, but I've never had someone to teach me and I've never set aside enough time to teach myself (though I have tried a few times unsuccessfully). However, I recently got a surface pro and came across the program Krita while in search of good drawing program. That led me to your artwork and tutorials. Last night I watched the entirety of Chaos and Evolutions and tonight I did part one of this tutorial. It took me two hours (pretty sure it took you like 15 minutes or less), which is less than I was expecting, and it turned out better than I had hoped. I have no prior skills in drawing, but because of you're tutorial I actually feel like I'm competent with drawing in krita. I'm so glad I found Krita and you and your tutorials. I can't wait to do part two tomorrow night!
I think what makes this tutorial especially helpful is the combination of instructions on how to use the software with the information about the brushes you use at each step and reference pictures for each step. I really loved this format.
Also, I love going through the layers and seeing how each layer adds a level of detail and seeing the rough sketch it started out as and how it got to the finished product.
PS
I couldn't figure out how to put a link or image in this message, but I'd love to show how my first attempt at art turned out, whether it's on here or in an email.
@Matt Michalka : Hi Matt ; thanks for the cool feedback. I'm totally happy to know my ressources are helpful ; and Chaos&Evolutions can still help even if I recorded it in a depreciated Gimp-painter fork. That's cool to know.
Yep; my blog content management system got quite poor comments options : but you can still copy paste a link to the picture ( hosted on picture hosting website ) ; the link wont be active or clickable but I can manage to open it :-) I'll watch or request to the developpers of my blog system a way to detect URL finishing by *.jpg or *.png to display them after a resize . Shouldn't be really hard to do ; but I'm bad with parsing XML.
Also good to know Krita behave well on the Surfaces. Krita really is doing better and better.
Here's my first attempt:
https://drive.google.com/file/d/0By1yGWQUrC9LNHhDQ3o5amRYSWs/edit?usp=sharing
And a second attempt I managed to squeeze in today:
https://drive.google.com/file/d/0By1yGWQUrC9LLTkyTjIwYlJ5TlU/edit?usp=sharing
They're nowhere near as good as yours, but for my first and second attempt I'm pretty proud of them. I notice that my lines aren't nearly as crisp as yours. I think it's because I didn't create hard enough edges in step 13.
As for Krita on the Surface, experimental build 2.7.8.23 now has wintab support and it works well enough to draw with. I think it still has some bugs, but I'm not familiar enough with Krita to feel confident that they're actually bugs =P
@Matt Michalka : Oh yes, there is still a lot of bug ; but not major or critical : the team focus on solving almost immediately all the bug who does crash or freeze. A lot of remaining bug are linked to usability ; or result expected with different output.
Thanks for sharing the result of the exercice. It also can help you to practise fundamental of drawing to have better volume underneath and know where to place hard edges. the book "Andrew Loomis - Successful Drawing" is a really good one with fundamentals, same about 'drawing the head and hand' . You can find them here : http://www.alexhays.com/loomis/
Have a good study time ! and thx for the feedback.
Hello David ! Have you plan make some live stream video at livestream.com, i really want to see your live work, it would be fantastic.
Hey a little something I'm wondering is how you made that GIF image at the bottom; What software did you use?
@Cestarian : Hey, I used Gimp for this one. Just make all the frame as layers in the layer stack ; convert the picture mode to use 256 colors ; then export to Gif file. Their is a dialog when you export as gif with option ( frame/second , loop , etc... ).
:O didn't know it could do that. Thanks!
Hello great and powerful Revoy! I have a question but I kind of figured it out. I had heck of a problem with step 9. I guess I ran into the same problem as Kevin. I read your response to him and understood it but I was just wondering if there was any easier way I'm just not seeing to do the filling step. Currently I'm just erasing all my white/grey area so i can fill that area in. When I look at your pictures it looks like you didn't do that at all. I feel like I just completely over looked a step. Anything you can over would be greatly appreciated.
My picture so far so you can take a look at it:
http://i.imgur.com/GVLP4Dj.png
Also I love your page, I think you're going to start getting me back into digital art. I just recently got a tablet and was using gimp having a heck of a time drawing in there. I was on the edge of just giving up because I always get so frustrated drawing with that program. Then I got referred to your page and I just love how you actually want to help other artist just starting out and people that have been doing this for a while.
@Yaffa : Thanks for the sweet feedback :-) Thx for the screenshot, it feels like your top layer ( thx for the preview ) has a background flat color. the Dark holes you the "layer preview pop-up" are holes of transparency.
To correct it, go to Filter > Color > Color to alpha ; and while the dialog is open, fly over the canvas ( a color picker icon should appear ) . Pick the grey background color. And press ok. It should remove the bright-grey background colors included by error on your top layer. Good luck
( by the way I think you use a too small brush. At this early step, don't be affraid to use a large brush, and imagine the face as a low-polygon model as in the first generations of 3D video games. )
Wow, thanks for the quick response! That did the trick though thanks.
I was thinking to myself after I finished the first couple steps that I might of made the strokes too small but I thought I was just seeing things. I'm probably going to redraw the whole thing after I'm done with it. My biggest challenge with drawing is getting the basic shape of something at the start. The start is always the most difficult for me. It's just something I need to work on and this is defiantly helping a lot. I'll defiantly be using you as a reference : )
@Yaffa : yes, the start strokes are really important. That's why a lot of artist likes to do sketch or speedpaintings ; mainly to practise first strokes ; and not spend too much time on finishing ( finishing is relatively easy compare to setup the right fundation underneath ). It's also fun, because you can go from a topic to one another very fast with skech/speedpainting ; and just enjoy to have a creative flow.
There is forums with thread ' dailysketch' with a lot of themes idea. ( eg. on cgtalk, or concept-art.org )
Have fun while painting !
I'm totally newbie at digital painting, but I really tried my best to follow this tutorial, but I'm stuck at the 13th step, how do you make those strong lines, and details. (What I mean is before that step it looks like you actually painted the image but at this step it almost looks like a drawing) Could you explain me this?
Thanks for the links I will definitely go and check them out. I'm pretty sure they will help me and It will be fun switch between several drawings. I just wanted to share what I ended up with after I finished this.
finished product:
http://i.imgur.com/ghPcx9b.png
After finishing it I definitely can see where I need to improve on (mouth, eye's, facial features, shading, lighting, and how to make better use of proportions). I do have to say though, I'm really jealous of your shading abilities you just make some areas just so solid. Like I said before this has helped me a lot and given me a lot to think about. After I finished this and compare it to my other drawing I just think to myself, "wow I can actually draw this". I know I still have a long way to go and will always be learning but this is definitely a huge step in the right direction so thanks for all over this and continue helping new artist get started.
@Yaffa : Hey, thanks for sharing your result ; yes, making solid volumes and give the illusion of depht, light and materials texture is defintely a challenge.
What I wanted to share with this tutorial was also how to work with a palette of grey tones, and transmit this 'sculpting' exercice with light and volumes.
Good luck for your next exercice and carreer path to take skill in digital-painting :) it's long for everyone but rewarding !
Hello David, I have a doubt. The hairy brush has pressure sensitivity, doesn't it? In that case, it doesn't work to me (the result is like using mouse), but other brushes work perfectly and I have installed your brushkitV3. Do you know what happens? Thanks for these tutorials :)
@Fran : Hi Fran, thanks for your feedback ; Probably the issue is about my V3 brush were designed for Krita 2.7 ; and now you use probably 2.8 version, or even a beta experimental between 2.8 and 2.9. This V3 brushkit went 'inside Krita 2.8' so normally you should have the brush already inside Krita default big set ( just the team changed a bit the colors to be less saturated ). So, I recommend to use the default set. It's hard for me to track change ; the dev team is too fast !
By the way, I updated my brushkit (v5) for 2.8 here : http://www.davidrevoy.com/article238/ressource-krita-brushes-v5 ; thumbnails are different, and effect a bit too ; but in overall it's should be not too hard to find equivalent brushes.
Hello again David, I could fix that problem, thanks for your response. I have another doubt, in the step 12, I don't understand why you choose the color of the background. I mean, wouldn't it be better choose the main color of your drawing? (The color that you have used to fill the drawing in the step 9).
I think this because the background has a smaller gray value than the fill color and it can generate zones more illuminated. Thanks in advance :)
Here my currently drawing after the step 12:
http://i.imgur.com/VolWrFm.png
I am being very patient :)
@Fran : Hi, sorry for late reply :)
For the background color ; sure you can. I wanted ( I presume ) just to pick a brighter grey value to work on modeling.
Congratz for your work in progress. Thanks for sharing a screenshot ! True, following a tutorial ask a lot of attention and patience , and I hope you start to get a better experience of how Krita behaves, and how tweaking opacity of the brush can be important for adapting thin stroke of glazing for darkening or brighting.
I really need to pick up some new techniques so I'm about to follow this again, I just noticed however that you are using the sRGB color profile, that's a no-no.
This video will help you understand why. https://www.youtube.com/watch?v=RhM_dStKinw
You should try to use Adobe RGB (1998) ideally to unleash the full potential of your coloring beyond the limitations of what sRGB can display (which may even be less colors than your screen can display)
Salut David,
Déjà bravo et super tuto (qui est toujours en cours de lecture de mon côté => mec pas lent, ni procrastinateur).
Je pense que tu peux ajouter le lien vers la troisième partie puisque disponible (du moins je crois :P).
Autrement et bien que ce ne soit pas un point hyper important en regardant un peu, tu ne précises pas ton changement de couleur au point 9 qui va du gris foncé au gris clair.
Encore merci pour les ressources dont tu mets à disposition.
PS : Préfères-tu les commentaires en français ou en anglais ?
@Aurélien Léger : Merci Aurélien ! En effet , le lien vers le tuto n°3 n'avait pas été mis à jour, et le changement de couleur manquait en n°9 . Merci pour ce retour , j'ai mis à jour.
Pour les commentaires, je préfère **personnellement** en français car c'est plus facile pour moi de les comprendre et d'y répondre avec précision ; mais **collectivement** je préfère en anglais car toute l'audience capable de lire le tutoriel à accès aux informations des commentaires aussi.
:-)
Just a few notes that got me stuck (in case somebody has these problems, working on Ubuntu Gnome 14.04, Krita 2.8), 1. Sometimes the "save file" gives you error when creating a new file, write the file extension manually to work it around (filename.kra) 2. The crop tool is unusable! weird bug that doesn't allow you to use the crop tool IF your tool layout is bigger than two or three icons (meaning you see two or three tool icons in a single row). :D Your tutorial is amazing! I started coloring in gimp and then found Krita but i didn't quite get the hang of it, plus the pure art tips are stunning, I've also been using Ubuntu and FLOSS for a while, your tutorial also inspires me to remember why i made this choice so long ago. Thank you so much!
@Sergi : Hi Sergi,
The 'Save' and 'Save As' got fixed in the latest stable 2.8.5 ; but the Ubuntu packaging system is lagging to include it. So, if your version is still 2.8.2 or ....3 you can update it to 2.8.5 with the kubuntu update repo ( safe, this repo with 2.8.5 is what I use since May 2014 without any issue) :
In a terminal ; copy this line one by one ( Ctrl+C ) and paste in terminal ( Ctrl+Shift+V )
sudo add-apt-repository ppa:kubuntu-ppa/ppa
sudo apt-get update
sudo apt-get upgrade
Thanks for your words about my tutorial !
Hey! I've...attempted at trying to draw it...And i'm really not sure how you make it look so smooth and shaded, mine is just thick lines, when yours is kind of shaded.
@Oliver : Hi Oliver, it's probably because I have more practice at painting faces, shading and I know the volume of a face ( even If I change here the proportion to match my style ). Keep practising, and study how the shapes and 3D volumes works in a face. Good luck !
oh thanks goodness, i think we can only draw these image in tablet or paper, and then scan it from the printer. ( -_- dont have the printer ) hahahahahha. time to draw draw draw ^_^, krita i come to you :P
Saved as a favorite, I like your blog!
Sorry for this stupid question but what is the "Select the 'Fill brush'" ?
In deevad-krita-brushpresets I don't find it (only"filling dots impressionism" and " fill shapes")
Or is it the bucket on the tools panel ? Thanks.
Edit : Ok "Fill Circle" in Krita tools woks well for me (Sorry just beginning Krita)
i cant even get pass step 7, i have no clue how to paint a face like that. i tried many times but the result was always somthing like a Monster. anything else but not a Girls face
@taifun : Hi, yes, this tutorial shows how to use basic Krita tools, but not tells basics of drawing. You probably should learn as a complementary exercise tutorial about human head proportions to draw faces.
wow i just took a look in ur paintings collection and i cant even imagine to paint like that. how do u do that incredible. one question do u have a starting Point if ur skechting a human face? du u start with the nose or somthing else? does that even matter?
@taifun :Thank you, I usually start with general volumes a sphere flatten on both side, with an extruded squary triangle for the jaw ; then I crease the eye socket like a venitian mask ; and when I have the correct perspective for the eye socket I extrude the nose , and lips . You can find here http://www.alexhays.com/loomis/ a lot of PDF book of the best drawing instructor ; his style is probably a bit vintage for both academic and cartoon , but the method and lessons are still very modern.
Merci beaucoup Monsieur
Thanks! I always drew by hand, and one day I got a Wacom tablet. I really sucked at drawing with it and it was just collecting dust in a drawer until I found this website. I'm getting better every second I use it!
@Opal : Thank you for the feedback !
good evening
i came back after some practice and heres what i got: http://i.imgur.com/kaEMzCX.png
the mouth Looks kinda weird but the rest is not that bad i think
Hi, thanks for doing these - made the whole layering process seem a lot less intimidating than figuring it all out on your own :)
I have a question tho, when learning and practicing, should I be using symmetry tools like this? I'd sort of assumed it would hurt my learning if I relied on that, but is that just depriving myself of useful tools? (obviously shouldn't be used for everything since then it becomes a bit eerie looking)
Anyway, here's my attempt --- can't seem to help but make the eyes too big hehe.
[url=http://imgur.com/uAH5PsZ][img]http://i.imgur.com/uAH5PsZl.png[/img][/url]
It was fun, and as you said, very rewarding feeling of 'completing' it (well, this first step of the tutorial anyway).
OK let's try that link again...
http://i.imgur.com/uAH5PsZ.png
@Jonathan :Hey, thanks for trying. I should update this tutorial soon, the Krita interface is changing in recent version and I probably need to redo the screenshots.
>> I have a question tho, when learning and practicing, should I be using symmetry tools like this?
No, for learning drawing , it's important to train drawing objects into a sort of 3D space. Symmetry flatten a bit all, it's just fun to train for a "getting started"
>> I'd sort of assumed it would hurt my learning if I relied on that, but is that just depriving myself of useful tools? (obviously shouldn't be used for everything since then it becomes a bit eerie looking)
It's useful in other cases : Sometime backgrounds can be symmetrical, character design sketching can be done from front view, model-sheet for 3D artist too ; vehicle top view sometime too.
It's just a tool, but it's also a nice exclusive feature of digital compare to traditional. That's why it's entertaining to get started with it.
>> Anyway, here's my attempt --- can't seem to help but make the eyes too big hehe.
Good work ! If you want to improve, have a look at facial proportions, there is a set of easy rules based on third, half, etc... and easy guidelines. Many guide cover it. It will help you to make more appealing characters from imagination.
Thanks for the answer :)
I've been going over a lot of tutorial videos for that kind of stuff, but it is a lot to take in at once as a beginner, obviously (including your old Chaos & Evolutions video, about halfway through and liked it a lot so far, it is nice to see the whole 'process').
I'm actually watching a video about the eye right now, and noticed how many of the 'common mistakes' that he pointed out, I was doing myself :P
@Jonathan : true, taking skill is a long road of little success here and there. Anatomy of small part of the body is rewarding ; eyes, mouth, nose, etc... are perfect topic to start with anatomy. Good luck with it.
I was wondering if there is a way to get shortcuts to work for a tablet? Id like the undo tool to be on one of the buttons on my pen but it wont work when i tried.
@Sarah : Hi Sarah, this customization depends of your tablet driver, Krita can't change it. If your tablet driver allows it, just assign Ctrl+Z to this button. ( eg. On Linux with Wacom , only KDE 4 can do it with a user interface ; for other, you need to use a xsetwacom command line. I can help with it ).
Hi, I just wanted to mention I would be very pleased if this was updated to the new version of Krita, I love the tutorial. But honestly, its a little difficult to use with new version. You basicly have to mess around with functions until it makes since with your tutorial and i think that defeats the purpose of it. No negativity here, Love your artwork and your the time you took to make these tutorials in the first place ^-^
@Michael : Hi Michael. You are right, I made an update 2 month ago to be sure all the tutorial is still compatible with 2.9 series ; but I couldn't also update the screenshot and they start to differ too much. I'll see if I can spent time on it to do a new symmetry portrait, mimic the same screenshot, and replace the images one by one. It can easily take two full days of work.
Im honestly just very impressed with the quick response. I thank you for the obvious dedication but dont want you to feel obligated to do this at all. I'm just new to Krita and its honestly my fault for not playing around with the tools more before i post judgement. But thank you ^-^ and keep up the awesome work!! ~p.s. im impressed with the broad range of projects, such as a concept artist/storyboard for tears of steel.. Its their loss that they didnt incorporate more of your concepts and ideas into it..~
@Michael : Thanks for the feedback! I just finished a new theme for my website ; this one allows me now a bit of more flexibility ; I could tranfert the 3 'Getting Started' tutorial into their own category ' Tutorial Beginner'. Next step will be to redo them. ;-) I also added 3 new tutorials, and plenty of Pepper&Carrot making of and sketches.
I see about the gray now, I think I will need to do this with many different pictures before moving on to the next part. I wasn't using enough layers and was using black outline.
I was all around your site and found where I was using color wrong by not moving on to the next step, that helped a lot too!
I will be talking with my library about getting the books you showed along with your site; they are starting a small studio for young people, for learning and painting.
Okay, I'm going to get some coffee and get to work, Thanks for the info!
@Will : Have fun painting, and thank you for the feedback :)
Very good tutorial. I felt like I had some sort of entry barrier into Krita and it feels like this helped me break through. Thank you for posting it!
I decided to try the technique taught in this tutorial with my own art style. I messed up a little when I chose the mid-grey tone which caused the brightest shade of grey to become a highlight color... Which is why I've stopped before the stage where pure white is added to the painting.
It's late at night right now so I won't be continuing this drawing... But I will try this tutorial from the start on another day.
http://s8.postimg.org/x4c7p1779/02_first_krita.png
@Shahar Korren : Thank you for giving a try to this tutorials and for the feedback. You have a smooth and delicate shading and already good proportions, keep painting! ;-)
great site and tutorial.
been a traditional artist for 20 years, finally bought a tablet . was so against digital media for the longest (something about mixing paint I need in my life)
your site and krita is slowly making me a believer
http://s14.postimg.org/az05jxmdd/Screenshot_4.png
used the same techniques you described.
picture of coarse is different. I wanted to see how much contrast I could get and test the pressure sensitivity of my pen.
my first digital portrait
Thanks you so much for doing this tutorial, is awesome ^^
I had so much fun doing it.
This is my result:
http://36.media.tumblr.com/4c1ecccae7bd42c3bbf4d453cc5dd500/tumblr_o2apf0CIWA1sjj5hpo1_1280.jpg
Hey, thank you Chris and Innae for sharing both your results!
Innae; beautiful character! Very appealing design and face style.
Thank you David ^^, I´ll keep practicing it.
Hi David, thanks for your amazing tutorial. Here is my result following your steps. Thanks for your comments.
Sorry, here it is.
http://imgur.com/lzTtEw7.png
@dancingmelon : Good job on the rendering for the shiny/glossy hair, and also for the right proportion for eyes. Maybe neck and nose needs a tiny bit more work to feel in volume, but this is anatomy training. Thanks for sharing your result.
Very very useful post for all of us and i'm delighted to see this tutorila reason i'm finding such tutorial.
My first attempt. I'm not proud about messed up hair and few things. Just started to draw something else than doodles in notebook :)
http://imgur.com/flmmFum
Really sorry. Here it is :D
http://i.imgur.com/flmmFum.jpg
@Dobry : Hey good job! The weak parts are the nose ( not easy to draw because it's a volume in the direction of the camera ; and need to know it's anatomy ) and the neck. Thanks for sharing your result about it.
Thanks for this wonderful tutorial. I just started with Digital art and tried the first part of this tutorial.
And here is my result.
Question: Did you do some blending in this first part to achieve the smooth shading effect?
http://www.nediljs.com/images/MyTest/small.PNG
Final try to load the image. Sorry!!
http://www.nediljs.com/images/MyTest/small.png
Really awesome tutorial. Thanks for sharing your knowledge!
I´m abandoning Gimp. Krita rules!
http://www.newgrounds.com/art/view/claudiovfd/training-in-krita
Thanks
I'm in awe with your style!! Simply chapeau bas!! Could you tell what's your favourite manga? :) asking out of curiosity, but men, you're great!
Is it only just me, or is the GIF at the bottom corrupted for anyone else? It turns green around step 10 and starts over.
Hey, that's right ! thank you for the feedback ; I probably had a issue on the last backup/move-of-ftp server. I'll try to re-upload it soon ( if I find a non corrupted backup )
it is an amazing post ..but it seems very difficult to draw a face or something with mouse..
.____. Its hard doing it in Mouse :l
Thanks for the tuts ^_^
Well, I have to say thank you for pushing me to start drawing again. The guidance really made me push forward!
I see allot of people here that followed the image but I just can't do that, that's the must fun part of drawing since I was a kid. Yeah, I've talked too much here it is:
http://i.imgur.com/0LmTruy.jpg
Imma do the coloring part now, really excited!!! *-*
Thank you for sharing your progress, and good luck for the next parts of the tutorial!
( sorry for the outdated screenshot, hard to maintain something about Krita, it evolves sooo quickly :D )
Hello David!
For starters, I just wanted to thank you for everything you're doing for the community!
I started with Krita and have been practicing digital painting both at college and home. However, I can work only design-related illustrations at college as I'm studying industrial design, I think concept art and illustration in general are great for me to just expand my outreach and learn as much as I can about the entire field.
I found this series and immediately started working on it, slowly and carefully implementing all your guidelines at every step and now I think I've reached somewhat of a satisfactory black and white portrait, having added some of my own style elements. Especially, the eyes and the blurred out clothing(which to be honest resulted slightly out of lack of willingness to render clothing lol). I experimented with the movement of the eye and what they would invoke, how different eye sizes can evoke different emotions and reveal the same person as having different character traits. It's truly amazing how just the eyes can communicate so much of what the person is like.
Here's the image file and I do hope to get bashed with criticism lol.
http://imgur.com/5iyc0Im
Thank you once again!
I don't know how to make it visible here lol
Lemme see.
i.imgur.com/5iyc0Im
http://i.imgur.com/5iyc0Im.jpg
lol please don't embarrass me again, imgur!
Hey, I was using my laptop for this.. So it isn't as good as I wanted to be. Thank you so much for this tutorial. I'll post the one in color.
http://i.imgur.com/a/MZaT0
Update:
I did this right after this one. I don't know why I didn't post lol
http://imgur.com/a/HhDUW
This is incredible, very nice job! I tried it, but I am only a beginner and it was a bit too hard for me, nothing to do with you or your tutorial, I just need more practice. I really like your tutorials, maybe next time you could post some guide for beginners on drawing manga? Something like this <a href="http://www.painterartist.com/en/pages/draw-manga/" rel="nofollow" rel="_blank" title="http://www.painterartist.com/en/pages/draw-manga/">http://www.painterartist.com/en/pages/draw-manga/</a> would be very helpful, or your drawing process perhaps, I'd like to see and learn :) Thanks :)
i noe, write a book!
Hello! Thank you so much for your tutorials David! I'm new to digital art and I decided to try it out with Krita :D
I do have one question though, if I want to make a landscape on the background, do I have to change my bg layer so I would draw the landscape there and then color it with grey on another layer or what should I do? Thank you very much for your response and please keep up the good work! :)
Hi, thanks! Good question. This digital-painting technique as it's own limits ; and one of them is this technique ease working on the overall picture ( compositing layer after layer to split the grey and color ), but make difficult to split elements of the painting ( eg. a character and a background ) . It's always possible to do two layer groups ; and redo the full layer stack for each of them. The character can even use 'alpha inherence' feature https://docs.krita.org/Clipping_Masks_and_Alpha_Inheritance to not do stroke on the background.
Ah, alright. Thank you for your quick response! :D
Okay, to be honest.. I'm kind of dumb and I don't understand what are alphas and alpha inherence xD Please pardon me, can you explain it to me? I'm really new to all this digital art and I don't know all the terms yet xD
Alpha = a complicated term to say 'transparency'
Alpha inherence = a layer mode, the little button ' α ' in the layer stack in right of each layer.
It's an advanced feature a bit complex. That's why I linked to the documentation, but this one is complex too.
Just skip it for now, I'll note it on my to-do tutorial :)
Ah, okay, I think I got it! Thanks!
But when should I paint the back ground? While I'm sketching the character or while coloring or whenever I want? I just need to have a starry night sky with grass xD
Here I advice to paint/color the background before the character ( the character needs to have an sketch or a drawing done, so you know what part of the picture you don't need to details ). Having the lighting from the environment will give you a lot of hint on how to shade your character.
Okay, I'll try that. Thank you very much for everything, take care and see you soon! :D
sir ,you are doing an excellent job...keep teaching us
Hello,
First of all, thank you for this amazing tutorial! I'm now trying to apply it to an old drawing I made, a while ago. Unfortunately, I have come into a problem as I was practicing the drawing technique you use. I am at step number 13 and I am not if I should draw clothing very opaque ... If i only softly press on my table pen, it will be very transparent and almost invisible but it will conserve the lighting I worked on previously, to portray the body shape. And if I make it a 100% opaque, i will not see the body shape i previously worked on. What's the best solution? Do clothing 100% opaque or leave some transparency to keep an eye on the shading previously made?
Merci d'avance pour ton aide :)
http://hpics.li/1692265
Hi, thanks!
Maybe the best way is to reduce the opacity of your layer with the dress ( Calque 8 on screenshot ). You can also try various blending modes to get special transparency effect ( the list on top of layer box, written 'Normal" )
Merci !
Je vais me remettre au boulot et on va voir ce que ça donne. Dernière petite question: Quel est l'avantage de combiner tout les calques avant de passer à une autre étape? Par example, si on veux aller en arrière et corriger des détails ombres à l'étape couleur, ça ne sera plus possible. Donc je me dit que mettre les calques en groupes verrouillés semble meilleur... A moins qu'il y ai une raison technique derrière le fait de tout combiner(/aplatir).
Il y a plusieurs raison:
- Simplifier la pile de calques pour le tutoriel, et aborder la fusion des calques.
- Économiser des ressources (mémoire vive et taille du fichier)
C'est tout :-) Si votre PC est assez puissant pour garder les calques sans rencontrer de ralentissement ; c'est parfait.
Hi, thank you so much for the tutorial
https://instagram.com/p/Bcrd6d_hIr-/
Thank you for following it, and for sharing your result!
thanks for the tutorial , it was really helpful to start drawing in krita
and adding details to the image (i never drew in this way IRL^_^)
https://www.instagram.com/p/BdBqFJhBPIx/
I must say thank you for the tutorial. I am new to digital art and when I found Krita I had no idea what I was doing. So after I had found this, I was able to gain a better understanding of what some of the tools do and how most of the setting work. I've left a link to what I was able to create. It may not be the best sketch but I'm proud of what I was able to get done. Any feedback would be appreciated.
https://imgur.com/27xXkQB
Thank you for your comment and for following my old guide. I'll try to refresh it in 2018 with something maybe a bit more easy and updated to recent version of Krita.
I'm always amazed to see your result ; for first attempts it's really good. You only need to study fundamental ( proportion mainly, to control the effect/stylistic deformation you want with distance between eyes, nose, mouth, and head shape in general ; there is a lot of tiny tips to make all this system works together while preserving deformation of style ). Also, the main part you struggled with is probably the neck. Not a lot knows all the volumes caused by bones, muscles and other part on the neck. Studying it might help you to sculpt good neck later.
Hello! I was wondering how i could remove the Outline from all the canvas. When I was using the Outline selection tool to move something it when around the whole canvas. Do you think you could help me on this?
You can deselected all by pressing Ctr+Shift+A , or select all with Ctrl+A ( or use the Select menu ).
If you selected with the outline selection tool a part of a layer ; the transform tool should move only this part.
Check also the 'tool-option' docker ; maybe an option can be checked to move the whole group.
I hope it will help you!
As of someone new to digital art, your tutorial is great. But im having an issue with step 9. I cant get the fill color to only be in the silhouette. Tried figuring it out from the previous comment but didnt help me. Gonna link a screen shot so would appreciate some help and feedback on it.
https://gyazo.com/3d9104b849fd29f17e8e8b2c4f97f1ba
nvm figured it out
Good job at figuring it alone!
And sorry for late reply, I try to be around.
Good luck on completing this (old) tutorial.
With the release of Krita 4.0 and your heavy involvement with the creation/update of the default brushes, are you planing on updating this tutorial to work with those in mind (or perhaps just making a new tutorial)?
(btw, i'd like to thank you for this tutorial all the same. it has helped me greatly over this last month.)
Hi Fools Errand, updating this tutorial is probably 3 days full time of work. Hard to invest that in the schedule of the next month but Ill keep it in mind , its a good idea.
Great Tutorial! Looking forward to start 2/3!
Does this tutorial include newer updates maybe..?
Sorry, it is not updated; but most of the features are still the same.
Merci beaucoup pour vos tutos et le reste...
Dommage pour moi, que vos vidéos soient en anglais ....
Merci! Il n'est jamais trop tard pour renforcer son savoir dans une langue :-)
Can you make more tutorial like this.
especially about how to paint a scene.
This is a good idea, I only miss more time to write something like this. I'll keep in a corner of my mind.
thank you so muchchchhc
How do i get rid of the white to go to the clear?
I can easily follow most of the tutorial in the current version of Krita. The only difficulty I see is finding the brushes that would be most suitable. It is hard to tell whether I get different results because of bad choice of brushes or some deficiencies in my technique. If anyone could either suggest the names of the brushes or describe their properties/settings, that would be helpful.
Otherwise, great tutorial. Thank you David and everyone who contributes to this project and to the development of Krita.
I have a XP-Pen Artist 12 Pro ( https://www.xp-pen.com/product/479.html ) Art Tablet with Screen and use it in krita for drawing . drawing directly on screen is cool! Krita is free and I don't need anything better.
How do you enter drawing on windows 10 chromebook?
Hi, sorry I can't help. I don't own a Chromebook and i'm not sure what you are trying to do by "enter drawing". Please ask on a Chromebook user forum, I'm sure they'll redirect you to application designed for this platform. I don't think Krita is supported on it.
Great trutorial! Thank you, my first day with tablet, and first time drawing after 10years, then iot was just learning airbrush. Really like digital painting since mistakes are so much easier to fix and i can paint immediatley when i have time, no need to cleaning and preparing stuff! Thanx again! drawing on xp-pen deco 01 v2.
My try:
https://imgur.com/qHHQ1mE
Any comments will be much appreciated.
Thank you for following the tutorial @murdock !
Good result (impressive if it is your starts); only main feedback would be about the neck and how muscle connects to shoulder (not easy); should be easy to fix after looking at photos.
Esteemed David,
Your excellent tutorial is helping me get started with Krita. Thank you so much.
I would like to suggest that with Krita 5.1 just released, you might find time to run through the lessons and bring some of the commands up to date. The artistic parts, shading, drawing, etc. are perfect, but as a beginner, I had problems finding commands and actions which have changed in the interface.
I follow Pepper and Carrot, so I know you have other things to do making your living. It is just that this set of tutorials is better at introducing the basics than anything else I have found
Post a reply
The comments on this article are archived and unfortunately not yet connected to a dedicated post on Mastodon. Feel free to continue the discussion on the social media of your choice. Link to this post:You can also quote my account so I'll get a notification.
(eg. @davidrevoy@framapiaf.org on my Mastodon profile.)