


Calibrating stylus pressure
Update: Spanish version available on Chalo Blogg.
Intro
If you were my student, or attended one of my workshops or conferences ; this tutorial will probably sound familiar to you. Indeed, I often start my talks with a brief "how-to calibrating correctly the pressure" session. I often see a lot of digital-painters ignoring this step. Ignoring this, make them struggle when changing of tablet hardware, have not consistent glazing ability and poor digital freehand line qualities. Let's get in.
Pressure ?
The pressure value - in digital painting - is driven by a sensor inside your stylus in contact to your stylus tip. In a nut-shell : the more you press on the tip, the more high value will be transmitted to your computer. This value helps software as Krita, Gimp or Mypaint to give extra feeling to the traditional tools.
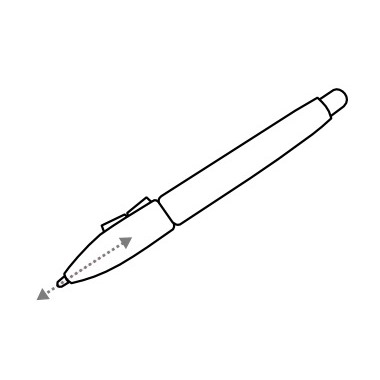
Pressure also exist in traditional media, this ball-pen ( photo under ) have variations of stroke size and opacity depending the pressure. So, when receiving high pressure, the ball tip of the ball-pen crease the paper and flatten it, making easier the ink deposit process and creating larger and darker lines. However, when the pressure is low, the ball have difficulties to roll or getting contact to the surface of the paper, making 'ghost' holes in the stroke, and revealing the texture of the paper. The resulting stroke is thinner and even often light-grey.
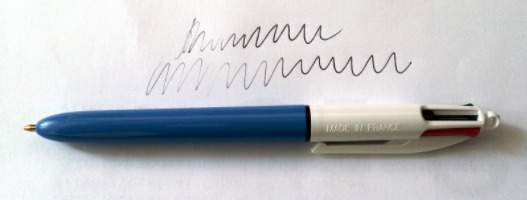 a ballpen 'made in France' and real life pressure example
With a Wacom stylus ; it's different : we are not going to crease the surface of our tablet, or lay down any ink. So, the little spring linked to a sensor inside our stylus 'hear' how much pressure is done, and return a value. Our software, here 'Krita' digest those values and according to the brush preset selected and settings interpret a stroke on the canvas. Easy :-)
How many pressure level needed ?
A common marketing bullshit strategy is to sell with upgrading any specifications numbers. Harder, faster, better, stronger... and Wacom also did it ; starting with 512 then 1024 then 2048 level of pressure. ( I bet soon we will have to count this in MP or GP, MegaPressure or GigaPressure ).
Ok, I stop useless rant here, because getting more 'level of pressure' can't hurt and even can be a good thing , it's not really something important , in my opinion. I have here tablets with 512, 1024, 2048 and the reality is with any of this levels ; you'll can't perform more variation than this :
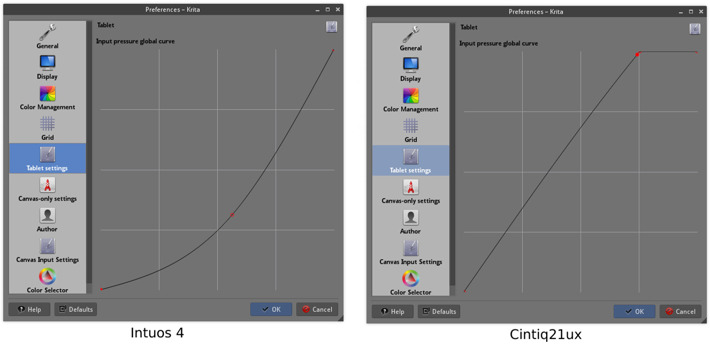
13 level of opacity done with the same brush preset ! and to be fair, most of my stroke are similar. I guess I can only manage up to 6 or 8 level of pressures decided with my hand. It does sound low, but it's already a lot. Most artist I see on videos have only 3 : the light stroke, the middle one, the full one. This was performed on a Intuos4 Medium with 2048 level of pressure, and I can do the same with a Bamboo fun with 512 , and a Cintiq21Ux with 1024 level of pressure.
I had issue testing line-art with 256 level of pressure on really old tablets ; 256 is not enough and affect transition if pressure is mapped to the line width. But above 512 , I feel Ok with any task. So , as a rule of thumb when I buy a tablet : pressure level must superior or equal 512. It isn't hard nowadays to fill this specification requirement.
Calibration : Why ?
When you open your computer at morning, take your stylus and start a first stroke , do you know exactly where is your mid-pressure ? Probably not, because this feeling change. Stress, health, energy and excitement can affect your way to express the pressure, and change daily your muscular approach of the stylus , so your "pressure" skill. Some day you will feel 'soft' and will have hand only expressing low levels of pressure ; and some days you'll feel like a warrior and put a lot of pressure on the stylus. So ; you understood it ; you need to make the computer understand what is for you a light stroke, the mid one, and a full pressure ; as well as all the in-between. Calibrating will help you to express light strokes, and full strokes without putting to much effort in your hands. If you have pain in hand after painting for an hour, it's probably because you need to put too much pressure to get the effect you want with a hand used to low pressure. If you scratch often the surface of your tablet , it's probably because too much pressure. Or, the inverse, if you feel every brush presets are too sensitive and do too much effect for you, you probably have a calibration problem.
Calibration : How-to test
The process takes less than 2 minutes , and can be done when you feel pressure do not respond as you are used to. First, you need to open a white canvas and select black color and a brush with a linear curve on the pressure. On my last brushkit ( version 3 ) the preset 'Basic Rounded' as on the picture bellow is ideal for this, and already setup to do the calibration :
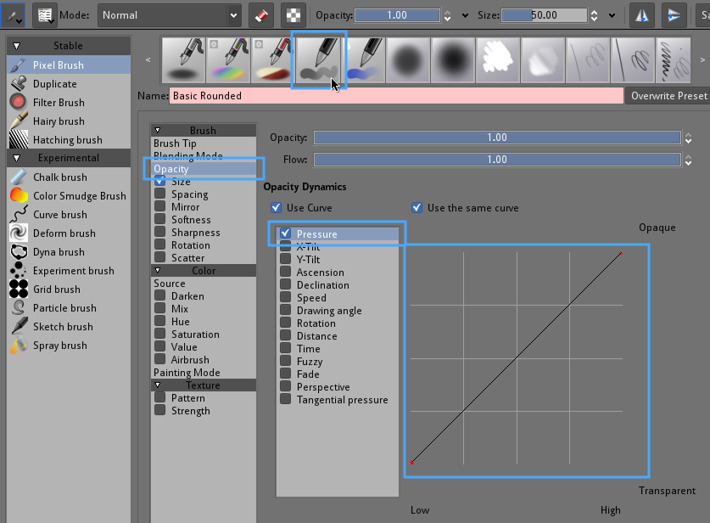 'Basic-2 Opacity' from the default Krita brushes is a brush preset ideal to do a speed calibration of your pressure
Now you'll try to paint a similar line with it, in one stroke making progressively increasing your pressure :
 Stroke exemple with 'Basic Rounded' and pressure
If you see while testing you can't really draw light grey ; or reach full blacks too early compare to what you expect, it's mean you have to tweak the calibration. If you can perform it with ease ; then you don't need to calibrate today :-)
Calibration : How-to change it in Krita
The tool is available on Krita since old 2.3 versions thanks to Lukáš Tvrdý ( note : feature also available in Mypaint ) . So, you can manage a 'pressure input global curve'. This will allow us to set a custom curve to define how sensitive we want our pressure to be.
 a curve tool in Preferences > Tablet config in Krita ( click to enlarge )
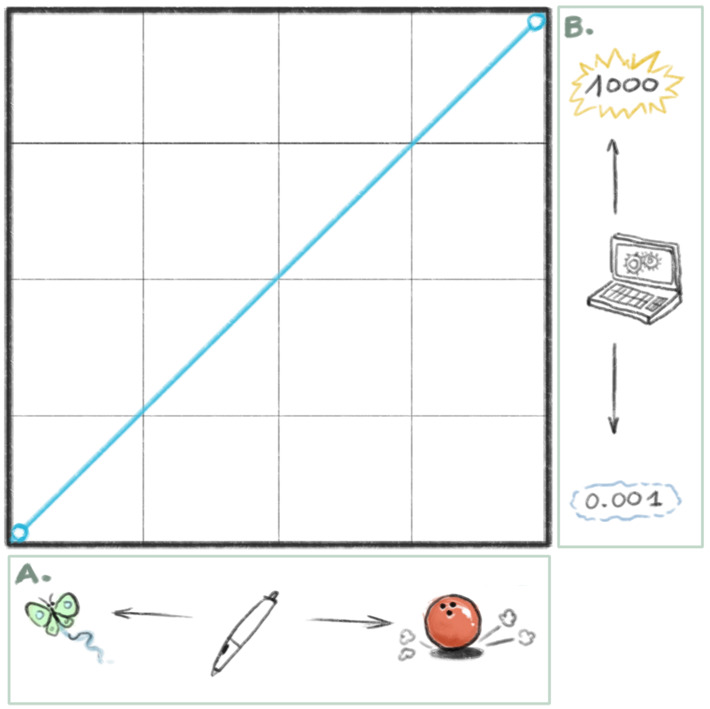
I will assume here that you are not comfortable with reading curves. So, here is a little lesson on how to read them ( feel free to skip if you know )
Reading sensor/input curves :
On the horizontal ( frame A ) you have your stylus pressure with on left light amount of pressure , and on the right a strong amount of pressure.
On the vertical ( frame B ) , you have the value Krita will attribute. Low value on the bottom or higher on the top.
So, the curve define a relation between your level of pressure and the input values.
On the example under, a 'linear' curve will just do nothing : low pressure will be mapped to low values, and increase in a linear way to high pressure mapped to high values.
To do a better calibration , you will need to move the nodes on the curves. If you click the curve between two nodes, you will create a new nodes, and to remove one, drag and drop it outside the graph.
Here under 4 example of curves, with a picture ( from left to right ) :
No-high-pressure : It mean the top value of pressure for Krita will happen when you press only 75% of the stylus. I use it on my Cintiq 21UX , this prevent me to put too much pressure and scratch the fragile surface. I also use this on a regular Intuos3 A4 , because I like to reach the 'pure' 100% pressure stroke easily without making with my hand too much effort.
Fix low-pressure-problems : I don't use this, but poeple with bad driver, or old stylus sensor might be interested ; this exclude low pressure infos ( the curve/line is starting a bit after the entry point on the lower bottom left corner ). Ideal for the syndrom of bugged stylus who 'keep writing' even without pressing it.
Soft : A curve where the pressure does really fast high effect ; giving all presets a very sensitive feeling and fast full 100% pressure effects.
Hard : Inverse than soft , this curve is good for too much sensitive tablets, and you'll have more control over the light pressure, but need to press more for getting a stroke with full effect. It's the one I use on the Intuos4 Medium.
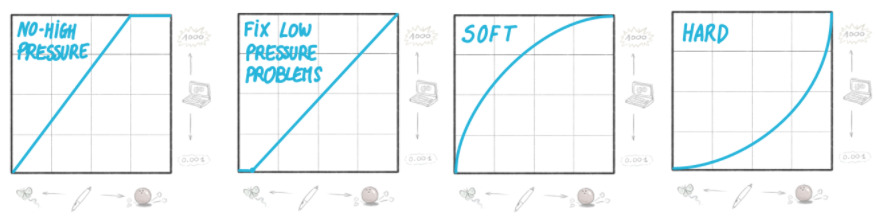
And here are the curve I use for my two main tablets here on my two workstations ; depending the day I bend more or less the main part of the line to be more soft or more hard, depending if I'm tired , or full of energy.
So, tweak the curve in the preferences , then close the dialog, retest your 'Basic' brush on the canvas , and repeat the process till you find a good setting, where you can easily most of all the opacity shade of grey the preset does, and feel to can predict it. Krita curves are not easy to manipulate, and you 'll probably need to play a bit with moving the nodes , adding some, removing, etc... to find a way to have the curve you wanted. Good luck !
Conclusion :
I hope you'll find the best setting for your tablet , and feel empowered with controlling the pressure of your brush-presets. Here, because I'm used to handle multiple tablet hardware, it's a very important feature and setup. Most of my sketches does an intensive usage of pressure variations ( ex : sketch under ). I use pressure variations to make construction light lines and drawing while keeping the same brush preset selected. I also use it when painting for glazing and opacity. So, it's important for me to know how to manage the pressure.
I hope you found this large tutorial informative !
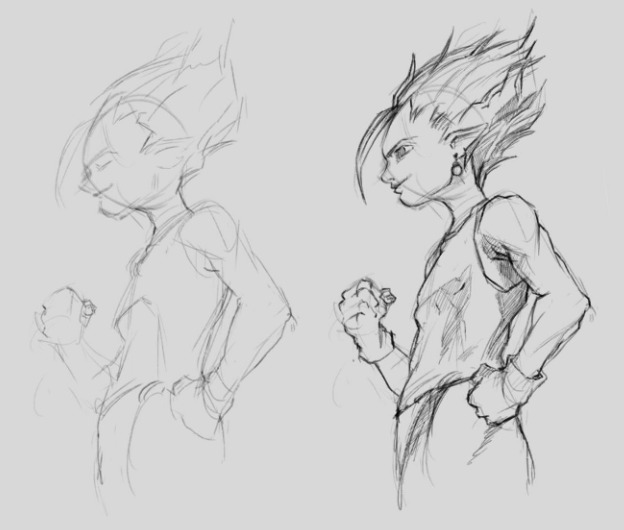 ... yes, DBZ haircuts, I can't help myself.... :-D
Link for further readings :
- A thread from Snowfly on Polycount about pressure management, (2010, English).
- A blog-post by Ghevan about pressure, curves, aspect ratio, (2012, Spanish).
- The very complete Arch wiki about setting Wacom tablets, (English).

49 comments
Super merci David !
Ah superbe, justement j'ai une petite bamboo et j'ai toujours trouvé impossible à bien régler ma pression de stylet, cela m'aide beaucoup
Every post is precious!
p.s. What about Krita on mac?
i've used the graphic tablet for years and i never taught about that O.o
merci David ^^
thank you for detailed tutorial with lot's of pictures
now I'm on the way of understanding my problem
Hi
What window decoration is on second image ? In Your tut "Linux for painters" (very helpful) You have oxygen but here on this image is another one. Imho this is better, no border, small icons etc.
Greetings
@lolko7 : Hi ! it's a custom Qtcurve theme I made, based on the this http://half-left.deviantart.com/art/KDE4-QtCurve-Google-375237379">http://half-left.deviantart.com/art/KDE4-QtCurve-Google-375237379 because after testing a lot of distribution , I fell in love for flat and minimalist theme. So I did a research for making it happen in KDE too. My changes made it a bit more near to a sort of flat Adwaita. I set KDE to use Qtcurve-GTK for GTK2 apps for perfect compatibility, and Adwaita for GTK3 apps, so all my apps are style consistently themed . For the icons , I made a mix of Oxygen and Faenza ; named Oxyfaenza ; you can find it pressing the 'Get more theme' button in icons under KDE, or my repo is here : https://github.com/Deevad/oxyfaenza ( I keep working on it ) . I hope to get time to do an article on customizing/theming KDE
Per chi ha problemi con krita ad impostare la sensibilità per esempio a me non succedeva niente era come disegnare con il mouse, io ho risolto con questa guida http://sourceforge.net/apps/mediawiki/linuxwacom/index.php?title=Wacom_Tablet_Set_Up
Lo script deve essere avviato in automatico da kde da impost. di sistema-avvio e spegnimento-avvio automatico-file di script in avvio.
Thanks a lot David for tip with Qtcurve and icons! Looks great.
Greetings
Cryx, there are some people who have managed to build Krita on OSX. There is also someone who has promised to work on the OSX specific issues, but I haven't received any patches yet. So, there is some progress, but it's slow.
Hi David. Thanks for the answer ... finally I migrate to mac. Wondering if krita was ready fot it :-)
Pressure sensitivity not working! urg. anyone run into problems with getting krita to recognize pressure?
Thanks a lot for this David!
This is indeed the first thing someone new to tablets should learn to do. So easy to forget about but so important, lets not forget however that it's also important to adjust the pressure levels in the drivers.
In Windows' Wacom drivers I like to set the pressure curve to the 3rd point on the slider, it gives me roughly the same pressure range as the middle point, but doesn't require me to press as hard down on the tablet. This is both more comfortable for me and extends the tablet and nib lifetimes.
After following this tutorial, I am for the first time satisfied with the results of varying the pressure on my stylus while drawing, it's truly important to do this from time to time; and this tutorial made it so easy to do, now I actually understand how the curve works!
Btw, I'm loving that character you drew, DBZ haircut and all :) He's reminding me of some other character, but I can't remember which one. Possibly Alibaba from Magi: The Labyrinth of Magic (It's the earring)
This time I'm also going to thank you specially for making your tutorials English, I know how much Frenchmen love their language (and to be honest even I am fascinated with it, but don't have the time to learn it as much as I'd want to)
As awesome as it may be, if these tutorials were in French I couldn't read them, so thanks a lot for making them English :)
@Cestarian : Thanks for the feedback ! I hope to find enough free time in 2014 to continue writting long tutorial :-)
I hope you do too, your tutorials have been super helpful to me, both learning painting techniques and how to use Krita.
On topic of more tutorials though, even if this was no problem for me personally to figure out I've seen a handful of people getting flustered over not figuring out how to get custom palettes working in Krita (they don't even figure out how to open the palette window in the docker; I saw one on the KDE forums and another on Deviantart stop using the program cus they couldn't figure it out! the KDE forum post was old I think, but I tried to help the deviantart user)
Even if I don't personally need it, having a tutorial on how to access the palette docker and creating custom palettes would be a nice, quick tutorial for some new Krita users to have. (While at it mentioning the color history in the coloring selector would be a good idea)
Thanks a lot, David! This article was very helpful. Do you mind if I download your image of the different curves for different situations, just for personal use?
@Binyamin : Hey, thanks. Feel free :)
Hey bro, on tablet use this tutorial was probably the most valuable I ever found (it's like no other digital art tutorial bothers mentioning tablet calibration, which isn't strange since most people are used to and expect things to work out of the box without configuration)
It would be really nice if you could expand this tutorial with how you configure the wacom drivers on linux (i.e. with xsetwacom or in a xorg conf file) most notably the PressureCurve(in xsetwacom) and PressCurve(xorg config file) but there are other nice settings. Since there's no GUI for this (as far as I know) there are a lot of configurations in there also I know nothing about, and in the pressure curve setting I only know what the last 2 numbers in the 4 number sequence do :P
@Cestarian : :-) Good idea about xsetwacom. I can do it. You can get most of my 'tips' on this page http://www.davidrevoy.com/article95/linux-mint-11-install-notes , at the Wacom chapter . Even if it's 3 years old, it's still the same.
Nowadays, I use Gnome 3.12 ; and Wacom support/GUI is really good on it. But I still have a little xsetwacom rules on auatostart to set the wacom stylus button to CTRL , cause I like to pick color that way, and the Gnome GUI can't assign a modifier like CTRL to the stylus.
I found out what levels of pressure we really need. We need 256, that is within the spectrum of 8 bit. Most artists work with 8 bit depth pictures (also known as 24 bit or truecolor, it's what most monitors use, 16.7 million colors to be a bit more specific)
What this means is how many bits each channel (R/G/B) has, with 8 bits 256 shades of each color are supported (0-255) meaning with 256 levels of pressure, you're able to get the full range of 8 bit depth in color variation. That means one pressure level for each possible shade of individual colors. It's exactly what we need, no more, no less. I think that if the possible pressure levels are increased, it'll simply make it easier to do this with less accuracy (being less precise with your pressure) since say you have 512 levels of pressure, this means that say we have opacity from 0-255 (like we normally do) then with 512 levels of pressure, this will really mean that each individual possible number value for the opacity will have to be scaled up. So there are two levels that output the same value.
so 0 and 1 in 512 bit are both 0. 1 and 2 are both 1. etc. And like you said, you won't notice the difference as long as you have the full range that your computer can possibly display for you.
That said, if you move on to 16 bit depth (that's 48 bit in monitor terms, twice the size of 24 bit) we will have smoother gradations (higher quality, but most monitors can't display this anyways, however when quality > filesize, 16 bit is advisable) then we have 65,536 levels for each value (rather than 256). This is very damn far outside the spectrum of pen pressure levels.
However 12 bit is only 4096 levels of pressure, so if we start working at 12 bits per channel (that's I think 36 bit) we will have use for higher levels of pressure.
You can read up a bit here.
https://en.wikipedia.org/wiki/List_of_monochrome_and_RGB_palettes
It might be worth saying however that while 12 and 16 bits per channel might be a bit nuts and over the top (we can't even see as many colors as this would give us) 10 bits per channel (30 bit monitors, 1,07 billion colors) is already a reality and many high-end CAD monitors offer it.
Take this one for instance. http://www.legitreviews.com/philips-28-inch-4k-ultra-hd-monitor-now-available_148308 (oh how I want that...)
If you're working with 10 bits per channel, that is to say 30 bit (40 if you include alpha channel) monitor, you will want to work with 10 bits per channel, and 1024 levels of pressure. With 1.07 billion colors (instead of the usual 16.7 million) we will notice a difference, but we will stop noticing it if we go any higher I think. (Our approximate number of colors perceived is 1 million, but we can see tearing in 8 bit/16 million color images, which essentially means that our approximation is probably more than slightly off on one side of the equation (be it how much our eyes can see or how many colors displays can show))
bonjour!
je viens d'installer Krita car étant étudiant et en difficulté pour trouver un logiciel autre que photos*** pour peinturlurer et patouiller digitalement. Je viens de tester le logiciel, il a l'air très prométeur et je me sens d'attaque pour passer quelques heures à le prendre en main. Seulement le premier problème qui m'a sauté aux yeux c'est la pression du stylet. j'ai une tablette intuos 5 de chez wacom et malgré cette page je n'ai aucune sensibilité dans mon trait, je ne comprends pas bien l'anglais est ce que quelqu'un pourrais me donner un coup de main? :( normalement le logiciel prend en compte la pression automatiquement comme sur paint tool ***, mais pas cette fois, est ce que j'ai trafiquouiller quelque chose qu'il ne fallait pas?
merci d'avance pour une réponse ! :)
@crocored : Bonjour, j'imagine puisque tu ne mentionnes pas ton système d'exploitation que tu dois utiliser une version de Windows. Je n'ai jamais testé de Intuos 5 et je n'ai aucun système Windows à la maison. C'est certainement un bug ( oui, la pression doit fonctionner à l'ouverture automatiquement ), ou quelquechose que je ne sais pas et il faut le rapporter aux développeurs de Krita. J'espère qu'une manipulation simple existe et que tu auras ta réponse auprès d'eux assez rapidement.
Hello.
It seems you're able to manually set the point coordinates in the curve if you want, if you're after absolute precision.
You do this by editing the Krita configuration file.
On Windows, you can go to...
C:\Users\YourUsername\AppData\Roaming\krita\share\config\
In the 'config' folder there's a "kritarc" file (without format), you can open it with Notepad or any text editor.
Then CTRL + F to find the word "tablet" so it takes to you setting "tabletPressureCurve". It should look like this:
tabletPressureCurve=0,0;0,1;
Then you can add any points you want in the middle, separating coordinates with a comma (,) and different points with semicolon (;).
The coordinates go from [0.0, 1.0].
Also important is that floating point values have 6 decimal spaces (0.123456).
Here's what I'm using:
tabletPressureCurve=0,0;0.500000,0.500000;0.750000,1;
Which produces the following curve:
http://s14.postimg.org/p3h08obmp/Krita_custom_curve.png
@Kryzon : Wow, super clean! Thank you for sharing this setup with screenshot !
This is great. I want to have this dialed in before I upgrade from an inous to a cintiq. I realized after a few weeks of inking I was having hand pain and realized i need to dial down my brush on the curve, but random experimenting was not helping me understand the graph.
Any idea if Manga Studio 5 tablet graph overrides the wacom graph? Or the MS5 pen pressure graph works in conjunction with the wacom settings?
Thanks, I have bookmarked this page to remind me to calibrate everymorning :-)
@Michael : Hey :)
> Any idea if Manga Studio 5 tablet graph overrides the wacom graph?
Sorry, I can't help ; I guess you are talking about Microsoft Windows and I don't use this operating system here.
No idea about MangaStudio5, and the Wacom Graph ( of Wacom Ms driver maybe?).
On Linux, I just made a script https://gist.github.com/Deevad/51820854ffd5ea5cd883 to get a "precision mode".
It map the full tablet to a 1:1 part on the screen. This make me more precise and also reduce all pain.
https://cloud.githubusercontent.com/assets/4021867/11267011/0f4286ae-8ea9-11e5-9362-c05edb34a090.png
Good luck in your research!
Every post is precious! and very helpful.
So this is why I couldn't control the thinness of my lines! I'm trying to equalize the experience of the real-world tools with the virtual ones -to make krita ink-pen work as if I were using a real one, for example. Thanks, David. I'm gonna take a look at your other tutorials
Hey!
I was wondering, I want to use krita on my mac, but the pen sensitivity doesn't work at all. Is it because they haven't worked out all the problems in the mac version? I feel like I remember when I downloaded it the site saying that there might be problems in the mac version.
Is there anything I can do to make it so that I can use krita with pen sensitivity? It seems like such a good software.
Thanks! ^u^
@Silver : Hey, I don't own a Mac, so I can't really help. I remember in one of my talk about Krita having in the audience a Mac user telling me with certain graphic cards, it was necessary to go to Krita Settings > Display and turn off 'openGL' .
>> Is there anything I can do to make it so that I can use krita with pen sensitivity? It seems like such a good software.
Maybe try to install the last Krita 3.0 Release Candidate1 ( beta software ) https://krita.org/item/krita-3-0-release-candidate-1-released/ , I saw a OSX package on this page. If you meet same issue, report to the dev team :)
Good luck!
Very usefull tutorial, helped with Krita and also with procreate app and jot adonit stylus for drawing directly on my iPad. Merci.
Um , my pen is making lines as if I was doing them with the mouse so how do I fix that?
It's a bug ; something between Krita , your operating system and the tablet driver.
First step is to be sure you have the latest version of your tablet driver and Krita.
Second step if it's impossible to fix ; report to the developpers of Krita your tablet model, your operating system, they might have a fix for you or a specific version to make your tablet working. Good luck !
hi, I got problem of my pc tablet's stylus on krita. Theres no stylus pressure active in there.
But when i open one one apps its work.
what should i do, thanyou
Hi, first, check if your issue is not a frequented asked question ( https://docs.krita.org/KritaFAQ ) ; if not, you need to contact the developer because it's probably a bug or an hardware unsupported at the moment. Tell them your operating system and the exact model of your tablet and the driver you installed for it because they can't guess it.
What about angles on stylus? How to configure it? I can see options for it in brush engines option, but seems to not work.... (using wacom intuos pro)
Hey, I'm a bit lost with recent product name of Wacom; So, I have no idea if the "wacom intuos pro" has tilt built in.
If the tablet has tilt, then it's possible to use the tilt sensor in the Krita brush ; but from my test, various tilt options are often really hard to predict.
Yes it have tilt sensor - in krita we have checkbox like(general->strength) Tilt-x, Tilt-y, Tilt-direction, drawing agles etc. I try to use it but checking it make no afect to drawing. I just start using Krita, maybe i should somehow save changes in brush engine?(see no option for it)
Overwirte preset - make no diffrence. Drawing like +/- 30 degree form 90 should't give us visably wider line?
For overwriting/saving a brush ; you'll find how to do it in this video : https://youtu.be/fgA4BcO3Nq8
The right setting for Tilt is 'Tilt direction' only for my Intuos3
eg. Pixel engine > Size > Tilt direction activated ; so when you tilt stylus, the line will go thiner.
You can get feedback with going to Settings > Configure Krita > General > Outline shape , and select 'Tilt outline'.
a little pen will appear on canvas to show you real time tilt while you paint.
Great post.
I would just like to note that not all Wacom pens are equal. I have three pens at home, a Cintiq13HD with a pen with 2048 levels of pressure, and a ThinkPad Yoga, with the built in tiny stylus and a Bamboo Stylus Feel to make it usable. The Bamboo Stylus Feel has 512 levels of pressure, and presumably the built in one too. Of these three, the Cintiq one is by far the best one. Let me elaborate:
The built in stylus is slow to register the initial touch. You will feel that the tip is touching the screen, long before it starts making a line. This is actually really annoying when drawing, which is why I got the Bamboo.
The Bamboo registers a line with very little pressure, but seems to have a bump half way through the pressure curve. This is most noticeable when inking, where it's almost impossible to get a line going gradually from thin to thick. It also seems to be calibrated differently than the built in stylus, so I need to sett the pressure settings to firm to get it around right. The side switch is also flush with the pen, and a bit hard to use. It works fine for sketching, but it's problematic for inking because of the bump in the pressure curve.
Finally the Cintiq pen just works right. It registers a line perfectly at the lightest touch, even better than the bamboo, and it's easy to draw a line going gradually from thin to thick, without any bumps along the road. Unlike the other two, it also has a dual side switch that is comfortable and easy to use. I use this all the time, and really miss it on the Bamboo.
It's quite possible that my Bamboo Stylus has a production error, as I don't have a second one to test. I've also seen that people who have Galaxy Note tables have opened up their styluses and adjusted a couple of screws in there, to tune the pressure level. It's possible that you can do this with the Bamboo Stylus too, but I've found no info on it, and it was rather expensive, so I don't want to break it by trying. :)
I do agree, that any pressure over 512 levels is fine, as long as it's working perfectly. I can't remember having had these kind of issues with any of the Wacom drawing tablets, just TabletPC with Wacom technology in them, and I've used the ArtPad II, Intus 1,2,3,4 and the Cintiq 21UX.
Wow. I am glad I found this early on in my krita experience what a difference
Hi David, is there a way to calibrate pen in linux? (i mean cursor placement, not pressure)
I LOVE YOU BRUH! I really do. And guess what? My tablet loves you too. Finally, it can get some much needed rest from my heavy hand.
hehe! thanks!
I'm glad it can help; with a high productivity and hours of painting, adapting pressure can save a hand. ;)
Hi Rice,
Under KDE I got the calibration of the cursor placemnt in the graphic settings.
When opening the KDE settings and go to the graphic tablet (full name of the window I'm looking at: 'Graphic Tablet -- System Settings Modlule')w there are tabs general, stylus, tablet and touch. Go to the tablet tab, press the button 'Map tablet area to screen' to open a new window that shows your tablet and screens, and a button 'Calibrate'.
Good luck with that!
Tellement merci, je vais enfin pouvoir reposer mon bras (mauvaise habitude de bourriner sur le stylo pour avoir l'opacité)
thanks david!!!
still helpful in 2021!
Post a reply
The comments on this article are archived and unfortunately not yet connected to a dedicated post on Mastodon. Feel free to continue the discussion on the social media of your choice. Link to this post:You can also quote my account so I'll get a notification.
(eg. @davidrevoy@framapiaf.org on my Mastodon profile.)