


XPPen Artist Pro 16 (Gen 2) - review on GNU/Linux
Table of Contents
- Install & Setup
- Get the USB ID identifier of the tablet
- The X11 rule
- Tablet setup with xsetwacom
- Issue: the upper button on the stylus is an Eraser!
- The Remote shortcuts
- Fix the 16:10 ratio into a 16:9
- Monitor Luminosity/Brightness
- The hidden "SelfTest" built-in menu
- Monitor options via ddcutils.
- My color setup and ICC profile
- Nibs
- Persistent cursor calibration and pen pressure
- The single USB-C to USB-C cable
- Youtube: https://youtu.be/gmmIwkvZagU
- Peertube: https://peertube.touhoppai.moe/w/ugr5t9Wj34KmLMdazAx1CC
Here is my video review about the XPPen Artist Pro 16 (Gen 2) pen display tablet. Everything about how I feel of the hardware is on the video above.
This blog post here will list my method to install, scripts, and tweaks to install the device under a GNU/Linux operating system.
Update
- 2024-09-26: Add a X11 configuration method to get persistent mapping
- 2024-09-26: Update eBPF HID install method (using the ./install.sh script)
- 2024-07-28: Update eBPF HID rules comand lines.
- 2024-06-09: Update and test on the remote control, update about the nibs after 8 month of usage.
- 2024-06-09: Removed outdated promo code 'DAVID15' (lol) for December 2023 and link to shops.
- 2024-06-09: Install guide added for the udev-hid-bpf rules that fix the stylus buttons and also fix tilt.
- 2024-02-06: I found a way to setup the display/digitizer for a 16/9 ratio clone (xrandr / x11).
- 2023-12-13: Added more info about color profile, ddcutils, thanks to the feedback of Bhoren.
- 2023-12-12: Added a note about xsetwacom MapToOutput display name for proprietary Nvidia drivers.
- 2023-12-06: Success with the single USB-C to USB-C cable test on GNU/Linux.
- 2023-12-04: The white type of stylus nibs gets a small flat. I also found a secret OSD menu.
- 2023-11-30: New settings about the Luminosity/Brightness, from 75 to 78 to get a 180cd/m².
- 2023-11-20: Thanks Ryuno-Ki for pointing to me three errors and possible enhancements.
Transcript of the video
Click here to unfold the text version of what I'm saying in the video.
## Intro Hey, so XP-Pen sent me their latest tablet to review. If you are not familiar with my channel, I only accept this type of review if the tablet could run on a GNU/Linux operating system with only free/libre and open source drivers. At this stage, all the other brands usually refuse to send me a device or don't even reply. But not XpPen. In short, they told me that even if they didn't have a Libre driver, even if it didn't work, all I had to do was make a video of everything that went wrong. For my part, I really liked this suggestion, and I was also seduced by the specifications of the tablet on their website. So I took up the challenge. The good news is: the tablet is now working on my system. It requires some very GNU/Linux specific tweaks, but I've decided not to go into them in detail in this video. You'll find them all in a link to a blog post in the description below the video. This blog post will be easier for me to update. This video will focus on showing what I think of this device. ## Unpack So what do we have here? It's a 16-inch tablet, not thick at all, with a Quad-HD screen inside. Quad-HD is my favourite resolution, and this one comes in the 16:10 ratio flavour. It's a metal chassis with very well-designed rubber feet that are easy to unfold. You'll also find plenty of power adapters for all regions in the box. A manual, a glove, something for cleaning, tablet cables, but also remote cables. Speaking of the remote, here it is. And the stylus in its case, along with extra nibs, and it contains a USB dongle to connect the remote. This can also be connected without it, via Bluetooth, or wired directly. I received it with this extra '3-in-1 cable' box and that's what I'll be using in this review. It has a red USB for the power connector, a black USB for the tablet's data to your computer, an HDMI for the display and they all converge on a single USB-C for the tablet. ## Device presentation The active surface of the device is large, larger than an A4 document or those video games, if you are more familiar with that scale. It's also bigger than my Wacom Cintiq 13HD and about the same size as an Intuos Pro Large. The active surface is laminated, very smooth, but not as smooth as glass, it has a slight texture, it's very fluid. On the back, you have two USB-C inputs; - one for the 3-in-1 cable - and the other in case you choose a direct USB-C to USB-C. You also have a plus and minus button for brightness and a power button. ## Colors I really like the design once it sits on a desk, the colour are great. But I would strongly advise any user to do a colour calibration on this device as it natively displays almost full AdobeRGB. I limited mine to 100% sRGB and it's great. As a result, this tablet has become my reference for checking my colours in general. ## Drawing In terms of drawing, the device is really responsive and the lag is minimal. It's the first time I've tested a device that feels like that and that's after 20 years of practice. I immediately fell in love with it. The parralax is also very low and even if it needs a bit of calibration, you won't feel much offset when drawing. ## Pressure The pressure sensor is also very sensitive to fine brush strokes. My first impression was that the amplitude of the pressure curve from a very light stroke to a very heavy stroke was too large. Maybe it's my hand getting old, or maybe I'm just getting more sensitive with the years, but I had to set up a custom pressure curve: with a firm curve that quickly reaches 100% of the effect. Then all my brushes acted the way I wanted. ## Overlay Texture I have to admit that I initially thought the overlay texture was too slippery. I would even describe its overlay as an 'oily' type of surface. However, once I started using the light grey nibs rather than the standard black ones, this problem was solved for me. These nibs have a bit more friction than the standard nibs, so I get that gentle 'shh shh shh' on the device. After two weeks of intensive use, these nibs still haven't flattened out. I'm curious to see how long they'll last, but for now I'm very happy with them. ## Tilt The tilt of the tablet is also very responsive and precise for the angle. It offers a level of brush angle control I have never seen before. I really like what the XPPen engineers have done with the stylus in general, the precise and lag-free experience really improves the digital painting experience. ## Eraser When you flip the stylus, you have an eraser. Krita - the painting app I use - will change the preset, so you can put an eraser preset on it and you'll have an eraser ready to go every time you flip the pen. This eraser brings the design of this pen closer to Wacom's, and I'm not complaining about that. There are some slight design variations, but they're very minor. ## Remote for shortcuts The remote for the shortcus is a completely standalone device, and you can even buy it separately. Under GNU/Linux, everything works out of the box, except the little middle button on the dial. All the buttons feel ok and you can customise them with a bit of efforts. On the edges, you have a button for power on/off or Bluetooth pairing, and somewhere else, ha there, you have a USB-C connector for wired use or charging. To be honest, it's a cool gadget. But I prefer full access to my keyboard, or this little gamepad or keypad I customised. ## Ergonomic As for the ergnomic, I like to use it flat with the keyboard in front. I don't really like the built-in feet, because then you can only use the keyboard between you and the tablet, and it works, but it's just not my style and preference. After experimenting with stacks of books, I made this little wooden easel. It is still a work in progress, but it gives me some comfort for now. I also like the fact that I can push it onto my desk and immediately free up some space for traditional drawing or small DIY projects. It's very good for the sketchbook training I'm doing now with ballpen point. It's also easy to unplug it, put it on a shelf and plug it when you need it. In my setup, I use it most of the time as both a display tablet and a regular tablet. I've cloned my main monitor with the tablet so I can get the best of both worlds, and I really like that because I've always struggled between a display tablet and a regular tablet. Now I don't have to choose, it's really convenient. ## Heat About the heat of the device, the hot spot is clearly on the top, around the USB-C connector. It's a good design, as the palm of your hand is rarely going to be there. A word of warning: don't set the screen to 100% brightness, as I found it too hot and difficult for my hand. I found the 75% brightness setting to be a good compromise. It gave me the right temperature for working. ## Conclusion As you can guess, I have already adopted this device full time on my desk, and have been quite productive with it. For me, it's really like having a slightly thicker Wacom Intuos Pro, but with a killer monitor built in. My favourite combination. How could I not love it? For more information, you'll find a link to my technical blog post in the description about how to install this device on GNU/Linux. You'll also find plenty of links to where you can buy the tablet, depending on your geographical location. Just a note about that: I don't make any money from these links. But there's a special offer until the end of November, so check it out because it's a real bargain! Also, XpPen gave me a promo code DAVID15, which is good until Christmas. It'll give you an extra discount. See you later, and thanks for watching.Install & Setup
Get the USB ID identifier of the tablet
For that, plug the tablet and execute in a terminal:
lsusbThis command will list all usb connected and their ID, the name shorten list into 'ls' and 'usb'. In front of the line with the XP-Pen tablet (it can be listed as "XP-Pen [unknown]"), mine is 28bd:095b.
The X11 rule
Change Directory (cd) to the place where your Xorg store rules for the devices. Oh yes, I forgot to say, this guides is right now for X11; not Wayland because it is not ready for digital painting yet.
cd /usr/share/X11/xorg.conf.d/I'll make a new rule in this directory (note it require your system root password because we are editing a system file with 'sudo') I'm using the text-editor "micro", but you can use your favorite. "nano" is often installed anywhere, but has less user-friendly keyboard shortcut and color syntax by default.
sudo micro 60-xppen.confWe can copy/paste the paragraph under at the end of the file; if your USB identifier differs, you'll need to adjust the line starting with MatchUSBID:
Section "InputClass"
  Identifier "XP-Pen Artist Pro 16 (Gen2) Tablet"
  MatchIsTablet "on"
  Driver "wacom"
  MatchUSBID "28bd:095b"
  MatchDevicePath "/dev/input/event*"
EndSection
Save and then reboot your system.
Tablet setup with xsetwacom
At this point, you should see lines about your XPPen tablet stylus when writing in a terminal:
xsetwacom --listNow we will create a script. It is just a series of command written line by line on a text file; so the computer will execute all of them. Each line will setup one aspect of your tablet. Line starting by character # are not read by the computer, so I added some notes to guide you in the customisation of the script. Open a non-rich text editor (eg. Micro, Kate, Geany, Gnome text also called Gedit, etc...) and copy/paste the script under:
A note for user of the proprietary Nvidia driver: the name of the display will probably differ from what you see from xrandr for the MaptoOutput Check this.
#!/usr/bin/env bash
# Setup UGTABLET Artist Pro 16 (Gen2)
# License: CC-0/Public-Domain license
# author: deevad

# --------------------------------------
# XP-Pen Artist Pro 16 (Gen2)
# --------------------------------------

# Tablet definition
# Identifier obtained using the 'xsetwacom --list' command line
# The tablet appears after installation of the Digimend kernel driver (10 or more)
# And after creating a special rule for Xorg.
# See blog post on https://www.davidrevoy.com/index.php?tag/hardware for it.
tabletstylus="UGTABLET Artist Pro 16 (Gen2) stylus"
tableteraser="UGTABLET Artist Pro 16 (Gen2) eraser"

# Constrain stylus to use it's own monitor
# Monitor name here (output) is "HDMI-A-0". It was obtained
# using the 'xrandr' command-line. Your might
# be different.
output="HDMI-A-0"
xsetwacom --set "$tabletstylus" MapToOutput $output
xsetwacom --set "$tableteraser" MapToOutput $output

# Calibration
# Start by reseting calibration to default area
xsetwacom --set "$tabletstylus" ResetArea
# Default area is '0 0 32767 32767'
# You can obtain it with:
# xsetwacom --get "$tabletstylus" Area
# Calibrate your device manually with `xinput_calibrator` after connecting only the Xpen-Pen pro-art
# (Area is "MinX" "MinY" "MaxX" "MaxY"), then tweak manually adding or rmoving +50 here and there to obtain
# Something pleasing I found:
xsetwacom set "$tabletstylus" Area 125 45 32810 32792
xsetwacom set "$tableteraser" Area 125 45 32810 32792

# Pressure Curve:
# a web GUI is available here to tweak it https://linuxwacom.github.io/bezier.html
xsetwacom --set "$tabletstylus" PressureCurve 90 85 15 100

# Configuration data trimming and suppression
# The event of this device are not legion; better to not filter any for sensitivity
# Minimal trimming is also good.
xsetwacom --set "$tabletstylus" Suppress 0 # data pt.s filtered, default is 2, 0-100 (old 4)
xsetwacom --set "$tabletstylus" RawSample 1 # data pt.s trimmed, default is 4, 1-20 (old 1)
Run it, create a start-up:
Save it named xppen_Artist-Pro-16-Gen2.sh (you can name it the way you want, and save it where you want on your disk, using the extension .sh at the end of the file is not mandatory but will ease identifying the file as a Bash script later and also some editor might rely on that to set a correct syntax highlighting ).
To run it, after saving the file you need to give this text file execution permission. You can do so with many desktop environment by right clicking on the file, and add the "execute" permission. Another way to do it is with command line:
chmod +x xppen_Artist-Pro-16-Gen2.shNow, if you run:
./xppen_Artist-Pro-16-Gen2.shThe script should run and apply your preference. If your windows environment is modern enough; you should have a setup option to add a script to the autostart (usually in Settings > Autostart). This way, the preferences will be applied each time you start your computer. You can of course change options, and execute the script as many time you want to test and adjust.
Issue: the upper button on the stylus is an Eraser!
Yes, this was a known issue and a drama for me, which was later fixed.
In short, you'll need to apply the rules contained in the udev-hid-bpf project. That one contains a rule to make it work again as a right click (or any button, or keypress: the key after the change will be exposed to xsetwacom for customization).
Newer kernel
On my GNU/Linux installation based on Debian 12 Bookworm, you'll need a newer kernel to load BPF programs with eBPF. To do this, I install the curl package and then the Liquorix kernel using the one-liner command line provided on their website.
Once everything is working, I like to "hold" the kernel packages with apt. In fact, the Liquorix project updates frequently, and I prefer to keep the same kernel once everything is up and running, for stability reasons.
Don't forget to reboot after installing, be sure the new kernel is selected on the Grub menu at startup, and once in the session you can still check with a uname -a to be sure.
Loading the BPF rule
udev-hid-bpf is compiled using Rust, and very recent versions. It will be almost impossible to compile it with Debian 12 without having to update almost all the operating system libraries manually and one by one (trust me, I tried). Fortunately, the udev-hid-bpf provide a precompiled utility that is cross compatible to load the BPF programs.
Download the latest package of udev-hid-bpf (Packages, not source code or asset) , unpack it somewhere, then go to the directory and execute the bash script ./install.sh
Once installed with a successful message, you can restart your system.
Your pen button should now trigger a right-click action by default.
The Remote shortcuts
I remember being able to connect wirelessly to this device on Linux via the USB dongle (the one in the stylus box), but my device has become unpaired over time and I'm not sure how to pair it with the dongle again. In total, there are three ways to connect this device to your computer: one with a dongle (which I'm pretty sure worked and now can't), one with Bluetooth (which never worked), and one with a USB-C cable, which always works. The official user manual can tell you which button to press if you want to try if pairing works on your side. For a TL:DR; it's a long press of 6 seconds on the button in the middle of the dial.
You can customize the buttons in several ways:
The first one is by using the software input-remapper. You'll have all the possibilities with it (presets/macro/composed shortcuts/even sending mouse events). It's also compatible X11 and Wayland.
The second one is using a udev rule but it will be limited because each keys sending two key events will be a pain: they'll have to send also two keys, and if you replace Ctrl with something else, it will affect all shortcut with Ctrl. Here is the layout under with the keycodes, and see this blog post for the method. It's exactly the same.
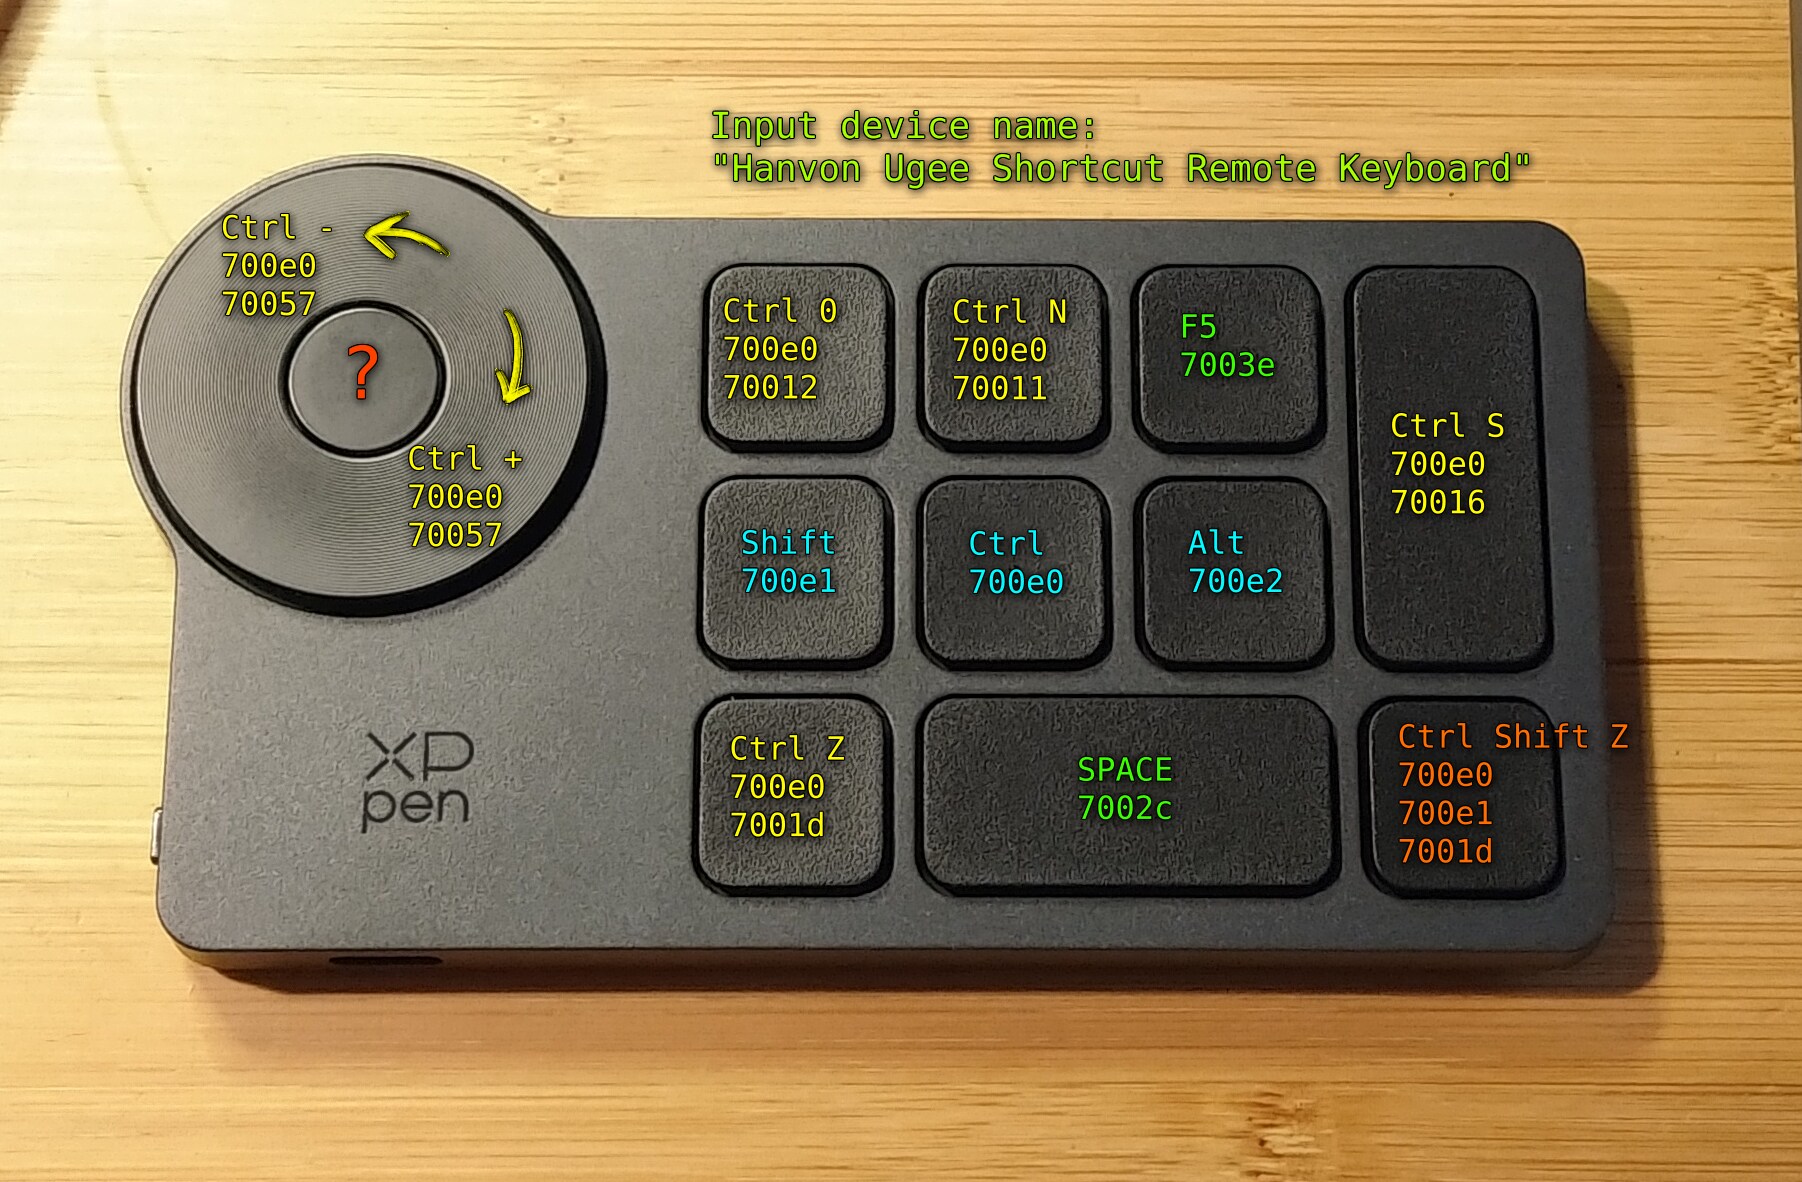
All in all, as I said in the video, I prefer to keep my tiny yellow 8bitDo gamepad and a full keyboard access on top of my tablet. But maybe I would reconsider if this device had a simple Bluetooth support and a support of the dial with the button.
Fix the 16:10 ratio into a 16:9
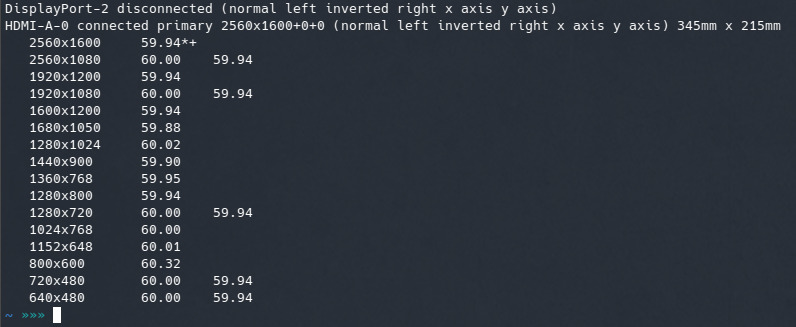
The available resolutions listed by xrandr
As you can see on the available resolution of the device, you have a list here of 16:10 ratio. It's problematic, because if you want to use this device cloned to an external monitor you'll probably have difficulties as most monitor for desktop computer in 2024 uses a 16:9 ratio.
Don't be fooled by the 16:9 ratio listed on the screenshot above ( eg. 1920x1080px); the resolution are stretched, and the display will look like stretched vertically to fill the 16:10 area ( probably a list of resolution to support classic gaming resolutions).
On my setup, I have a Philips 245E 24inch as my main display, and if I want to clone this tablet to this 16:9 quadHD 2560x1440 monitor, I have to setup the tablet in a very specific way using xrandr/X11 command lines. This setup will sacrifice a bit of the maximum height of the Artist Pro 16 Gen2 (2560x1600) to get a final work area of 2560x1440px centered vertically (with black on top and bottom, a letter box like cinema effect). But at least, you'll get a perfect clone, and also a better ratio to screen record videos and livestream.
For setting this, you'll have to make a startup script with xrandr command lines. On the example under, I have HDMI-A-0 identifier for the plug of the Artist Pro 16 Gen2 and DisplayPort-0 for my 24 inch Philips monitor. You can retrieve the name of your monitors with xrandr in a terminal.
Here is my script:
#! /bin/bash
# Setup xp-pen 16 pro fix screen ratio

# We setup a new mode for the 16 Pro:
xrandr --newmode "2560x1440_60.00"  312.25  2560 2752 3024 3488  1440 1443 1448 1493 -hsync +vsync
xrandr --addmode "HDMI-A-0" 2560x1440_60.00
# We apply the mode:
xrandr --output HDMI-A-0 --mode 2560x1440_60.00 --set "scaling mode" "Full aspect" --same-as DisplayPort-0
Once the ratio deformed, the calibration of the stylus will not match the new 16:9 restricted and centered display area. You can fix this with xsetwacom Area in your xsetwacom startup script:
tabletstylus="UGTABLET Artist Pro 16 (Gen2) stylus"
tableteraser="UGTABLET Artist Pro 16 (Gen2) eraser"

xsetwacom set "$tabletstylus" Area 125 1745 32810 31050
xsetwacom set "$tableteraser" Area 125 1745 32810 31050
Monitor Luminosity/Brightness
In the video, I tell my sweet spot for the "Brightness" was 75 to not get the device too hot. With a Color Calibrator, I was able to measure the candela per square metre of this setting: 170cd/m². By the end November, I pushed my device to 78, to reach 180cd/m². This change makes the device slightly warmer, but in exchange I have a luminosity similar to my two Philips 245E monitors.
The hidden "SelfTest" built-in menu
Switch off the tablet using the power button, then hold down 'Brightness +' and press 'Power' once to enter into this mode. The Logo XPPen will be replaced by a white on black background "SelfTest" menu. I discovered this out of curiosity, as I thought the layout of the buttons was the same as on a mobile phone.
Once in this mode, pressing the power button once brings up an OSD menu on the top left, which you can navigate using the + and - buttons. The menu includes colour temperature. They all act like presets, the temperature are just labels. You can change the colour channel on each of them. You also have a factory reset. A nice touch.
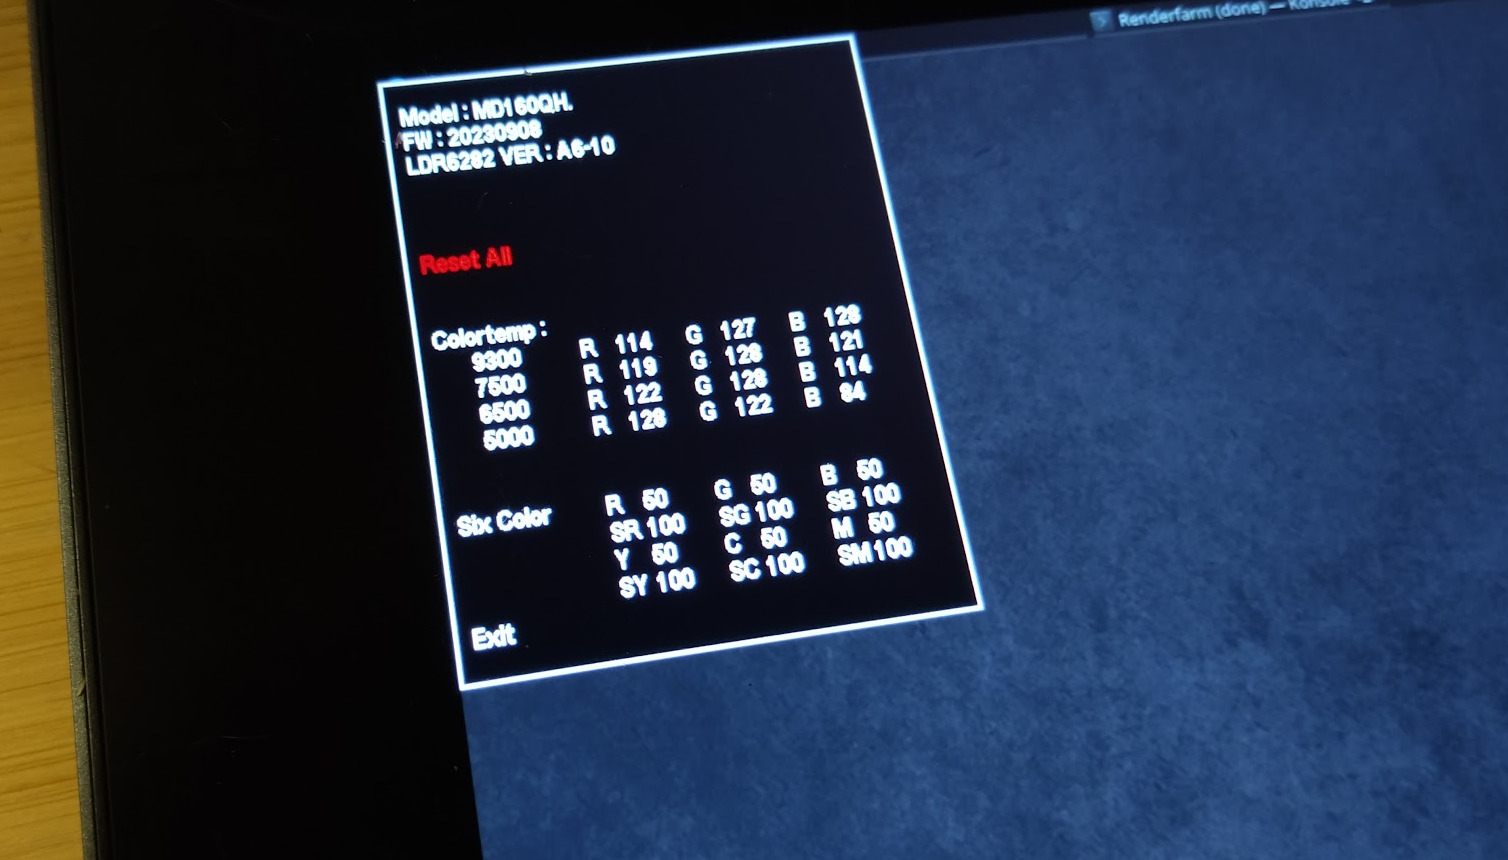
The SelfTest Menu.
Monitor options via ddcutils.
All the options of the SelfTest secret menu, can be also controlled by software. On GNU/Linux you can access them with this method. Here is the available options:
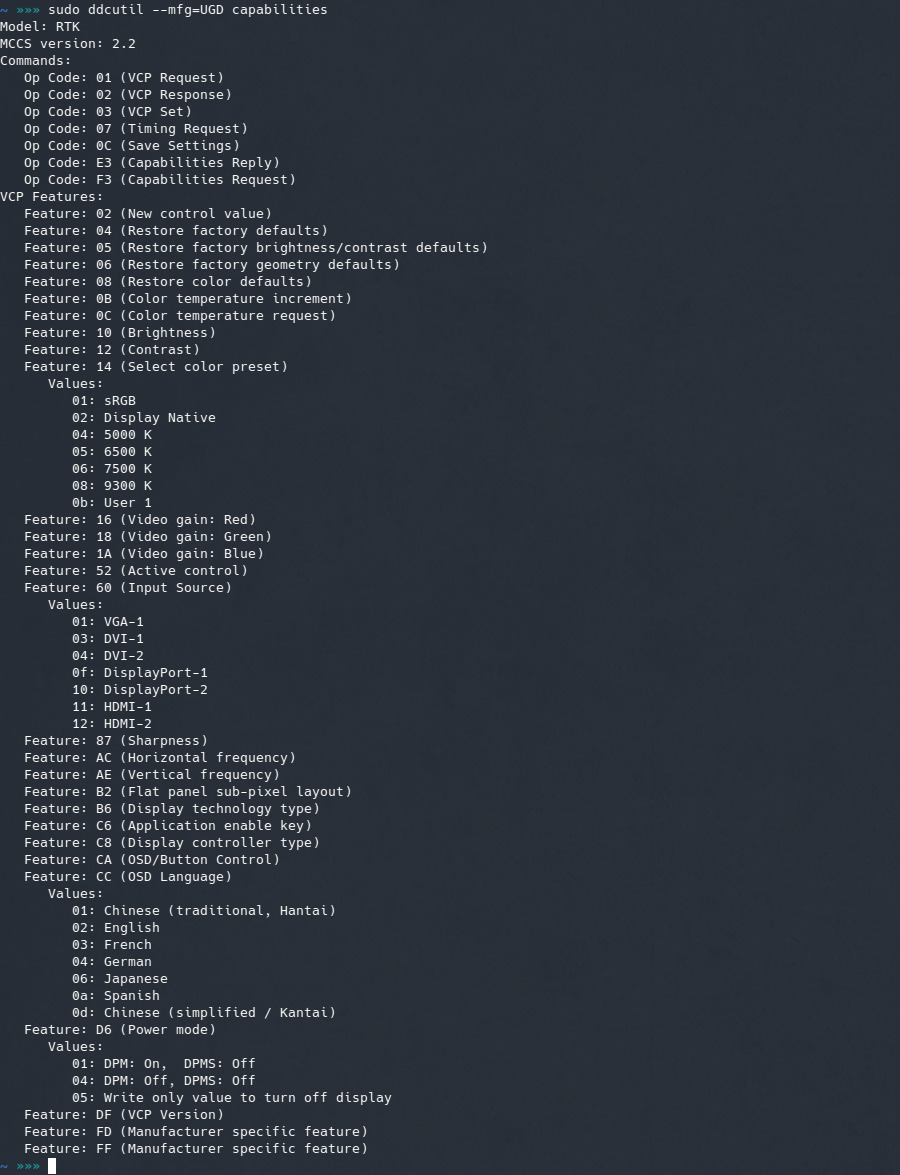
The identifier is UGD so you can see what color preset (feature 14) is set with this command:
$ sudo ddcutil --mfg=UGD getvcp 14
VCP code 0x14 (Select color preset           ): User 1 (0x0b), Tolerance: Unspecified (0x00)
sRGB:
This way, you can change all options. You can switch to (eg.) force to sRGB with:
$ sudo ddcutil --mfg=UGD setvcp 14 01This sRGB is not a really good sRGB color preset. It's blueish, way to blueish. See the next chapter about the color profile I provide with it.
AdobeRGB:
If you want to get the AdobeRGB color mode, on this menu it looks like it is the 0b User 1 (not 100% sure). If you want to select it with ddcutil, use the syntax with an extra 0x in front or it will fail:
$ sudo ddcutil --mfg=UGD setvcp 14 0x0bMy color setup and ICC profile
Each screen are differents and will get older differently depending of the temperature, how you use them, how they receive light of the sun, etc... That's why sharing the profile I made when mine was new will probably be inaccurate for your display. But it can help.
This ICC was made for the 78 Brightness value, in sRGB mode (with ddcutils see chapter above).
Gnome and KDE on X11 both have a GUI in the settings to load the ICC to your display.
If you are using another D.E. you can apply it with the dispwin command line tool part of the argyllcms package available on most of the distro. To apply an ICC with dispwin, you'll need first to run a dispwin --help and dispwin will tell you the number ID of your monitor. If your XpPen monitor is number 1, it will looks like that:
dispwin -d 1 /home/<username>/path/to/your/directory/2023-11-30_XPPEN-A16Pro-180cdm²-D6500-2.2_DisplayCal-brightness78.iccNibs
Here is an update on the nibs in December after a pretty intensive usage of the tablet over the last weeks, I'm starting to get a flat nib but this only raise a bit the friction and stability of the stylus and I really like the feeling. I hope this more tender type of alternative nibs will have a good duration once they reach this. I'll keep you informed.
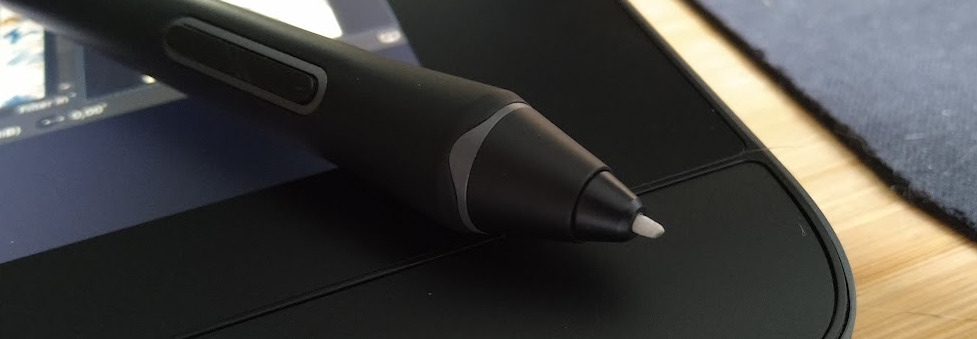
A close up on the 'white' nibs with a flat.
In the middle of 2024, I switched to the standard black plastic nibs: I just took very thin sandpaper (T400 grit) and slightly flattened the tip to get more friction. This also solved the slippery surface. That's what I'm using now and it's stable: I don't see any wear on the tip after 3 months.
Persistent cursor calibration and pen pressure
Keeping xsetwacom command line in a script executed at startup is a good method but it also has caveats: after a sleep time, the computer loose the mapping on screen, cursor calibration and pen pressure. The user has to re run the script manually (or reboot). That's why you can also save these into a X11 configuration file: this one will be persistent.
To do so, first, you need to have the cursor correctly setup via xsetwacom (using MapToOutput and Area ). We will then ask the system to translate the effect into X11 Coordinate Transformation Matrix. To do that, list the device with xinput:
$ xinput listThen check in the returned list the ID of your stylus, mine here is 17). I'll then list the property of item 17 with this command line:
$ xinput list-props 17This will return the the transformation matrix of the device we are looking for, it looks like that:
Coordinate Transformation Matrix (177): 1.000000, 0.000000, 0.000000, 0.000000, 1.000000, 0.000000, 0.000000, 0.000000, 1.000000Then you can add this info to your X11 configuration file, for example mine here is in /usr/share/X11/xorg.conf.d/60-xppen.conf and look like that:
Section "InputClass"
  Identifier "XP-Pen Artist Pro 16 (Gen2) Tablet"
  MatchIsTablet "on"
  Driver "wacom"
  MatchUSBID "28bd:095b"
  MatchDevicePath "/dev/input/event*"
  Option "Suppress" "0"
  Option "RawSample" "1"
  Option "TopX" "0"
  Option "TopY" "1745"
  Option "BottomX" "32764"
  Option "BottomY" "31050"
  Option "PressCurve" "75,85,20,100"
  Option "TransformationMatrix" "1 0 0 0 1 0 0 0 1"
EndSection
You can also see that you can put the RawSample, Suppress, PressCurve points, and Area (TopX, TopY, etc). Only customisation of the buttons cannot be applied with this method as far as I know, and you'll need to execute a set of xsetwacom command line to customise them. But it is still a quality of life to have the mapping totally persistant.
The single USB-C to USB-C cable
In my review, I'm testing the device with the 3-in-1 cable, a HDMI+USB(data)+USB(power) to a single USB-C. I couldn't test the USB-C to USB-C because I didn't have one on my workstation. But on my Yoga Thinkpad I saw a high-speed USB-C port, so I decided to test it: and it is a success. My Fedora 38 GNU/Linux KDE automatically made everything work for the display and the tablet via this single cable. That's good if I want to take the tablet on a trip. I'm actually considering it for the holidays at the end of the year. (Note: the laptop was connected to an electrical outlet; I assume that a device of this size can drain the built-in battery very quickly).
That's all 🙂
 36 -
36 -  96
96