


How to customise a USB numeric keypad under GNU/Linux?

Table of Contents
- 1. Find how the computer identify your keypad.
- 2. List all the scancodes of your keys
- 3. Assign custom keycodes to your device
- 4. Customize your keypad
- Your customised keypads:
- Sources:
- Other methods from the comments:
Something that relaxes me after hours of painting or drawing is doing DIY projects. It's always very rewarding for me to hack, repair or customise existing hardware.
Today I'm going to show you how I turned a cheap USB numeric keypad (also known as a numeric keypad, number pad, numpad, 10-key...) into a pad that I use for my digital painting shortcuts when I'm using my display pen tablet or when I'm painting on the go with my laptop. I bought this from a local computer shop for just 5€, a very good deal as this type of device usually sells for between 13€ and 30€. The build quality is a little bulky, the cable is thin and of poor quality, but in the shop I noticed that the keys felt good to press and weren't too noisy (they weren't even in sealed boxes). At this price, it wasn't much of a risk to try it out on a DIY project.
In this tutorial, I'll describe what commands and steps I used to create this project: remap the key on Linux, and paint the keys.
Disclaimer: This modification has limitations. You won't get a professional macro pad with these steps. The hack can only change one key to another. For example, you can't put Ctrl+Z on a single key. You'll have to find a key for Ctrl and another for Z.
The duckyPad looks like a perfect solution (I never tried it) if you want something more advanced. It is also a different budget: around 100€. The project I propose on this page will cost 1/10th of that, and sometimes even less, because you can reuse a device like the one you find around you. In fact, it's not uncommon to find these accessories unused in the cupboards of many computer users.
Also, your device should work. This guide is not intended to solve the problem of broken keypads or keypads without drivers under GNU/Linux.
Let's start!
1. Find how the computer identify your keypad.
The lsusb command line in a terminal should list your device among the full list of your other USB-powered devices. If you have trouble finding its name, unplug it, relist with lsusb and compare the two lists. My device is marketed under the brand name 'Mobility Lab', but thanks to the lsusb comparison we can see that it has a different name under the hood:
Bus 001 Device 004: ID 04d9:1203 Holtek Semiconductor, Inc. Keyboard
Hello 'Holtek'. But that name is not really important. What we are looking for is the number 04d9:1203. This number is unique to the product, so unless you have exactly the same keyboard as me (or one with the same circuit board), you'll have a different one. Write it down somewhere, this is the number plate of our device.
2. List all the scancodes of your keys
Each button also has a special identifier. These are called scancodes. To list them, we need to install a tool. On Fedora, I do that:
sudo dnf install evtest(If you're on Debian/Ubuntu/Mint, replace dnf with apt, the package will probably have the same name). Then run it, with sudo administrator privileges:
sudo evtestEvtest will list all your USBs and ask you to select a target. Here you can see mine at event3, 4 and 5. I had the clue thanks to the 04d9:1203 lsusb identifier.
/dev/input/event2: Samson Technologies Samson Meteor Mic Consumer Control
/dev/input/event20: HD-Audio Generic Rear Mic
/dev/input/event21: HD-Audio Generic Line
/dev/input/event22: HD-Audio Generic Line Out
/dev/input/event23: HD-Audio Generic Front Headphone
/dev/input/event3: HID 04d9:1203
/dev/input/event4: HID 04d9:1203 System Control
/dev/input/event5: HID 04d9:1203 Consumer Control
/dev/input/event6: Dell KB216 Wired Keyboard
/dev/input/event7: Dell KB216 Wired Keyboard System Control
/dev/input/event8: Dell KB216 Wired Keyboard Consumer Control
/dev/input/event9: UGTABLET 24 inch PenDisplay Mouse
Select the device event number [0-23]:
After selecting a device (e.g. 3), Evtest will begin to 'listen' to the keystroke and give detailed feedback on each keystroke. Here is a paragraph for a single key press.
Event: time 1693422668.703634, type 17 (EV_LED), code 0 (LED_NUML), value 0
Event: time 1693422668.703634, type 4 (EV_MSC), code 4 (MSC_SCAN), value 7005f
Event: time 1693422668.703634, type 1 (EV_KEY), code 46 (KEY_C), value 1
Event: time 1693422668.703634, -------------- SYN_REPORT ------------
In this paragraph we are only looking for the MSC_SCAN value. For our key it is 7005f. Make a note of all the MSC_SCAN values for your keyboard keys. If some keys return nothing, also check if your device had other evtest entries (mine has 3). You'll find them this way (e.g. this was the case for my calculator key, alone on event5). I also have the 00 key on the bottom of my device, which is a special key. It has a hardcoded behaviour: it types the number 0 twice. If I replace 0 with anything, this key just repeats it twice. I'll just do the best I can to avoid the use of this key.
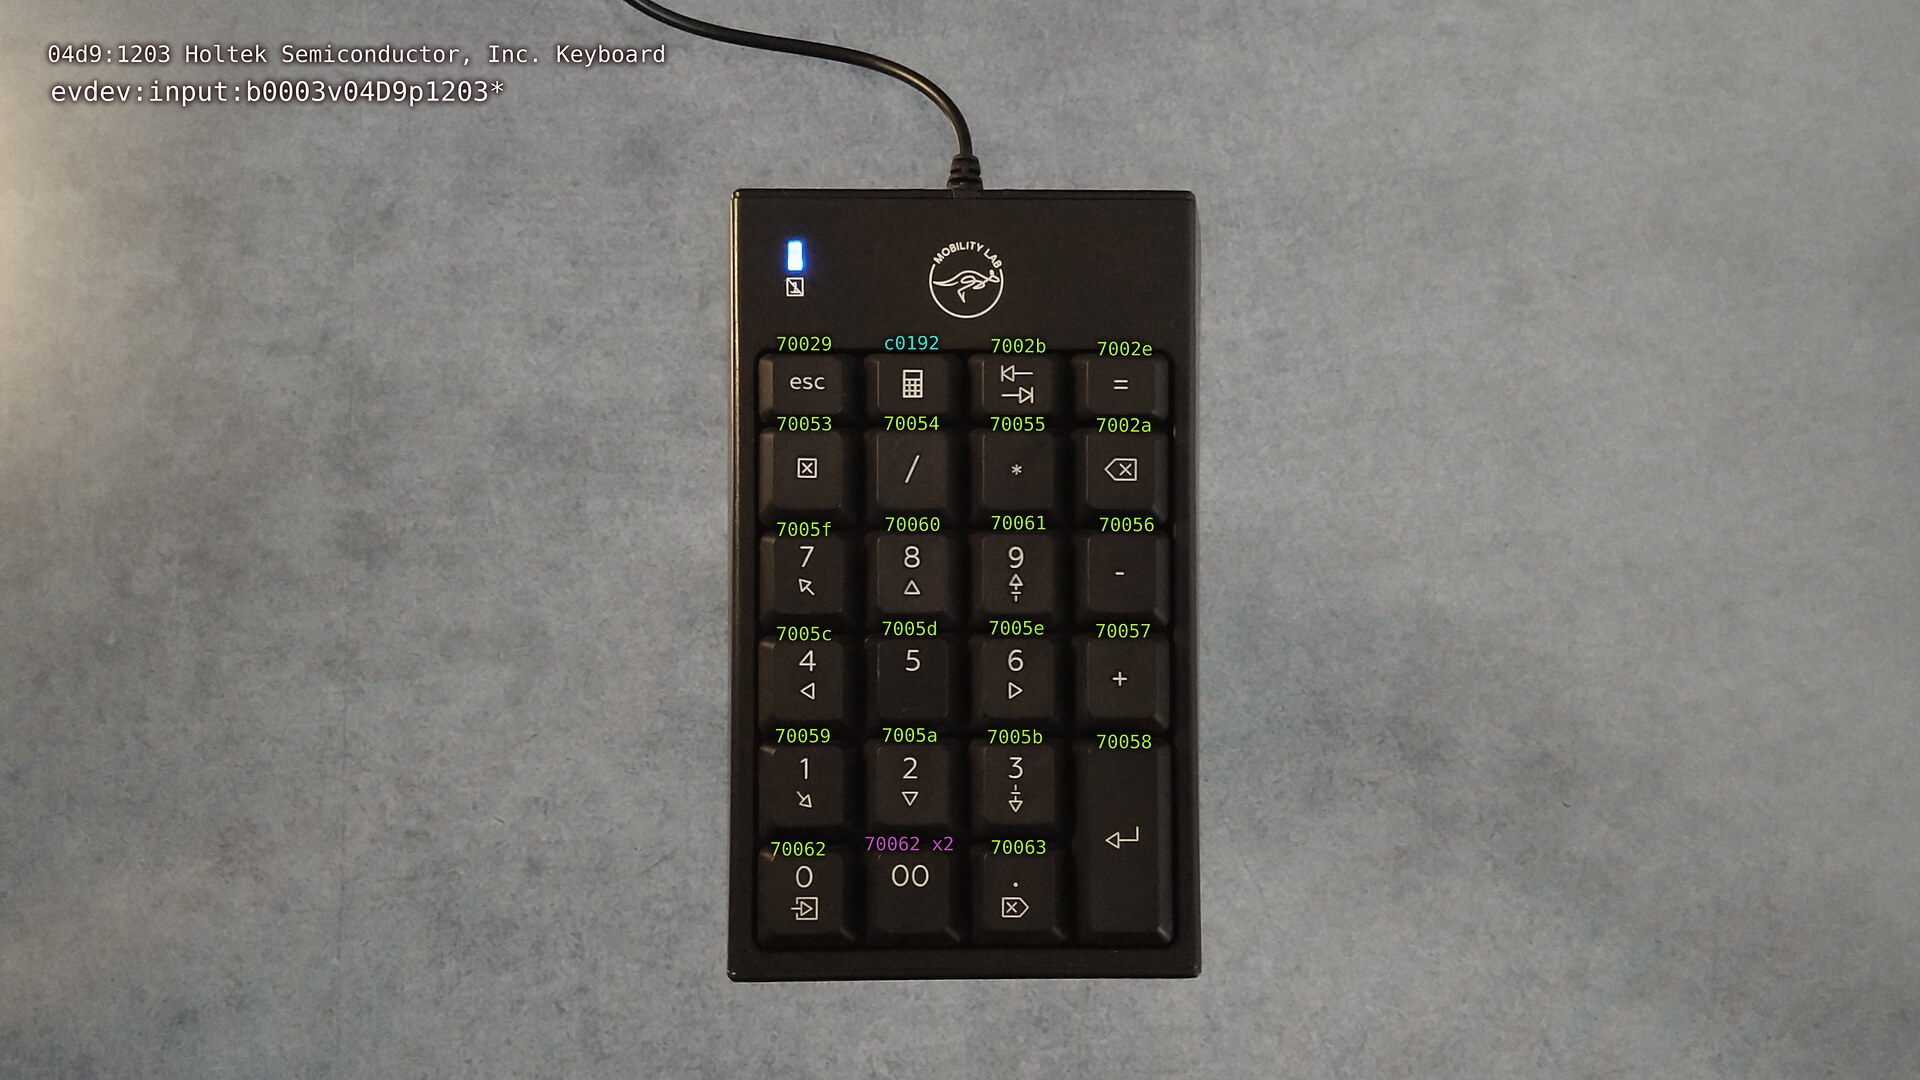
The keypad with the scancodes written on top of the keys (click to enlarge).
3. Assign custom keycodes to your device
Start by making a plan or sketch of your future keyboard layout; it's not easy, and it's a good idea to do this with a pencil and eraser, as you may change your mind during the design process.
To apply our plan, we'll create a new file at /etc/udev/hwdb.d/95-custom-keypad.hwdb (use your editor with administrator privileges, in my case: sudo micro /etc/udev/hwdb.d/95-custom-keypad.hwdb).
The filename is flexible:
95-= you can use any two-digit number to start your filename. It's used to sort the configuration files.custom-keypad= your custom description of your device, lower case, no spaces (you can replace it with the - separator)..hwdb= the extension, mandatory.
Here is the content I put in this file:
evdev:input:b0003v04D9p1203*
 KEYBOARD_KEY_70029=0x29 # [Esc] => [²]
 KEYBOARD_KEY_c0192=0x02 # [Calculator] => [&1]
 KEYBOARD_KEY_7002b=0x03 # [Tab] => [é2]
 KEYBOARD_KEY_7002e=0x04 # [=] => ["3"]
 KEYBOARD_KEY_70053=0x2b # [Numlock on/off] => [*]
 KEYBOARD_KEY_70054=0x10 # [/] => [a](q)
 KEYBOARD_KEY_70055=0x11 # [*] => [z](w)
 KEYBOARD_KEY_7002a=0x12 # [Backspace] => [e]
 KEYBOARD_KEY_7005f=0x1f # [7] => [s]
 KEYBOARD_KEY_70060=0x2f # [8] => [v]
 KEYBOARD_KEY_70061=0x15 # [9] => [y]
 KEYBOARD_KEY_70056=0x14 # [-] => [t]
 KEYBOARD_KEY_7005c=0x38 # [4] => [Alt]
 KEYBOARD_KEY_7005d=0x1e # [5] => [q](a)
 KEYBOARD_KEY_7005e=0x2e # [6] => [c]
 KEYBOARD_KEY_70057=delete # [+] => [Del]
 KEYBOARD_KEY_70059=0x2a # [1] => [LShift]
 KEYBOARD_KEY_7005a=0x56 # [2] => [<]
 KEYBOARD_KEY_7005b=0x2c # [3] => [w](z)
 KEYBOARD_KEY_70058=0x1c # [Enter] => [Enter]
 KEYBOARD_KEY_70062=0x1d # [0 => [LCtrl]
 KEYBOARD_KEY_70063=0x39 # [.] => [spacebar]
The first line targets the device:
b0003= 0003 stands for USB device.v04D9= first value of lsusb identifier, but capitalised and with a leading v.p1203= last value of lsusb identifier, but capitalised and with a leading p.*= wildcard to match any other number after it.
Then we have an incremented list of key definitions. It uses the syntax: KEYBOARD_KEY_<scancode>=<target keycode> #<a comment written the way you want>. About the scancodes, we should have the whole list thanks to evtest. The target keycode can be keywords from this list or Qwerty scancode in this type of visual. Just prefix the scancode with 0x and keep it in lower case. (e.g. Y = 15 => 0x15). Note that all changes will be made from the perspective of a Qwerty keyboard, so if you enter the keycode for 'a' on an Azerty, you'll get a 'q'.
When you are done, save, quit and refresh the system with this command line:
sudo systemd-hwdb update && sleep 2 && sudo udevadm triggerThe keyboard should work, but it is normal to have to make adjustments and go through several loops of editing and testing.
4. Customize your keypad
This part is entirely up to you. A simple suggestion for your project: draw on sticky paper labels and plastify them with clear tape, no need to sand the keys or anything.
For my part, I decided to experiment and paint the key with coloured nail polish. This varnish (acetone based) is very strong when dry and resistant to key presses. But it's also super thick and sticky and it's very difficult to make thin lines or details.
To clean the keys, I sanded them in two passes: 320 grit to remove the letter, then 400 grit to smooth them. I had a can of black spray paint around, so I applied a thin coat, as sanding the keys turned them a dull dark grey.
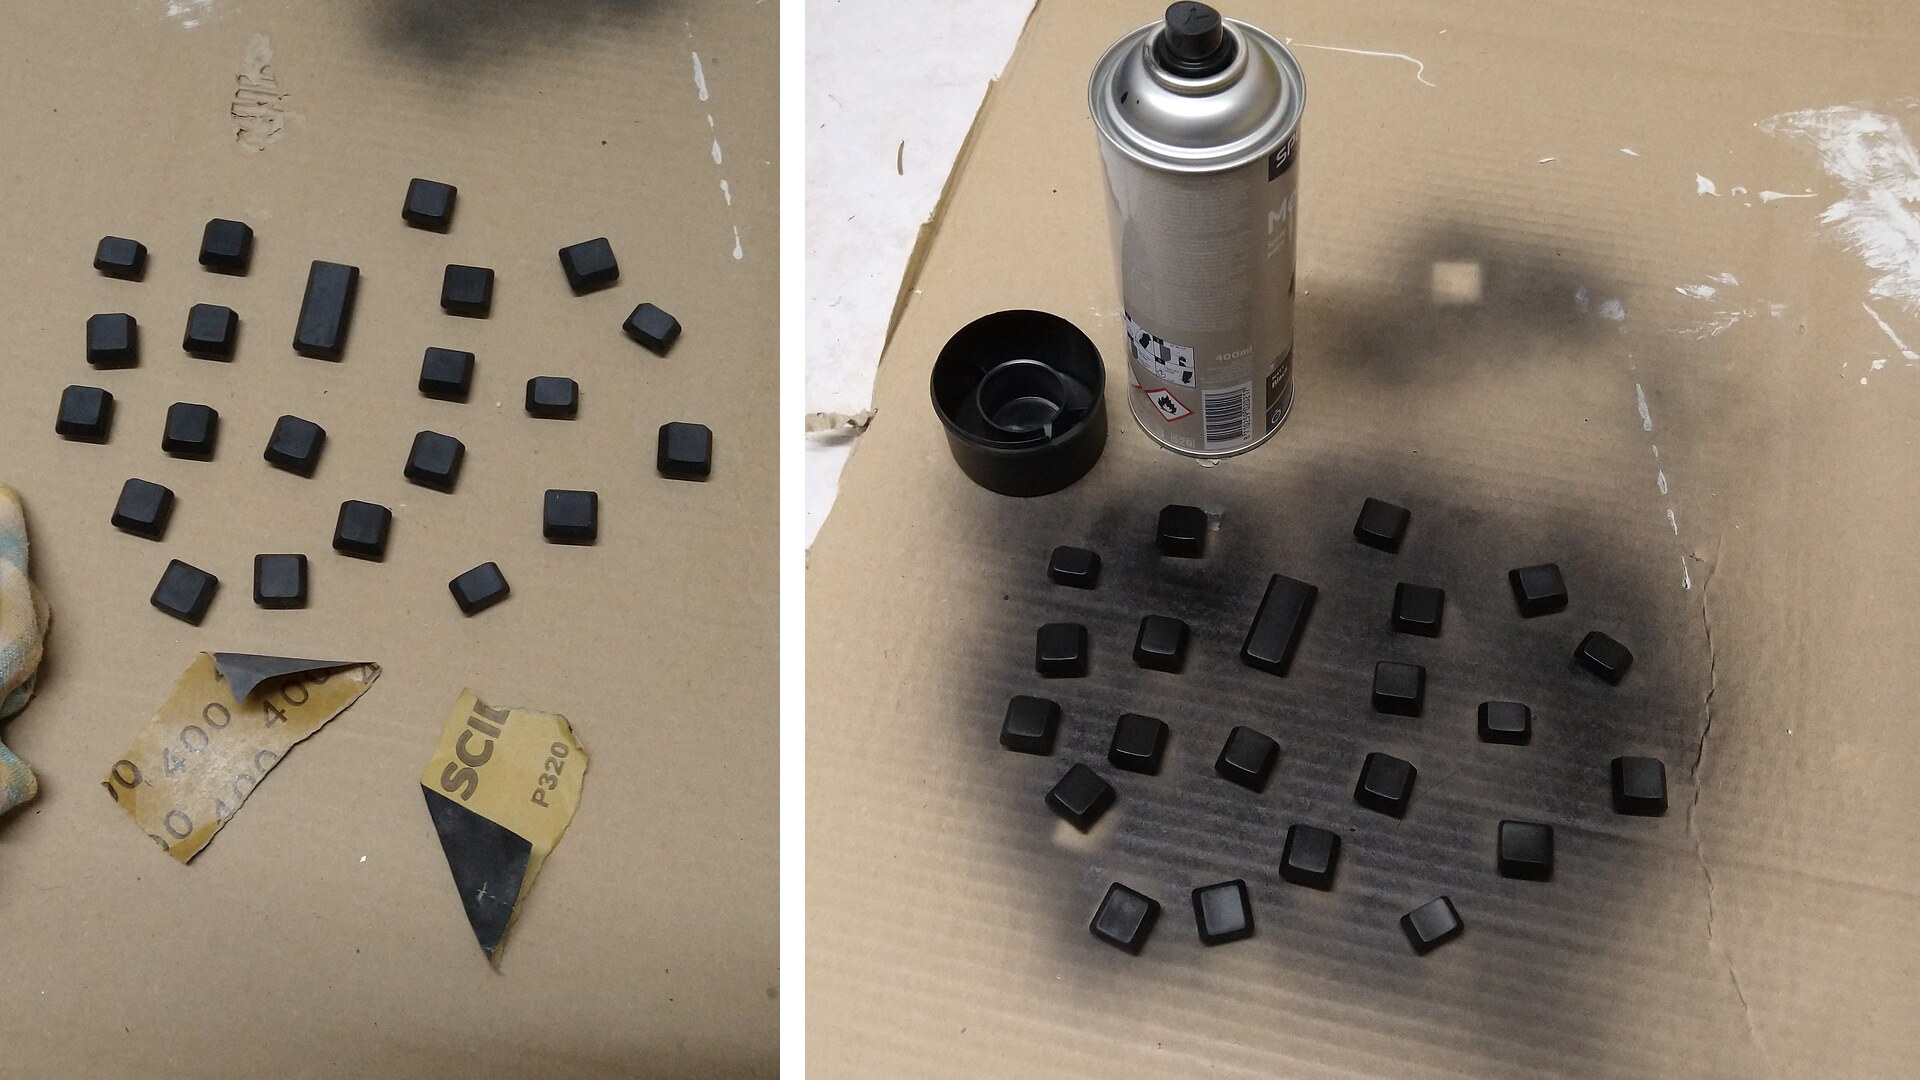
Sanding and coating with black paint.
My guideline was to make each key visually unique and not take the thing too seriously. I had a lot of fun! But I was often frustrated because my lines were very thick and wobbly and I was constantly fighting against the drying time and the lack of control.
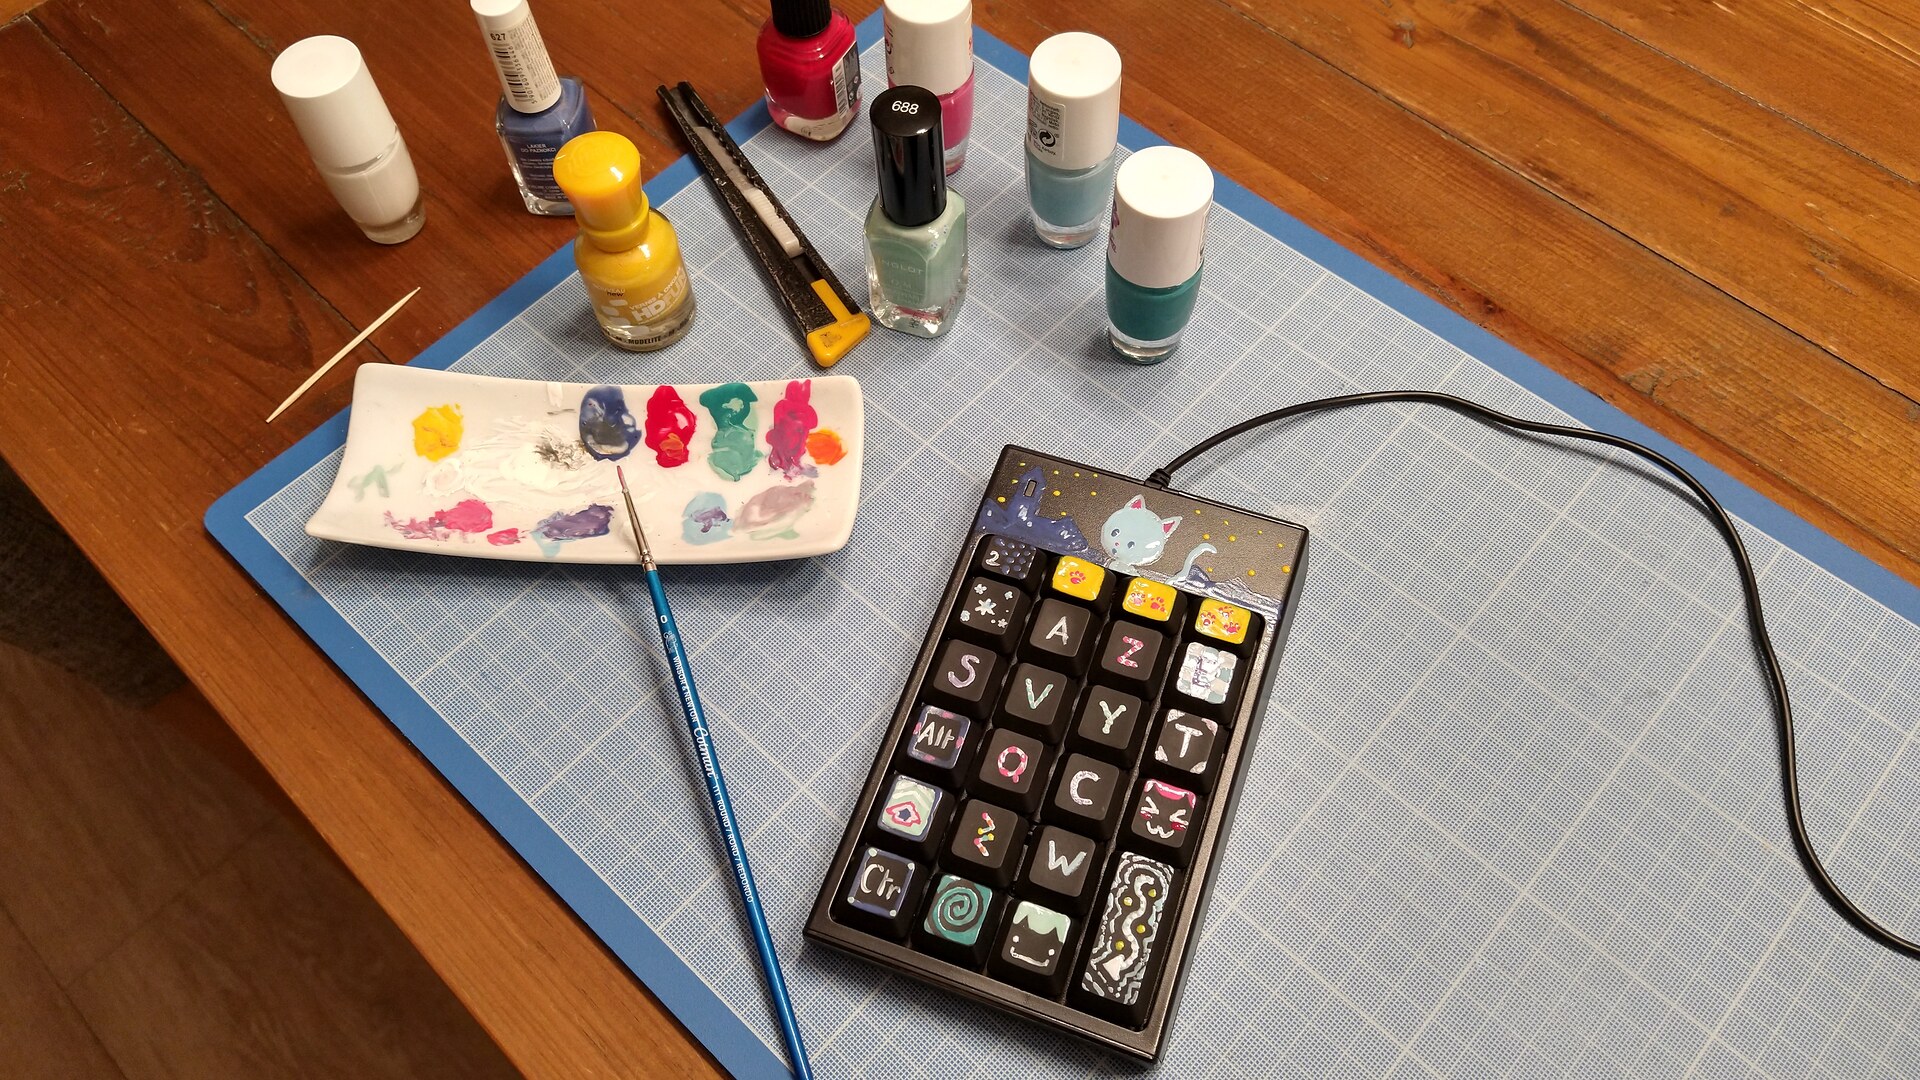
While painting the keys.
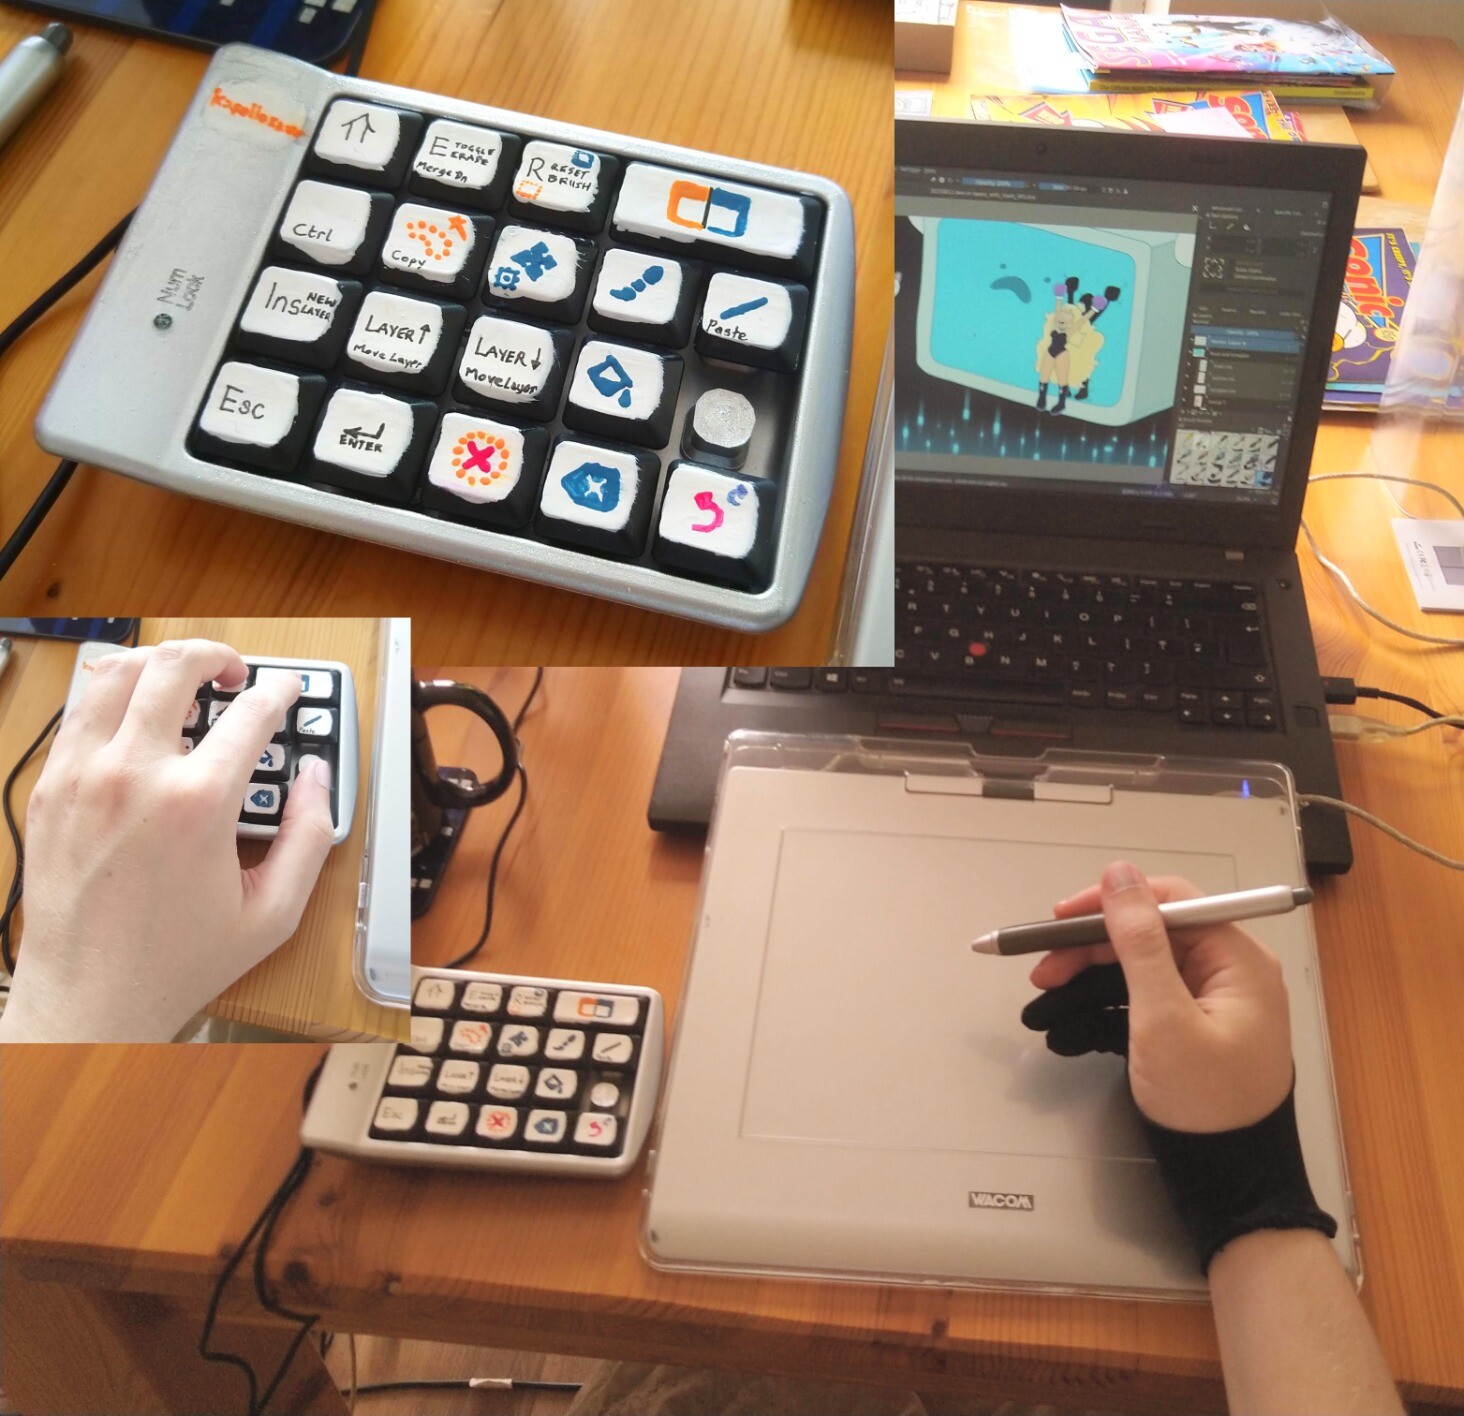
Finally, here's how I use the keyboard.
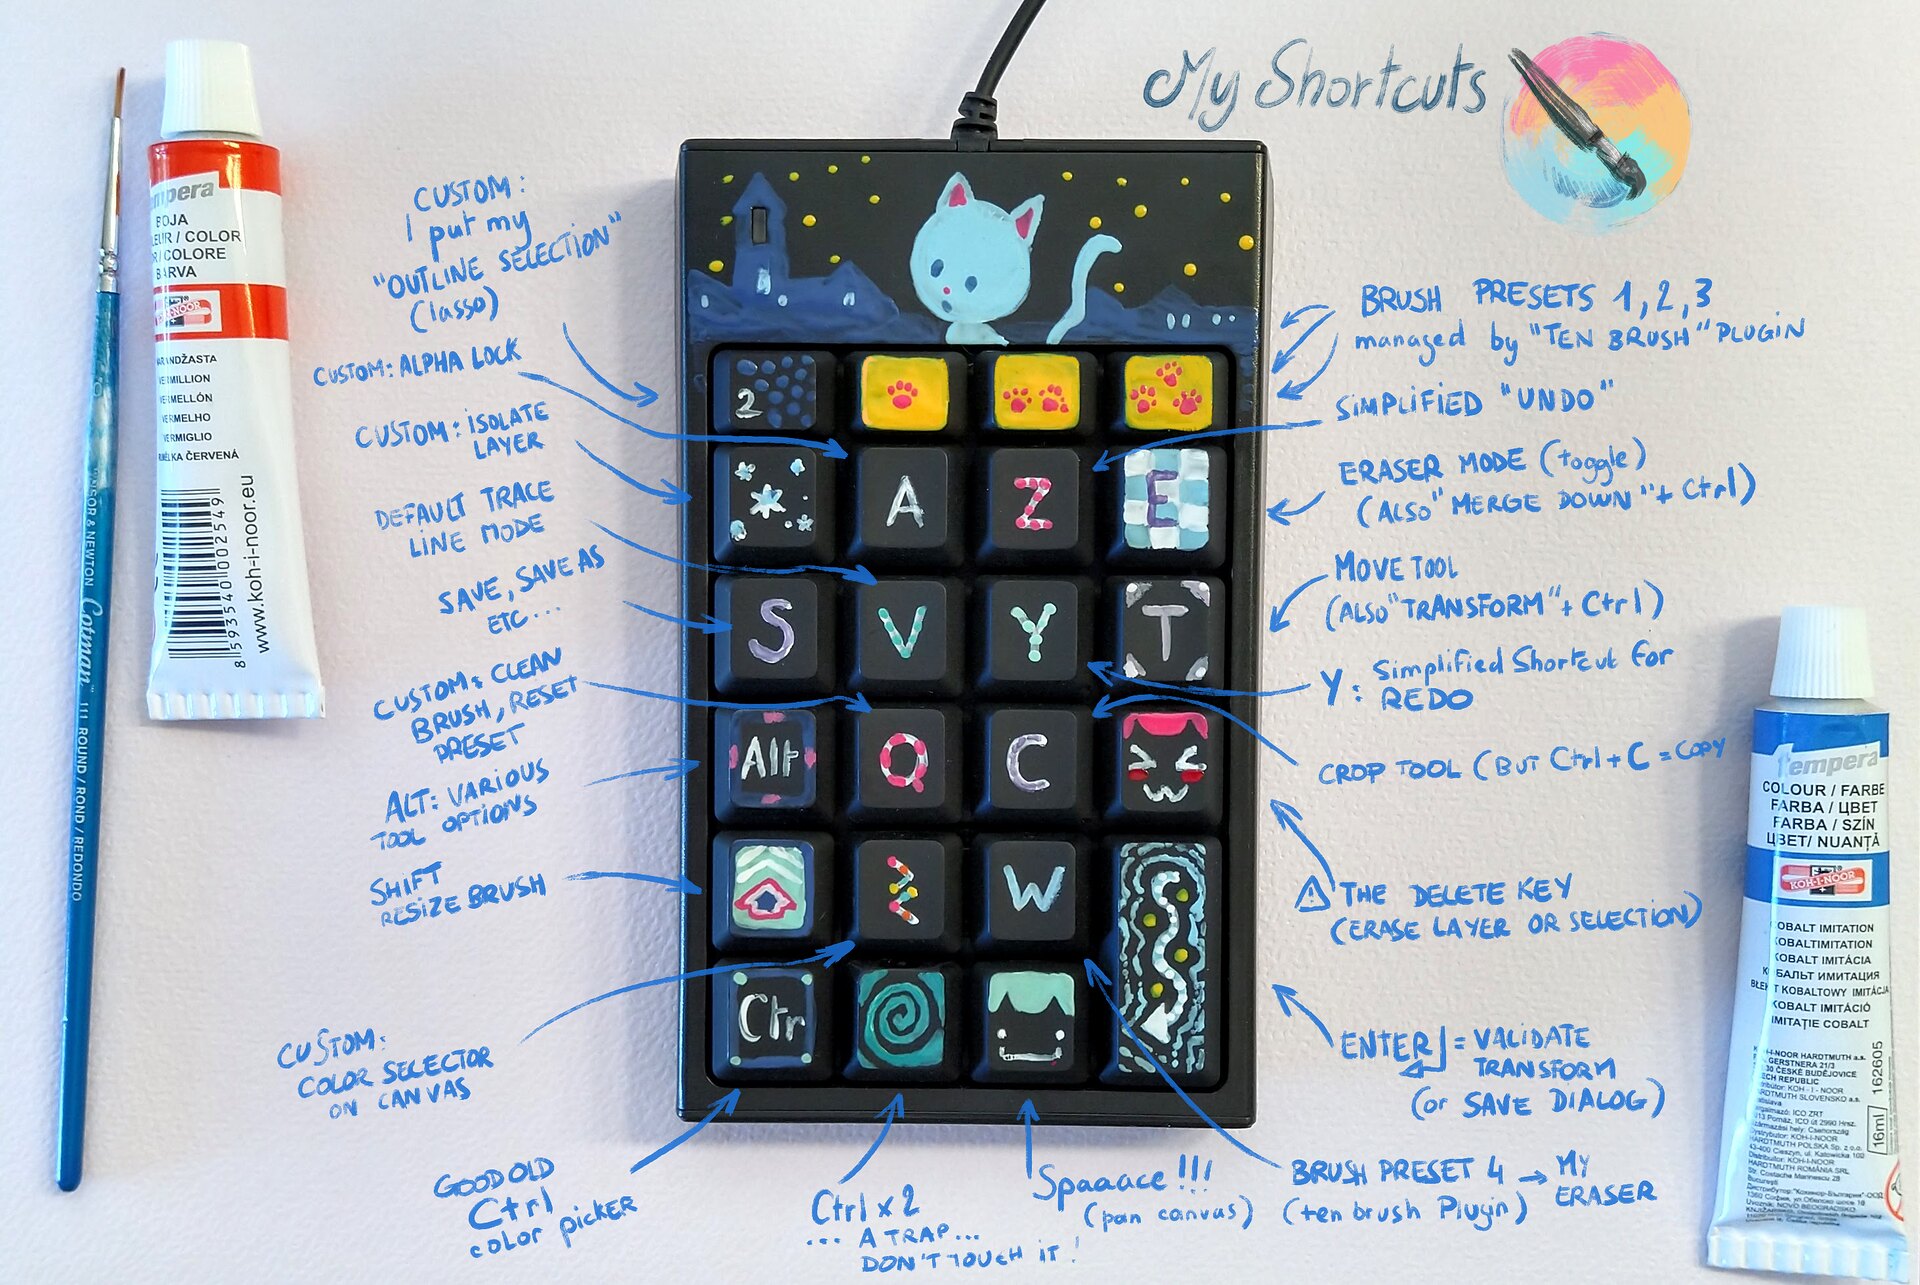
The final result with notes on how to use the customisation.
I wish you lots of fun with your own future projects!
Your customised keypads:
I'll post here photos of your keypads (with authorizations).
2023-09-10: Kathy Murdoch's "kapelloboard" (original post here)
Sources:
- https://www.freedesktop.org/software/systemd/man/hwdb.html : the manpage, a bit crude, but with tips.
- https://wiki.archlinux.org/title/Map_scancodes_to_keycodes : a solid tutorial with really cool links to go further.
- https://github.com/systemd/systemd/blob/main/hwdb.d/60-keyboard.hwdb : A massive hwdb file full of possible syntax example.
- https://www.youtube.com/watch?v=D0gTkPAkFIs : Nail painting art for beginners.
Other methods from the comments:
GUI method via Input-Remapper:
Moini posted a link to the free/libre and open source software Input-Remapper. I have tested it and it was easy to install following the instructions in the README.
This tool has a graphical user interface and will detect all your USB devices: your keyboard, gamepads, mouse and tablet. It can also enter macros and complex input (e.g. shortcuts such as Ctrl+Z). You can also assign multiple presets to the same device.
On the downside, you always have to have the software installed and running (or the systemd daemon), and if your device has a feature for going to sleep (or disconnecting from Bluetooth, or simply not being powered on), you'll have to reopen Input-Remapper and press 'Apply' after the device has come back from sleep. If the whole system goes to sleep, the connection might have difficulties to reconnect.
That's why I stopped using it after the excitement of the first few days of test. My keypad wasn't always plug and play and I had to go in a series of menus and clciks to get it ready again (something that I don't experience with the hwdb method described in the article). That's why I'll continue to prefer my method and have moved this part to the footer of the article as a note.
But Input-remaper is easy and your best option if you need complex shortcut or macros. Read the basic Usage tutorial section of the documentation and then the Examples. You'll save a lot of time and your imagination will open up to the many possibilities this software has to offer.
 346 -
346 -  670
670