


Tips for using Smart-Coloring GMIC filter

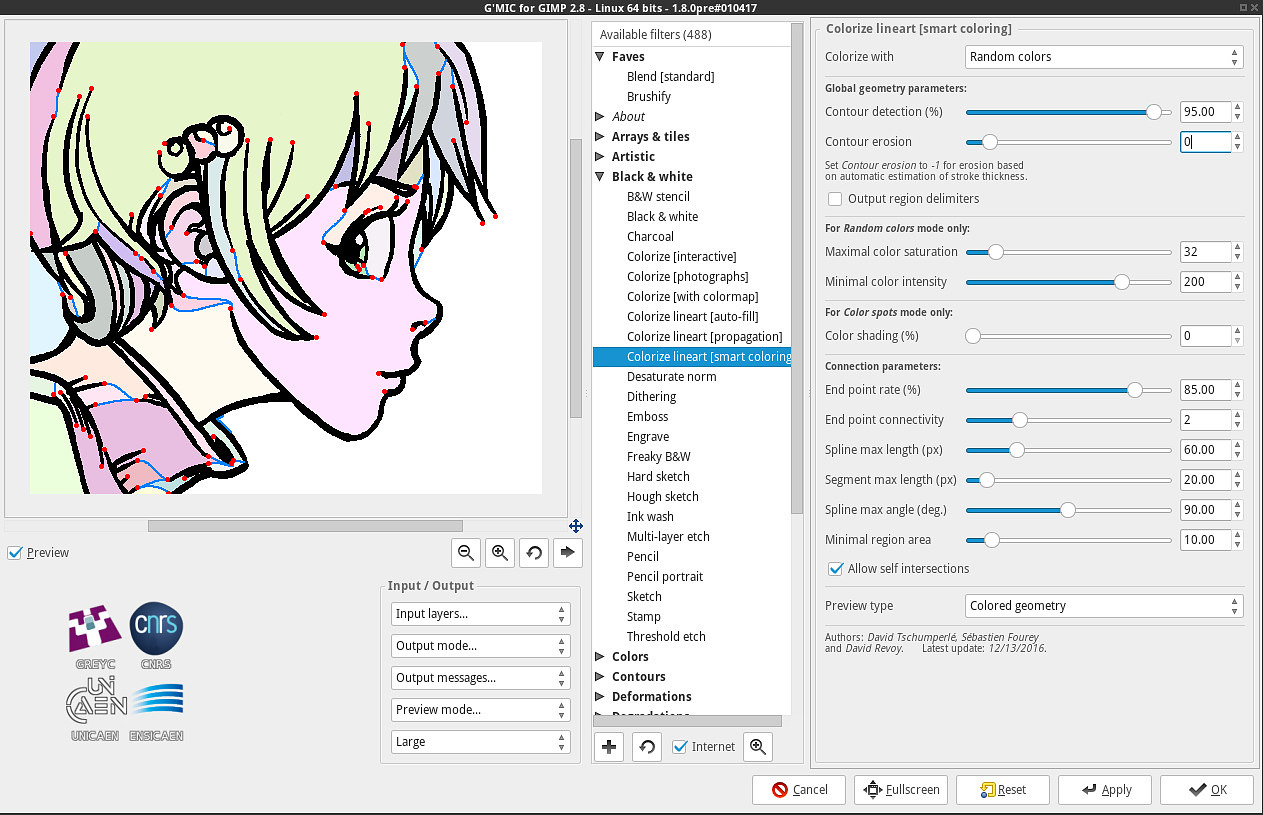
Here are my notes about the Colorize Lineart[smart coloring], a new GMIC filter to auto-colorize line-art created by David Tschumperlé, Sébastien Fourey and me. The workflow of this filter is really simple as you can see on the picture of the top:
- Open your black and white line-art
- Send it to the GMIC filter Black&White > Colorize Lineart[smart coloring] the filter will auto-colorize all the areas for you with random bright colors and split two layers: your line-art above the generated color-map.
- Open the result (the filter is really quick) in your digital-painting program, and flood-fill/replace the colormap areas with the colors of your choice.
- Shade on the top, paint, color-corrections and voilà!
The filter :
When launching Colorize Lineart[smart coloring] , the preview display red nodes at the end point of each detected lines, then between the nodes a bezier curve in blue is generated to help 'fixing' the tiny holes in the line-art, or fix the artistic 'missing lines' suggested by the artist. When applying the filter, the node in red and the blue lines disapear to let only two layers: the line-art and the color-map.
Pros
- Free/Libre and open-source.
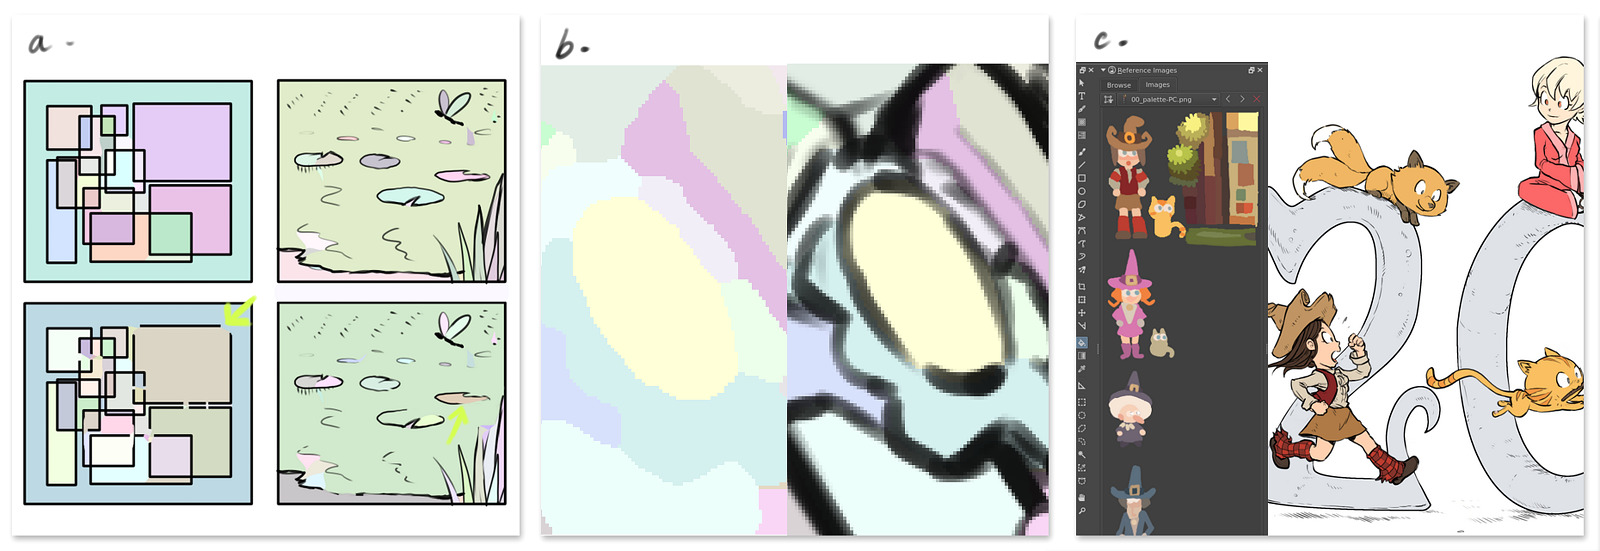
- (a.) Auto-close holes in line-art. ( eg. I made two simple test-artwork: on top with closed lines, on bottom with arbitrary holes in the lines. The filter find the holes, and reconstruct a bezier curved line to smooth the limit. )
- (b.) Result of colormap are clean aliased pure color areas easy to replace with a fill-bucket at low tolerance, with line-art over just perfectly center above it. No problem with the anti-aliasing or bluryness of the line-art (eg. a closeup without the line-art on left, with line-art over it on right ).
- Quick to use, just a filter to launch and quick to compute compare to all the other method I tested.
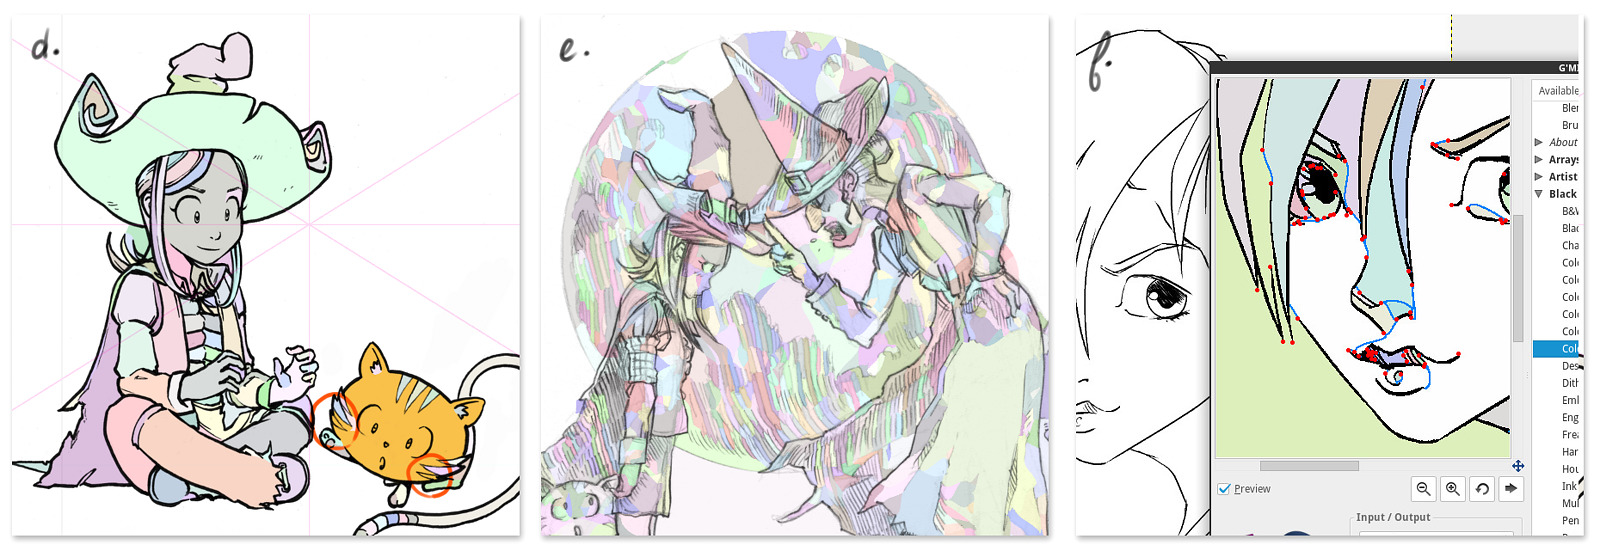
- (c.) Let you use your digital-painting software for coloring with your tools, palettes, color selections, etc. (eg. I can color in Krita taking advantage of the "Reference Docker" as a palette for color references, also fill-bucket on Krita is super quick and you can click 'Ctrl' to pick color with it at any time , or press 'e' to fill with 'eraser' blending mode, and get full transparency to remove backgrounds.)
Cons
- (d.) Some areas are sometime ignored or merged together. (eg: circled in red, some zone of the fur of the cat Carrot are merged with the body color. This part will need to post-fix the color map with an aliased brush , painting it manually ).
- (e.) Line-art with a lot of crosshatching render with two much little islands on the color-map to use it. it's definitely not a style suited for this filter. (eg. a pencil artwork of Pepper&Carrot episode 11, color map is crazy on the moon in background of the characters.)
- (f.) A limitation of the GMIC Gimp plugin; the preview windows is not really "What You See Is What You Get", it needs a lot of trials and errors for an artist to test the settings (a lot of sliders) and get a setup working with a style.
Install/test
You can already test this filter in GMIC 1.7.9 and 1.8.0beta, I'm using here the GMIC plugin for GIMP, import/export as open-raster *.ora files my line-art and islands to fill and paint them in Krita. For using the filter directly in Krita, we need to wait; last version of Krita 3.1.1 embed only GMIC version 1.7.0.
More informations
Everyone reading my blog already know David Tschumperlé: he is the creator, manager and main developer of GMIC and a good friend. He is a permanent CNRS research scientist, working in the Image group of the GREYC Lab in Caen. Last November, I was invited to join during a couple of day his workplace to work on the research of a "Style transfert" method. Style transfer is a technique to create an image from two sources; -in a nutshell- your holiday best landscape photo and a masterpiece of Vincent van Gogh. The expected result: your holiday photo painted in the style of Vincent van Gogh. Some algorythm already does it, but the results are variable and the existing methods needs a lot of computing time and big databases. At GREYC, the plan is to find a better and more lightweight solution, filter based. As an artist, I was invited to show how I break-down the copy of a painting and give informations on how I perform this "Style transfert" manually as I did on this video.
During this short period of work we had in Caen, I made a conference for scientists at CNRS. At the end of the conference, I presented the making-of episode 12 of my webcomic Pepper&Carrot as a proof-of-concept about merging multi computer tools: filters, scan, 3D, etc.... This episode mix also a lot of GMIC filters and a very old script for GIMP named Multifill. It's a filter I used 6 years ago on my early comic-style test. Unfortunately, with newer version of Gimp, the filter became very buggy, slow and unmaintained. David was surprised to learn that it took hours for this filter to auto-floodfill all the potion on episode 12. Two hours after the conference, he made a version of Multi-Fill in GMIC named Colorize lineart[auto-fill]. His filter matched the same work than 'Multifill' but in less than 30seconds! A couple of discussion later in front of a "Coloring Pages" hanging on the wall and colored by a kid of the crew, we started to share common issues of automatic coloring filter and what method exists to colorize black and white line-art. The work on the new filter Colorize Lineart[smart coloring] came later after I came back home. I started testing it and giving feedback while David Tschumperlé and Sébastien Fourey kept improving it.
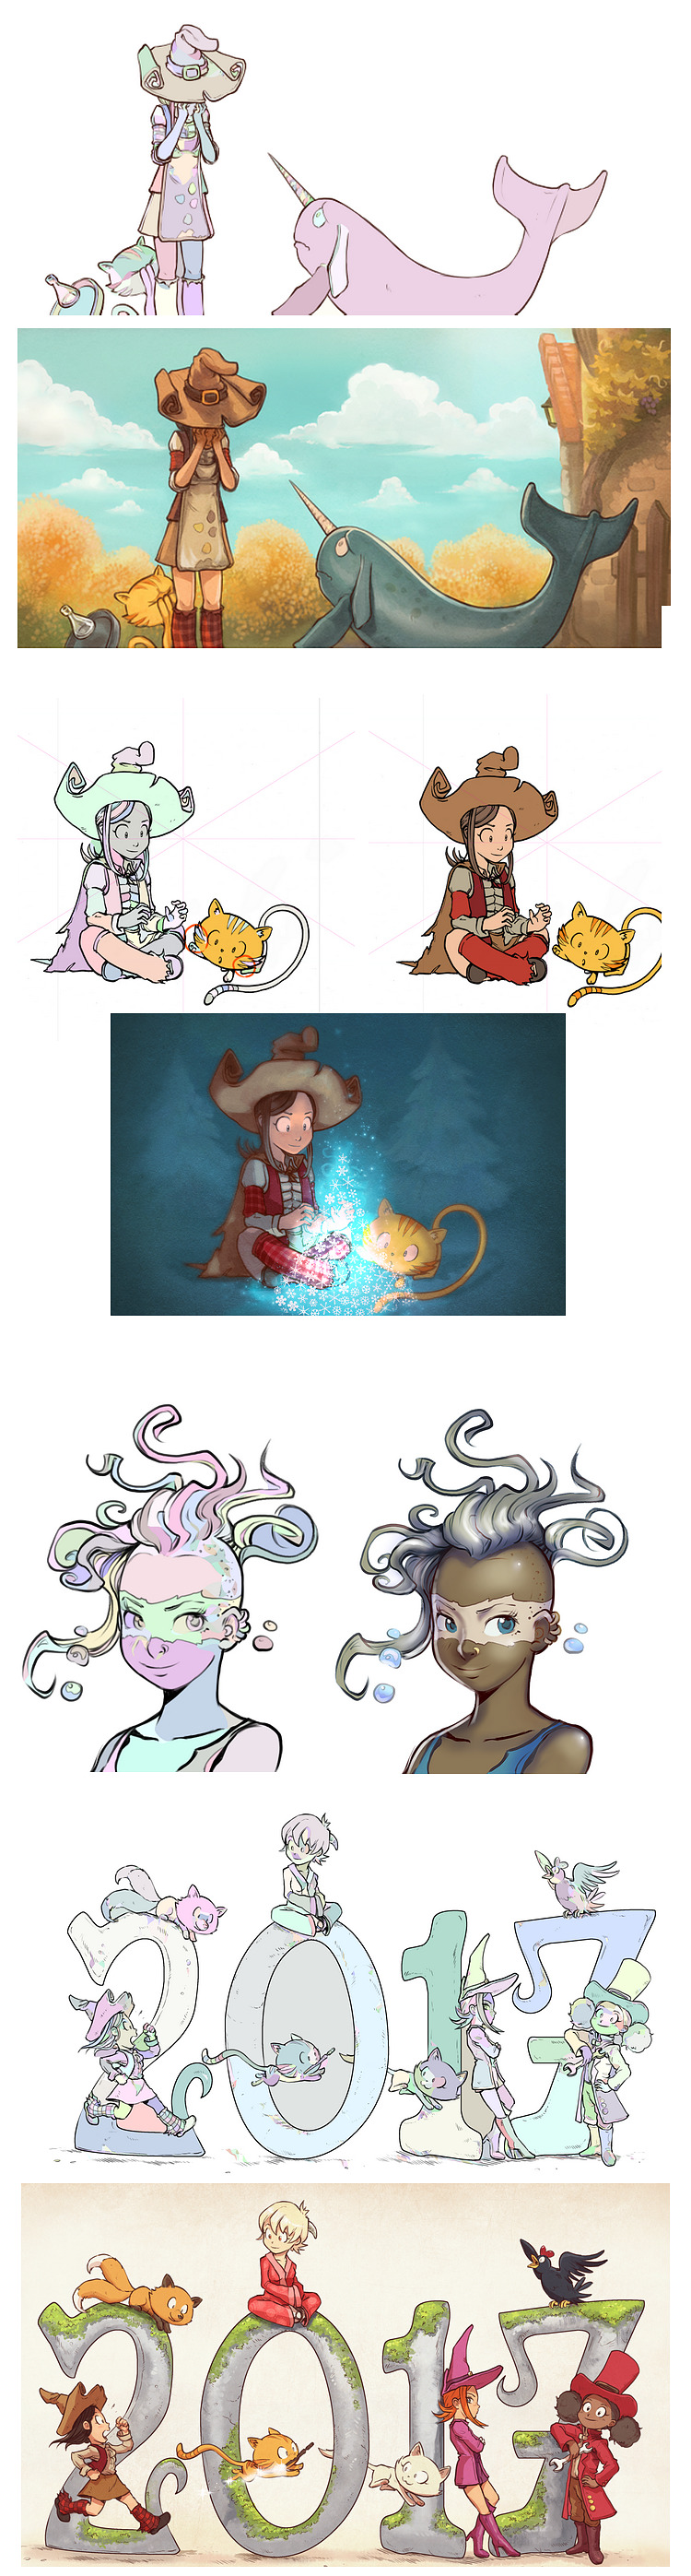
Gallery
I'm still testing the filter. A single panel of comic here, a little artwork there. Here is a gallery of recent works made with it.
Your feedback?
A lot of digital artists reads my blog ; so question for you: what do you think about this new method? Do you think it can save you time when coloring your line-art? Would you plan to use it? Do you have a quicker method? Let me know on the comments.

30 comments
This looks really easy and useful! I really like the 'interactive colourise' filter you posted about some time ago, but I often don't think to take the time to use it. I look forward to trying this one out!
Brilliant stuff! You always put up stuff that is absolutely fantastic, innovative and straight forward on helping other people involved with digital art. Thank you for that! Wish you an amazing 2017!
P.S. - did you decided on what distro and desktop interface will use in the future? I made a few tests myself and for now i'm still on KDE 4.14.2 ...
Yes, this one will be easier and quicker to use.
With the previous one (Gmic, Colorize[interactive]) I didn't liked this things:
- Placing all the nodes, and doing a lot of trials and errors
- Picking colors with tools built-in Gmic
- Be locked into a 'mode' where I can't save my work. An electricity cut during 20 minute of adding nodes, or a random press on 'enter' by one of my cat and boom; work is lost.
- Sometime non WYSIWYG
This filter is a bit faster, more predictable on a production workflow.
Thank you!
I'm still using Manjaro Linux since the last 8 month on both desktop and laptop with XFCE desktop. I had to switch after the fail to adapt to Ubuntu 16.04 or Linux Mint 18 ( I made an article about Ubuntu 16.04 with Cinnamon desktop in April 2016; but 1 month after I started to get too much bug and problems, so I switched to Manjaro. )
I like Manjaro with XFCE. It's a distro where I'm free to customize, make a lot of scripts ( for everything: xsetwacom, dispwin for color calibration, xrandr to place my monitor layout, etc.... ) and rolling all the time. The documentation of the Arch Wiki is cool too ; I'm learning to 'fix' my distro from time to time and not reinstall when problem arise. It's defintely not a beginner distro ; but it tries to smooth the 'elitist mentality' I don't like in Arch Linux. I probably had to manually do tweaks to get all my driver working correctly ; but I feel independent this way.
I'm still unsure to do a full article about it. Maybe just a showcase and sharing my script and how I perform all the day tasks? Hard because all this resources breaks so quickly...
KDE 4.14.2 is a good choice. New plasma5 is still a full regression compare to 4.x in my opinion. It's amazing Plasma5 still don't have any tablet panel or built-in color calibration panel...
My latest tests i made where with: KaOS-plasma5, Mint-18.1-cinnamon, Mint-18-plasma5, Manjaro-kde-16.10.3-stable, Solus-2017 and Fedora25-plasma5. I really love the way Manjaro is build and seems a very solid distro, but couldn't get the Graphic Tablet Configuration to work on Plasma5. In Fedora25 is quite simple and works 100% with no stress to compile from source, just make all the updates after the install, reboot and in search "wacom" in Apper will come up the kcm_wacomtablet version 3 beta1 ... Still it doesn't impress me with a huge amount of applications by defaul. Krita is the latest version 3.1.1, but adding repos manually might be a way to get a solid system. I still test ...
I love Mint and the way they handle the packaging and also be able to use PPA, but i don't understand this kcm_wacomtablet issue on plasma5 ... I don't know exactly how much influences the Qt version how Krita performance on KDE4.x, but sometimes i feel like is not at 100% potential. Is the only reason i want to change. Will see. Thanks again for sharing your experience. Cheers!
I WANT IT!!! Where can we get this awesome plugin? Thanks for the info and your hard work.
Does kcm_wacomtablet version 3 beta1 you are talking about is a GUI for tablet in KDEPlasma5 ? I'm very curious about it. Here I setup now everything via terminal for tablet. Using Xsetwacom and xinput_calibrator.
For my D.E. choices ; on my experience, I found the desktop using the GPU ( Gnome Mutter, Cinnamon Muffin, KDE Kwin, Unity Compiz ) to affect the performance of the canvas in Krita and the smoothness of painting experience. After tests, I couldn't go back to this D.E... I found good performances and smoothness in digital painting, but also 3D editing and more in: Open-box, Xfce xfwm, MATE Marco (Old GNOME2 Metacity), Awesome, i3 . As I like the features of modern desktop, I kept XFCE. But MATE is also now back on my list of future to-test. The project has good health, and recent switch to GNOME3 ( XFCE does it too ) will probably make the XFCE and MATE app easier to mix and then it means more choices for the end-user. I like how this two teams keeps a sort of Unix cross-compatible and modular design.
:-)
You can get it by :
- Installing or compiling the latest GMIC for GIMP ( 1.8dev, http://gmic.eu/files/prerelease/" rel="nofollow" rel="_blank" title="http://gmic.eu/files/prerelease/">http://gmic.eu/files/prerelease/ )
- Installing the previous stable version (1.7.9 ), but this one has issues for this specific filter. It will work, but error like missing islands or weird lines might appear more often.
Why not in Krita?
Because Krita embed version 1.7.0 of GMIC (released in February 2016) and new filter can't run on old version of GMIC. If you wonder why Krita team doesn't update GMIC, I can try to explain it with what I'm understanding of the situation. The main developer for this part of Krita is not active anymore. GMIC uses a different codebase and way to build than Krita: it makes problems for being compatible on all the platform proposed by Krita. I'm even not sure if GMIC is available on the Mac version of Krita. I heard GMIC to be a very fragile part in Krita. Right now the project leader decided to keep this GMIC 1.7.0 version; certainly because more work are necessary to update GMIC and this version is 'working'. The GMIC plugin in Krita still has a lot of problems and some of the main features are missing: replaying last filter with Ctrl+F, saving favorite with custom settings, remember the last sliders. Unless knowing GMIC precisely, this plugin offer a "GMIC in advanced" mode.
The future for Krita plugin ?
The small team behind GMIC started an ambitious project: a unified graphic user interface for all the applications. This way GMIC will be more 'stand-alone', the graphic interface directly maintained by the creators, and all software as GIMP, Krita or other will be able to just let the end user install it and only activate an option if the GMIC app is installed. With this context, I wouldn't advice Krita team to do work to update the GMIC Krita plugin ; but more to wait and invest time later to call this future version of GMIC. Right now Krita team has a lot on the plate with 3.1, animation and SVG. Even if I'm probably the most intensive user of GMIC in Krita, I don't think maintaining the Krita-GMIC plugin as it is now is a good idea ( unless it's a one evening hack to do, but I'm sure it's not ).
Yes, the kcm_wacomtablet version 3 beta1 is the GUI that works for Plasma5 but for now i could get it on Fedora25 only. Some time ago i wrote to "ETRIC", the guy that started this project, and send him the correct buttons configuration for Cintiq22HD, after i messed up a bit with the source was working. He got it improved, but still no major change for most Plasma5 distros.
The best thing about it is that you can create different profiles for the same tablet, but it can handle two tablets simultaneously, each with their own multiple profiles. All the express keys can be mapped custom. This is the screenshot with the version of KDE and Qt http://www.mediafire.com/file/zmzbj9dadhbsvv4/GTC_version.png
With the xsetwacom i can get only one tablet working at a time ... This weekend and next week i will have more time for investigation and i'll let you know my findings. I think you have better skills than me to spot the pro and cons and how to get a good distro.
Ha, the Cintiq22HD. I had it in April for 3 weeks at home, but I didn't liked it a lot. I switched back to my old Intuos3 A4 and sold it back while it was still 'new' to get a good selling price.
But I could work on a xsetwacom script with it, here it is if it helps you. ( save this in a eg. wacom.sh script, put it in execute mode, and execute it at system start up )
#! /bin/bash
# Setup xsetwacom script for Cintiq 22HD
# License: CC-0/Public-Domain license
# author: deevad
# Tablet definition
tabletstylus="Wacom Cintiq 22HD Pen stylus"
tableteraser="Wacom Cintiq 22HD Pen eraser"
tabletpad="Wacom Cintiq 22HD Pad pad"
# Reset
xsetwacom --set "$tabletstylus" ResetArea
xsetwacom --set "$tableteraser" ResetArea
xsetwacom set "$tabletstylus" RawSample 4
# Screen mapping
xsetwacom --set "$tabletstylus" MapToOutput "HEAD-0"
xsetwacom --set "$tableteraser" MapToOutput "HEAD-0"
xsetwacom --set "$tabletstylus" Area 693 693 94974 53592
xsetwacom --set "$tableteraser" Area 693 693 94974 53592
# Stylus
xsetwacom --set "$tabletstylus" Button 2 "key Control_L" # Ctrl color picker on first button
# button on left
xsetwacom --set "$tabletpad" Button 2 "key z" # undo
xsetwacom --set "$tabletpad" Button 3 "key e" # color picker
xsetwacom --set "$tabletpad" Button 8 "key Shift_L" # resize brush
xsetwacom --set "$tabletpad" Button 9 "key Control_L" # color picker
xsetwacom --set "$tabletpad" Button 1 "key KP_Divide" # '/'
xsetwacom --set "$tabletpad" Button 10 "key m" # mirror
xsetwacom --set "$tabletpad" Button 11 "key y" # redo
xsetwacom --set "$tabletpad" Button 12 "key o" # opacity +
xsetwacom --set "$tabletpad" Button 13 "key Tab" # canvas-only mode
# left strip
xsetwacom --set "$tabletpad" StripRightUp "key KP_Add" # zoom in
xsetwacom --set "$tabletpad" StripRightUp "key KP_Subtract" # zoom out
---(end)---
Also, here was the note I made about button mapping xsetwacom ID :
http://www.peppercarrot.com/extras/temp/wacom-button_net.jpg
Maybe it can help :)
Great post! Will definitely try this the next time I colorize linearts.
PS: I particularly liked the side-notes on style-transfer since I have already read about it a few weeks ago and was very fascinated by the fact that the neural-network based algorithms (kind of) resemble how the human brain separates artistic style from image structure.
I don't know much about image filters, so this might be a stupid question, but do you know (or think) if this resemblance might also be recognizable in a filter based approach?
That's a good question. For sure, we are still more near to the begining than the into the real work.
The filter approach split the image in pass, then re-composite it:
- A detection of edges, and reproduction of them
- A detection of the textures
- Applying the thickness of a detected brush size ( or having a slider to input a level of detail )
- Matching color palette.
For sure , the approach by filter will not be full automatic ; and sliders/setting will be exposed to the end user for 'cooking' something better.
Thanks David and David and Sébastien !
Looks really interesting, I'll try as soon as I can and let you know my feedback ;)
I tested the interactive colorizing a lot... but finally I'm not using it anymore because it wasn't really saving time in my workflow, probably because of the interface and the added technical steps. In my workflow the best use was to apply one color for the foreground, and one for the background to create an alpha silhouette of the filling zone, then painting my colors restricted by this alpha.
Is it possible to limit this filter with only two colors (foreground and background) ? As far as I know there is no way to do that with GMIC today...
Hello Nylnook :-)
Thank you for the feedback.
With this filter, extracting background is really quick ; all colors proposed by the filter are bright-one to ease color replacement.
After applying the filter, just fill your background elements with a pure green ( green screen ). When it's done, select all the green ; remove them then invert selection and fill what remain to another color.
I don't thing GMIC can guess what is inside or outside ; there is always a "hole" in the artwork to fix manually.
Dave, I downloaded this version of Gmic into Gimp (not Krita) and found 'Colorize Lineart'. I set my controls to match yours exactly and the blue and red nodes appear in the preview, but when I click to make it happen ... nothing. I've tried different images and my tech looked at it but my images just will not color. Any ideas?
I have no idea Jessica. If you match this screenshot :
https://www.davidrevoy.com/data/images/2017-01-06_smartcoloring_gmic_preview_02-screenshot.jpg
But have no results, maybe it's a bug. Here I'm using Gimp 2.8.18 , GMIC 1.8.0pre#010417 (a version built from sources) on Manjaro Linux XFCE.
What setup/version are you using?
merci beaucoup encore une fois
I am using Krita 3.1.2 and their is no option of Colorize Lineart [smart coloring] rather there are options like colorize [comic] colorize [interactive] colorize [photographs] and colorize [with color map] can you please help?
oh wait, I am so sorry if it's about GIMP! I though it was krita tutorial.....
Hey, no problem :)
Yes, this filter require a 'new version of Gmic' and the Krita team had issue with updating the plugin.
The team is right now in development of a new way to communicate with Gmic ; and this should make possible to use this type of filter inside Krita directly for maybe 3.1.3 ; or 4.0
I couldn't find this filter. There's a colorize comic filter though.
This method is quite time-efficient, but the end result is kinda sharp due to the aliasing. Do you have any tip on how to process it so it's less jagged?
You need last (development) version. And not in Krita... It's written on the article.
Anti-aliasing would be an handicap for 'island selection' of colors ( eg. all anime industry workflow works with pure aliasing for this reason ). If you work at a higher resolution, the aliased frontier will be totally covered by your lines. You can also use a Antialias filter, Gmic has a very good one.
This tool is convenient and color also is nice. Thanks for sharing the article, with this tool I can make my picture become more beautiful.
is this available for Krita yet?
Yes the GMIC is in the latest version of Krita, version 3.1.4, but it do not look the same as in the above screenshots and I can not make it work :(
Hello,
Any update for the standalone version ?
Looking for either as a plugin for Photoshop and Clip Studio Paint or as a standalone for the mac OS platform
The standalone version is available on www.gmic.eu website ; it's called Gmic-Qt now, and it works.
I have no idea if a ClipStudioPaint or Photoshop dev made a plugin with it. Don't expect it done by Gmic developper. ;)
Hey David, thanks again for the input, I tried to use this with Krita and it crashed my machine, I'll check with Gimp and see what happens, I don't know if this is off topic but I wonder what happened to the old colorize comics filter, the one you use with color spots on a layer below, thanks again!
Post a reply
The comments on this article are archived and unfortunately not yet connected to a dedicated post on Mastodon. Feel free to continue the discussion on the social media of your choice. Link to this post:You can also quote my account so I'll get a notification.
(eg. @davidrevoy@framapiaf.org on my Mastodon profile.)