


Comics inking and coloring with Gimp 2.6

1) Scan the pencil drawing :
First step is the scanner acquisition with Xsane of my drawing (HB pencil on A4 paper ). I scan it in Gray level at 300dpi. To produce a beautifull result , I play with the level to clean white.
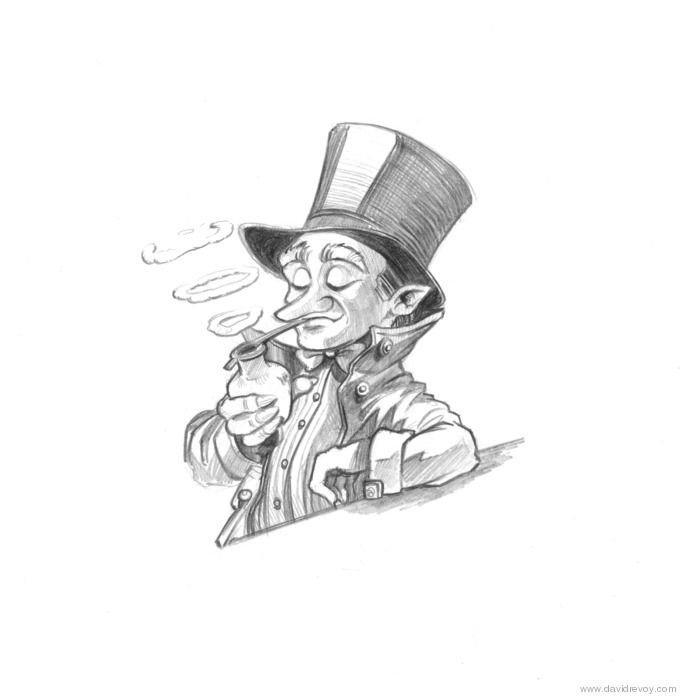 the original pencil drawing
2) Inking :
I start to convert my pencil artwork in a light blue range of colors ; I use the tool colorize ( Color > Colorize ).
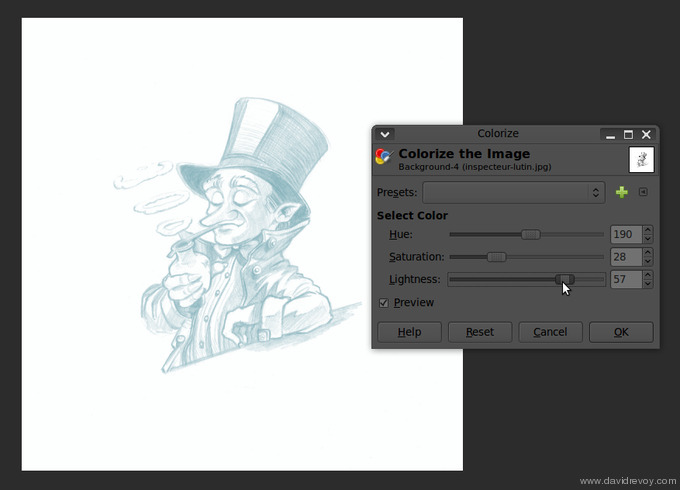 the colorize tool in action
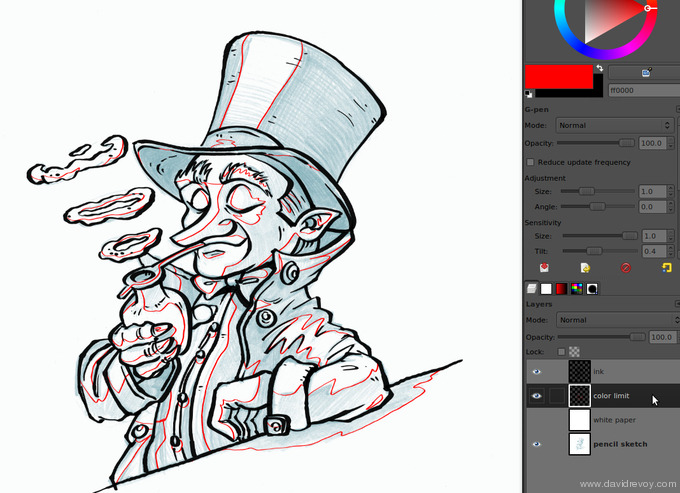
With the G-Pen tool of Gimp-painter I start to ink my drawing, on a separate empty layer. The screenshot above show the setting I use with G-Pen.
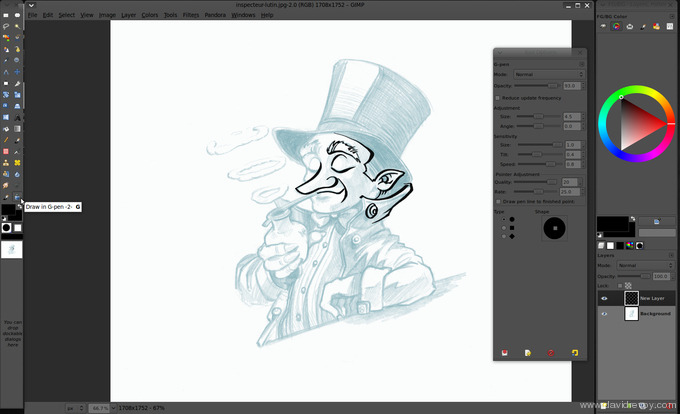 starting the inking process
At the end, I add a white layer under my line-art to finish my inking. When it's finish , I save my work, and I save in another file a copy of the final Line-art layer ; I will need it later.
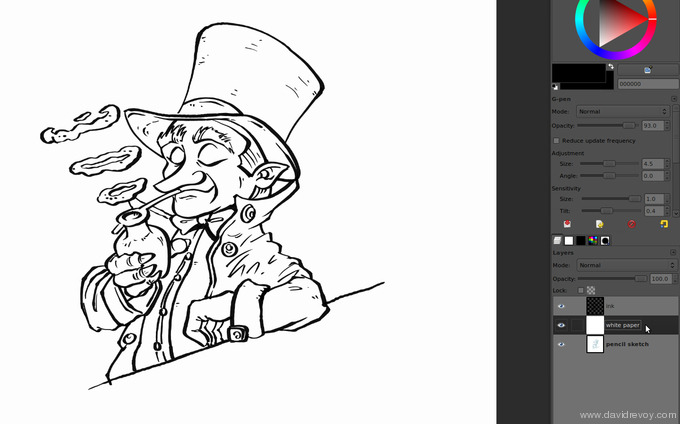 finishing the inking with a white layer under
3) Multi-Fill
This is probably the main section of this tutorial. I add a new layer under my line art, and I start with a thinner G-pen in red to draw the limit of each different color zone I want. I flatten the layer when it's finish.
 preparing the zone for the cell-shading
I launch the script 'Multi-Fill' with the same setting as in the screenshot above and I let the script detect each closed zone, and fill with a random color.
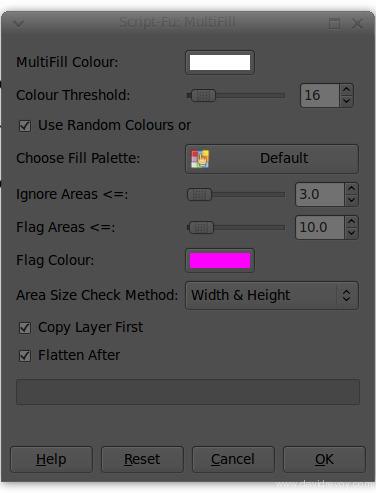 the flatting-tools script in action
When it's finish ; delete the layer above with Line-art + red limits ; and load ( load as new layer ) your old copy of final Line-art ( the one without red lines ).
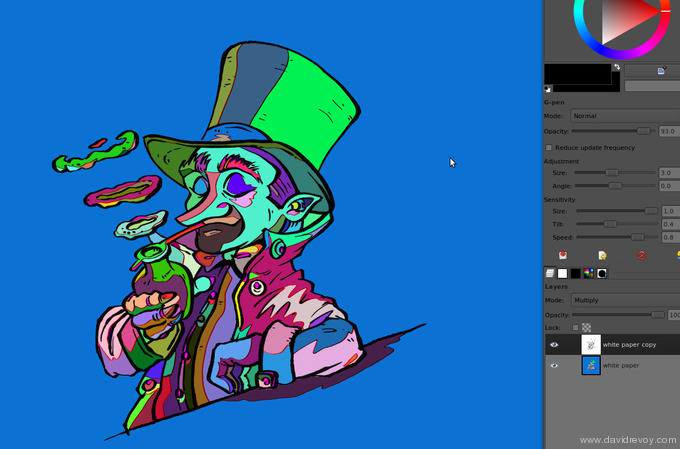 the result of the flatting tools
As you see on the animation above; the advantage of this script is in the clean result of the colorisation : each zone frontier are right in the middle of the thickness of your black lines.
 importing the line-art over the result
4) Colors
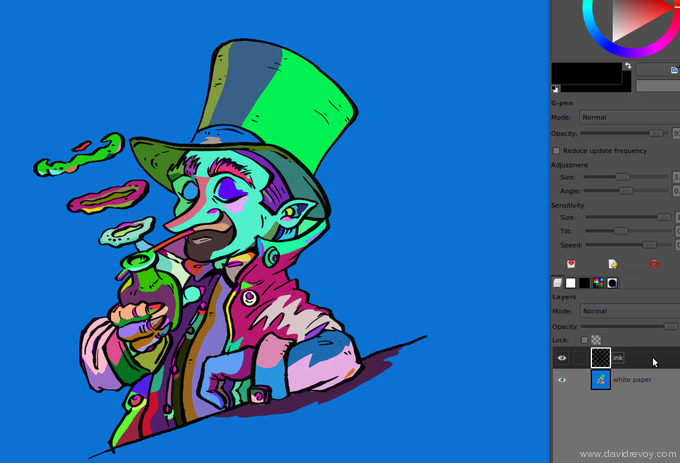
With the Fill bucket tool ( with the option 'fill similar color' and a low 'treshold' ) , it's easy now and fast to replace each automatic psychadelic colors of the Multifill script. Open a large color palette to make this process easier. For most of the fast cartoons with a cell-shading rendering ; this step can be the final.
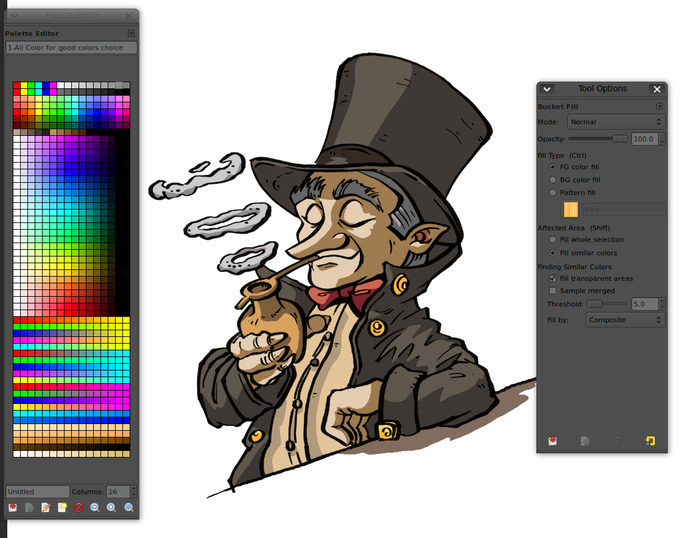 coloring by replacing the colors
If you want to add a bit more of life, you can brush with a rounded basic brush over the colors layer with some brighter strokes and a low opacity. You can play with the balance of colors to warm up the overall too.
 adding life with a rounded brush
the final RGB colorisation
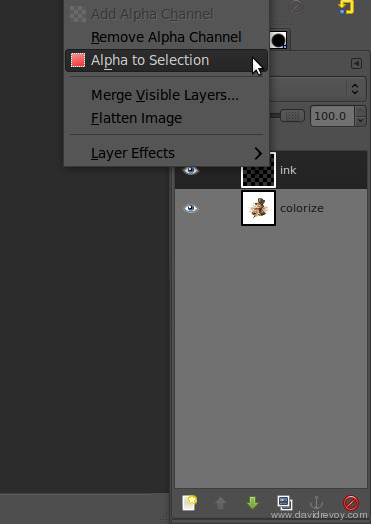
5) Export for print
For exporting in CMYK I still use my license of Photoshop CS2 ( with Wine ) cause I still don't know how to do it with the security of a corect result with only FLOSS. Be sure when I will know it, I will be the first to use it. I want here to have all the color using the CMY cartbridge colors only and the line-art using pure Black color ink. Also, I want to prepare under the line-art a dark grey to make the black look deeper when it will be printed.
 selecting the line-art layer
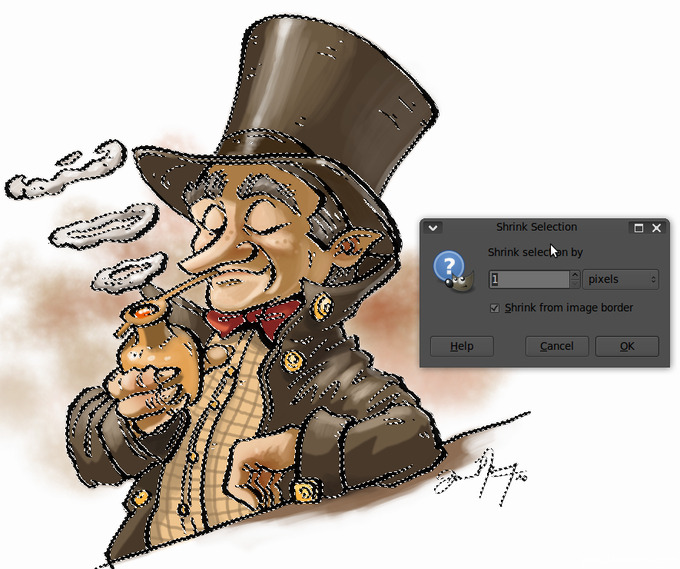 shrink the selection of 1 pixel
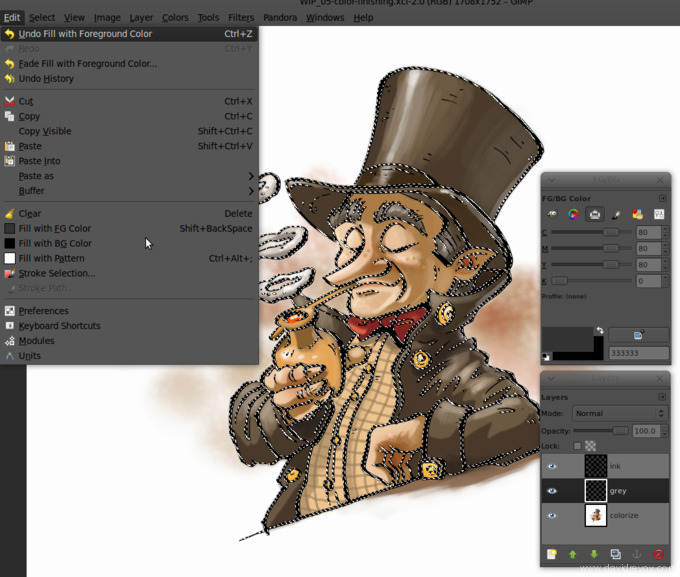 Fill the selection with grey on a new layer
I prepare the grey layer in Gimp ; I use the 'Alpha to selection' on my line-art layer combined with a 'Shrink selection' of 1 pixel. When it's done, I fill the new selection with a dark grey. To give the file to Photoshop, I save in PSD. On Photoshop, I convert my file using the layer group properties to restrict the channel; on the black ink , I use only 'K' , and on the color and the grey channel I use only 'CMY'. I change the color on the layer of line-art to use only Black 100% and on the grey I setup the grey of my publisher : C=80% M=70% Y=70%. I finish with saving to the TIFF file format , with the CMYK ICC profile asked by my publisher too, here a 'Europe ISO Coted Fogra27'. For saving disk space, I allow a LZW compression. That's all !
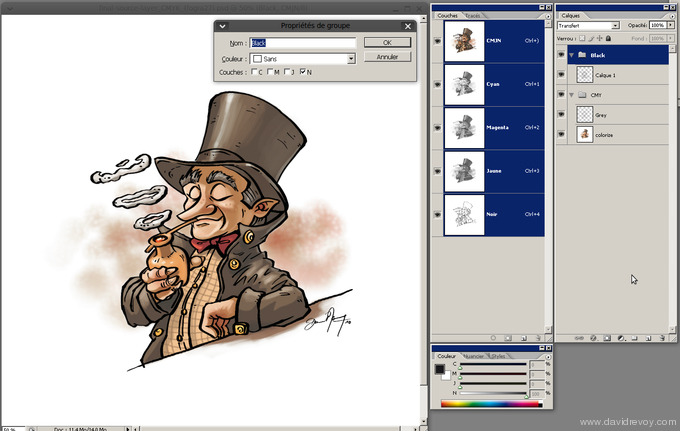 Result of the CMYK conversion with Photoshop CS2
Download :
Here is an archive file with the final RVB file in xcf and the CMYK in TIFF. gimp-painter-color_source-file.tar.bz2
Sources :
- Flatting Tools : http://gimp-registry.fargonauten.de/node/14051
- (FR) "Colorisation de BD Du traditionnel au numérique" (FR) de Stéphane Baril, Naïts ( http://www.editions-eyrolles.com/Livre/9782212115086/colorisation-de-bd )
- Almost same technics with Photoshop: http://www.questionablecontent.net/tutorial.php

30 comments
Hi
I want install in my Ubuntu Gimp-painter
but... I have a 64 bits version.
And when a friend bought your DVD, he experimented the same problem :S
because in the DVD only was a .deb for a 32 bits version.
What may we do?
Greetings
Hi erik90mx,
I think you have to compile it :
How-to in english : http://swiss.ubuntuforums.org/showthread.php?t=1364346
How-to in french : http://blenderclan.tuxfamily.org/html/modules/newbb/viewtopic.php?post_id=309395#forumpost309395
How-to on the documentation of Ubuntu (french) :http://doc.ubuntu-fr.org/gimp-painter
Maybe another way to consider is to start from 'Gimp-studio' a code source already patched with many tools and brush asset directly installed on :
http://code.google.com/p/gimp-studio/downloads/list
You can give feedback using the thread of 'Chaos&Evolutions' DVD on : http://blenderartists.org/forum/showthread.php?t=179695
Good luck !
Thanks, David. Great tutorial.
He I knew I had seen this kind of technique before over at QC
Good to know there's a multi-fill script for Gimp as well.
Now I've gotta try this on a real sketch (I just doodled something for testing).
Thanks David
p.s. is there a special reason to reimport the ink as new layer? I just duplicated the ink and background layers, merged the duplicates and the red lines, hid the original ink layer and un-hid it after the script.
exvion : thanks!
Skiri-ki : Hey thanks for the tips of duplicating the ink layer before merging with the red; that tips save minutes of filebrowsing. I will use it ;)
erik90mx : From another comment in this blog of Prawn-shushi ; thanks him : a PPA repositery with Gimp-painter for 64bit , for karmic : https://launchpad.net/~mizuno-as/ archive/ppa
David, i recently bought your dvd, and is one of the best art tutorials i've seen. very easy to understand, and i liked that it has text instead of a voice over, its not distracting, and great art. I too had the problem of not finding gimp-painter for 64bit ubuntu. I just saw the PPA above, and was wondering if anyone knows if its from a reliable source. thanks in advance and sorry for questioning about the PPA but i always try to check.
From what I have seen so far, your work has been an inspiration. Good artists are known by their art, and your work speaks for itself I think. Hope you continue inspiring people.
Was wondering where I can get the script multifill for GIMP? The version of GIMP that I am using on Ubuntu 10.04 does not have multifill under Filters > Script-Fu. After a quick google search and checking the plugin registry for GIMP, I did not find it. Any help would be appreciated. Thanks.
@ max : I cannot be sure this PPA is 100% safe, but all user who tested it seams to be happy. That's a good indicator imho. Btw, I will install it on a Lucid machine to be sure in less than few weeks.
@ amhphp : Thanks for your comments on my work ! The link to 'multifill' is in the 'source' chapter of the article but not really visible and the script have another name than the function multifill itself : "Flatting Tools" ( http://gimp-registry.fargonauten.de/node/14051 ).
Finally!!
It was very dificult ;) (trying to install form the terminal :S )
I used the last link and dowload a 64 bits version .deb
these are the links:
64bits
https://launchpad.net/~mizuno-as/+archive/gimp-painter/+files/gimp_2.6.8-2ubuntu1.1+painter~lucid3_amd64.deb
32bits
https://launchpad.net/~mizuno-as/+archive/gimp-painter/+files/gimp_2.6.8-2ubuntu1.1+painter~lucid3_i386.deb
Thanks a lot
Greetings
the easy way with this ppa would have been to use Synaptics and add this repository
ppa:mizuno-as/gimp-painter
refresh repositories and update gimp to gimp painter. This way Synaptics chooses whether to use x64 or x86 plus it'll automatically install updates once they are available.
Thanks Erik90mx and Skiri-ki for the feedback, all this info gathered after Chaos&Evolutions make me the idea to build in next blog post an article special on how to install Gimp-painter on various system. This last ppa make things really easy for beginner. Cool !
Nice tutorial and good spirit. Thanks for the sharing.
Vraiment beau travail monsieur revoy.
J'aime ce que vous faites.
Hello David. Thank you very much for this tutorial. I'm totally new to Gimp as my first graphic editor. One question if I may.. you write: "With the G-Pen tool of Gimp-painter I start to ink my drawing, on a separate empty layer."
Have you been using a mouse for this part? I cannot get straight lines no matter how hard I try. Thanks in advance!
Hi David!
I can give you some pointers for your CMYK work with free applications, so you can get rid of your Photoshop copy :-p
Just drop me a line, I'll be glad to help you.
@Roman : No I use a tablet, and even with a tablet it's hard to have straight lines. It's a little training to have a good ratio between speed and direction, as well as a bunch of Ctrl+Z (undo) when lines does 'epic fails'.
@Gez : Hi ! I use here more and more CMYKTools as an alternative, but I'm always happy to here other suggestions. A really cool tutorial ( in french ) was done here as an alternative : http://www.calcyum.org/gimp-du-gris-cmj-pour-la-bd/.
I was about to suggest you to try CMYKtool (specially with devicelink profiles, so you create a custom black generation curve for the rich black line-art).
Using that you can't have the exact CMY values under the black ink (neither a clean separation between line-art and color) but it would be more appropriate for print, since it would preserve the ink limits and a preserve the color appearance better.
The rich black proposed by your publisher is rather heavy. it gives 320% total ink amount (which is inside the Fogra27L limits) when maybe something like 280% would be dry faster and look as deep as the other combination.
You could use a hybrid method with CMYKtool (for the CMY conversion) and overprint the black strokes re-opening the CMYK file with GIMP and Separate+, and there you'd have more control and correct color appearance.
I did some tests with your files last night and tried a couple of extra methods. I couldn't get the same result you got with PS, but then I tried with PS and I couldn't get the same results either.
I guess you have a color profile mismatch in you PS configuration (probably using a different profile as working CMYK instead of Fogra27L). Your CMYK file looks shifted to magenta, compared with the colorimetric conversions from your original.
What's your default color configuration in PS? is your working CMYK profile Fogra27L or a different one?
I forgot to mention this:
http://registry.gimp.org/node/24944
It's a nice companion for Separate+
I checked the method you linked. In my opinion, it has a problem: when the author fills the selection with white to transfer the black generation to the CMY channels, he's creating a 100C 100M 100Y mix, wich gives a very dark gray with 300% ink coverage, which is probably too heavy. It will need more time to dry and will increase the risk of staining the other prints. It's also more expensive.
And, apart from that, the color managed conversion from RGB to Fogra27L is supposed to give the best possible separation (that's the idea of color management and profiles). Using devicelink profiles to tweak black generation gives extra control without sacrificing color accuracy (manually tweaking doesn't)
Also, I wouldn't use ECI RGB as working RGB profile. Using wide gamut profiles in 8 bpc and perceptual intent to convert to CMYK isn't a good idea. I'd use sRGB and relative colorimetric intent.
@Gez : Waooo, I'm really impressed by your knowledge around colors, and thanks for talking about it.
> What's your default color configuration in PS? is your working CMYK profile Fogra27L or a different one?
I can't remember how was setup my wine/Ps at this moment, but I surely forgot to change the color profile from another one I use often for one of my publisher : ISO Coated v2 300% (ECI).
It would be really good if you could write a documentation in english for various cases of use CMYKTools (simple step by step ); here I don't feel enough mastering it to create one. That would help so many users to have WIP to do it the right way. If you need illustration to do it, I can bring.
ISO Coated is the ECI equivalent to Fogra 27 while ISO Coated v2 is equivalent to Fogra 39.
The 300% refers to the total ink coverage (so you should keep your separations below that value if you tweak them manually).
Fogra39 is better, so using ISO Coated v2 is fine if your print provider is ok with that.
However, in that case you can't use 80C70C70Y with 100K (you'd be exceeding the TIC value)
It depends also on the paper you'll use. These are profiles for coated (glossy or matte) stocks. For uncoated papers you should use other profiles.
It's a good idea to put some instructions together and I'm sure that using some of your beautiful illustrations as an example would be a great plus.
I wonder if it wouldn't be even a better idea to talk with Alastair Robonson (who's a really nice guy) and use that document as an official guide to CMYKtool for illustrators. What do you think?
*Robinson, not Robonson :-)
Thanks for the tips, this is usefull to learn about it.
For the article/tutorial/documentation ; I'm 100% in . Mail me ( my mail is in contact ) to continue this discution and tell me what sort of illustration you would need to be a good exemple.
CMYKtools really deserve a user friendly documentation written for CG artist. It will makes a lot of happy artist, and printer too !
Great great tutorial, thank you very much :)
Hi, great tutorial, indeed. Anyway, in my opinion this method suits well when I want to retouch a raster paint. If I have to begin a new drawing, why not use Inkscape to ink? I think its better than Gimp, becouse you can edit your trace more finely and you'll have a vector image which can easily scaling. It will also be easier to fill the areas with colours. just an opinion. Bye!
@Antonio : Hey, thanks for your comments. I already did a commission for large series of Posters with Inkscape ; the piece needed to be print very large ( more than 3 meters ) and client really wanted to not get blury or aliased lines. Inkscape does a good job, sure. I remember only the slowly redraw, it's hard to get many objects or lines and not get fastly lagging in Inkscape. Same for Gimp/Krita with Raster too ; hi-res picture are ressources consuming.
Nowadays I'm not really into clean lines , and I'm a bit against a too flat look. So I tend to avoid drawing with vectors ( doing icons and presentation is nice on it )
Thank you so much David for posting this tutorial. I am an amateur graphic novelist and I desperately needed some guidance on coloring. I put a link to this tutorial on my blog. I hope I can help others like you have! =)
Marissa
Can't I have the Gpen somehow in the Gimp 2.8? Gimp painter is a fork of Gimp 2.6 as much I know and I dont wanna revert back in old Gimp...
or if there is an equivalent tool...
Thank you. I don't know what else to say.
I have been wanting to make the leap from sketchbook to digital for a while but it always seemed so overwhelming. Your resources and tutorials are a tremendous help!
Thats a great tip! thanks for sharing. Very helpful not just for the beginners.
I have been using Gimp with a XP-Pen ( https://www.xp-pen.com ) drawing tablet for almost a year now and my experience has been that I can make decent art in Gimp but there are some roadblocks with the software I cannot seem to find answers to deal with them.
What I end up doing is using Krita on my computer to create outlines and then do colors and detail in Gimp.
Thanks! I'm surprised (and glad!) this article from 2010 still is helpful. Oh yes, Krita evolved a lot!
Post a reply
The comments on this article are archived and unfortunately not yet connected to a dedicated post on Mastodon. Feel free to continue the discussion on the social media of your choice. Link to this post:You can also quote my account so I'll get a notification.
(eg. @davidrevoy@framapiaf.org on my Mastodon profile.)