


Autostiching scan with Hugin
About Hugin:
If you like drawing on large sheet of paper but decided you can't do it because you own only a small scanner, then this article about Hugin is for you.
What is Hugin? Hugin is a free/libre open-source software. With Hugin, you can assemble a mosaic of photographs into a complete immersive panorama, stitch any series of overlapping pictures and much more. I'm using Hugin since 2010. Hugin is a very technical tool with many options. The development team is doing big effort to simplify the process, and recent versions are really easier to use than the previous one, but still not really as intuitive as modern software: I still need my notes to get things done with it. But if you know your way and settings the tool is easy. Hugin can be really faster than doing the stitching manually and produce a perfect result. Convinced? Follow me.
Install Hugin:
On Ubuntu/Elementary/Linux Mint (Ctrl+C to copy line in your browser, Ctrl+Shift+V to paste on terminal. One line at a time).
sudo add-apt-repository ppa:hugin/hugin-builds
sudo apt-get update
sudo apt-get install hugin
On other Linux distro, Mac and Windows , check the download page of the project.
The process, step by step:
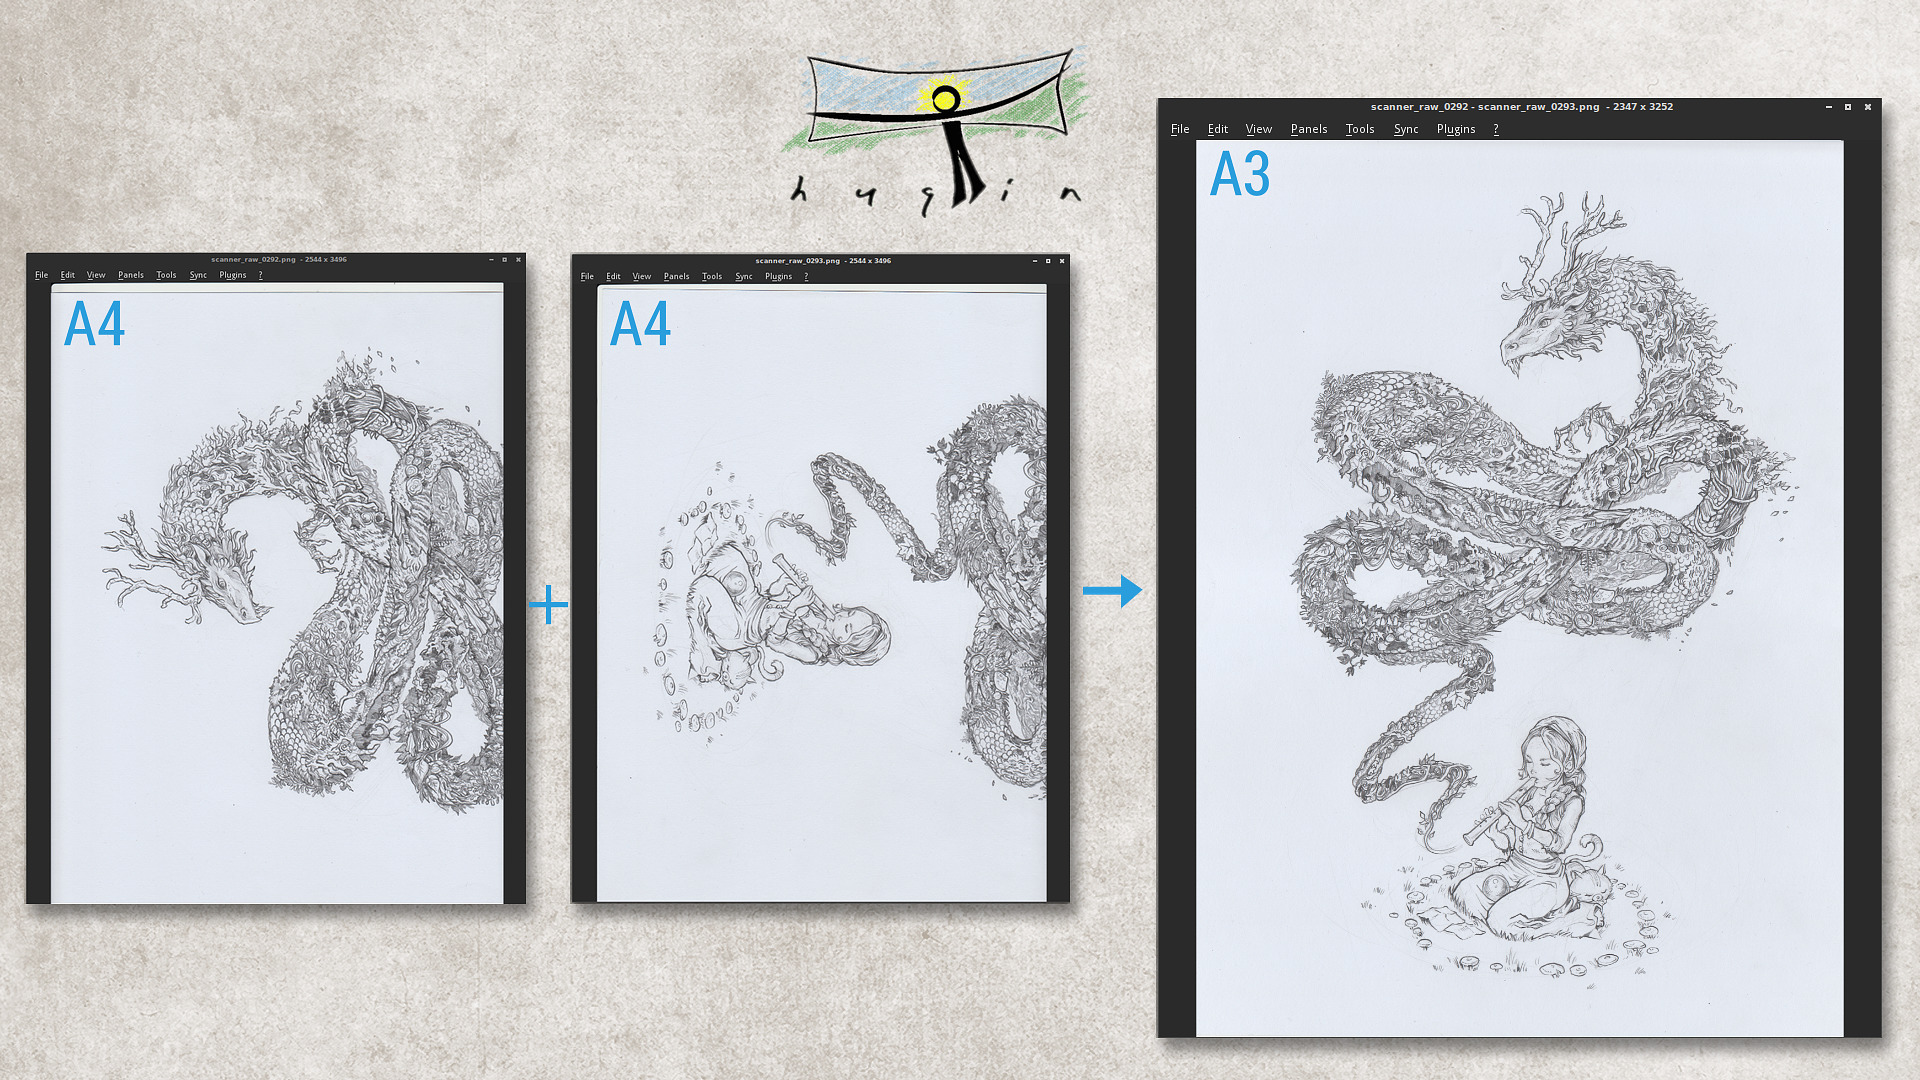
- Here the problem start: I like drawing on A3 sized paper (29,7x42 centimeter / 11.69x16.53 inches), it's double size than A4 and have more room for drawings details.
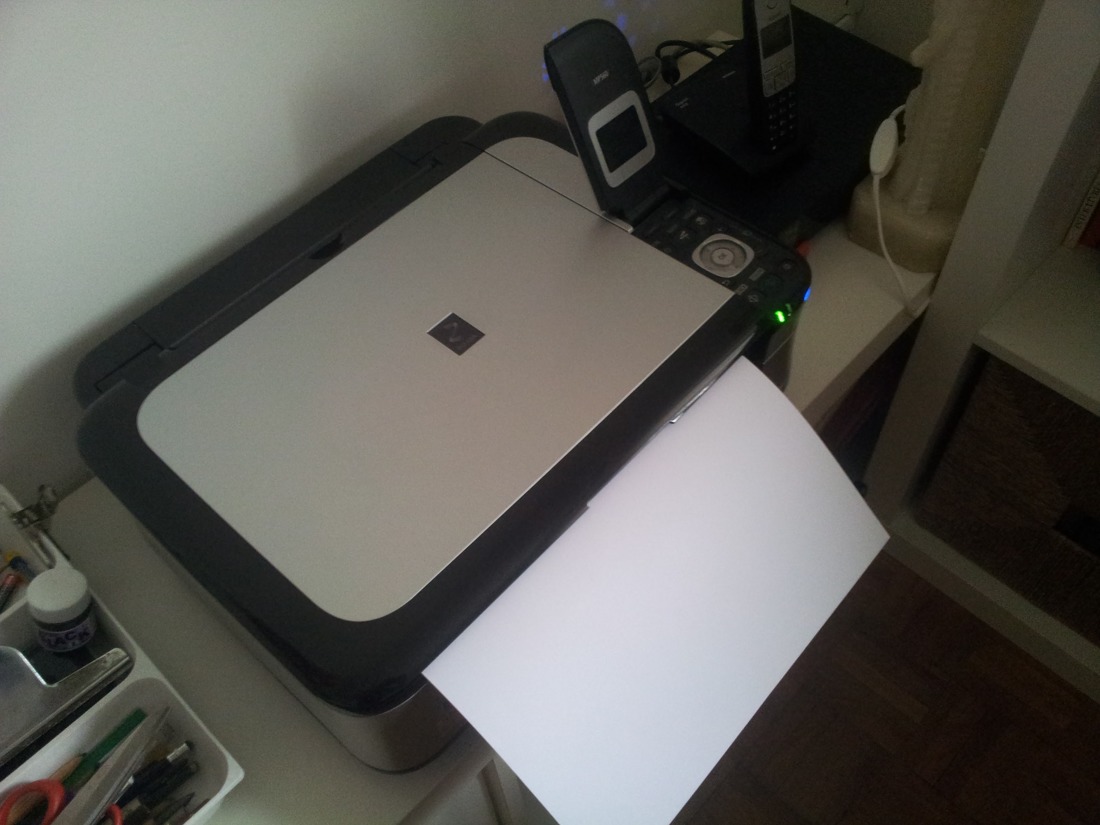
- But I don't have a A3 scanner at home : they are expensive and take a lot of room. I also have no idea where I could find a A3 scanner compatible with Linux. It's only problems, so I have to find a solution with my A4 scanner. A4 scanner are cheap and nowaday bundled with many printers 'all in one' devices. Here under my old Canon Pixma MP560 all-in-one printer scanner with a A3 sheet in the A4 scan top part. I'm scanning my big A3 artwork documents this way in two time, flipping the artwork upside down on the little scanner.
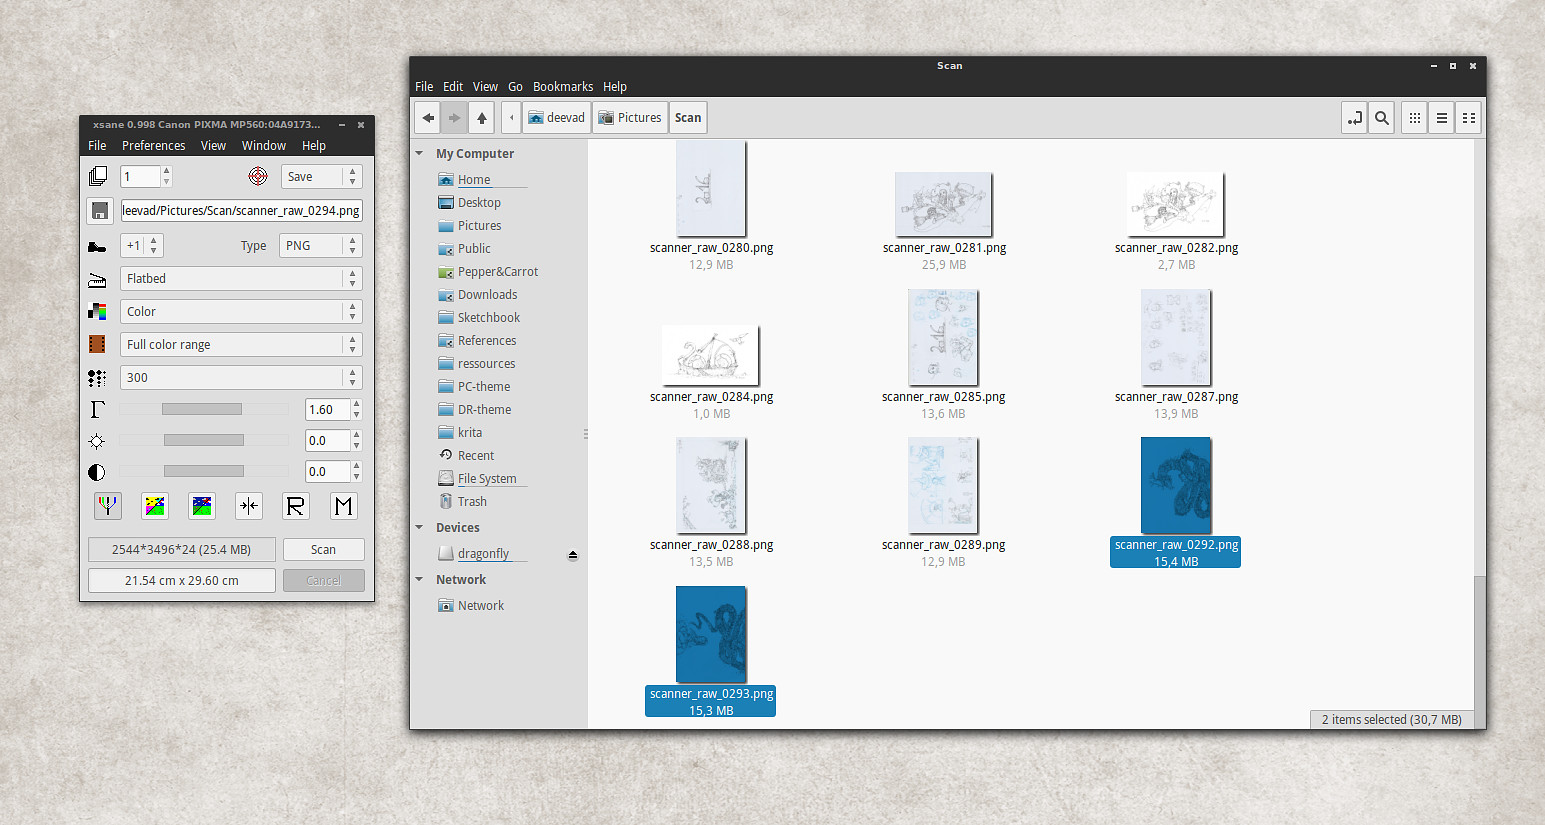
- I scan them with Xsane on Linux Mint 17.3. I like Xsane because if you remove all unecessary panels and keep only the main user interface, it can just scan and auto-save the picture in a target folder. This way, I get two PNG files in sRGB , A4 sized with 300ppi quality (selected in blue here).
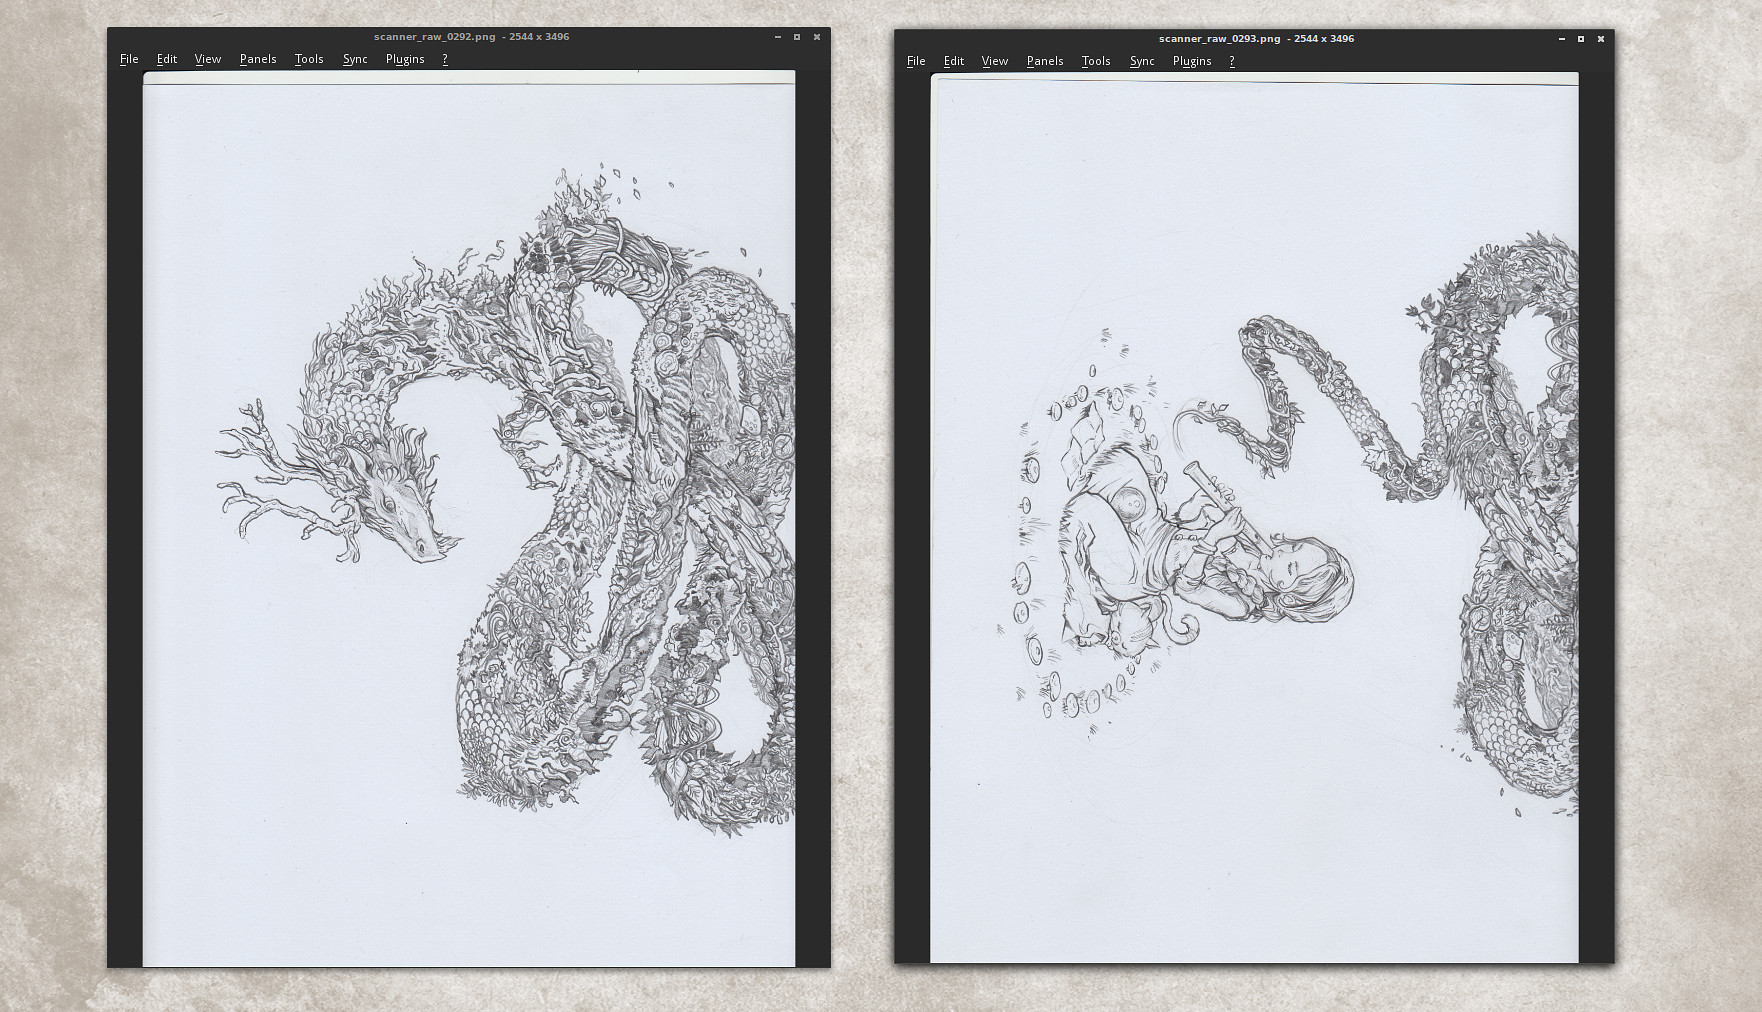
- Here is the two scanned documents. I often have white margin all around the artwork, I rarely draw on all the surface of the A3. Only a central part of it. This way I need only two scans to get the full artwork scanned with an overlapping area. It's important to have overlaps. Hugin will use the informations in the overlapping area to match the document together and stich them perfectly.
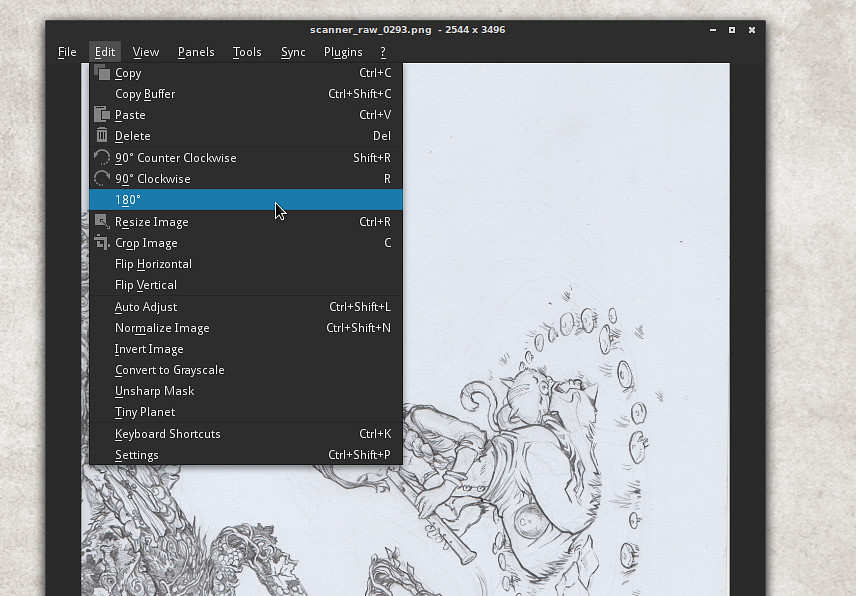
- Before feeding Hugin with our raw scans, we need to prepare them a bit. That's why I'm rotating the second scan at 180° thanks to the editing functions of the image viewer Nomacs.
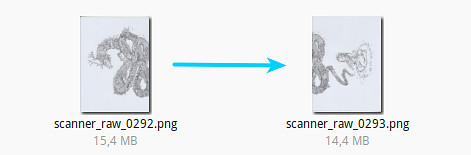
- The preparation is all about filenaming and alignement. The filenames must follow and images must have similar orientation. Hugin does a good job only if the images are ready this way.
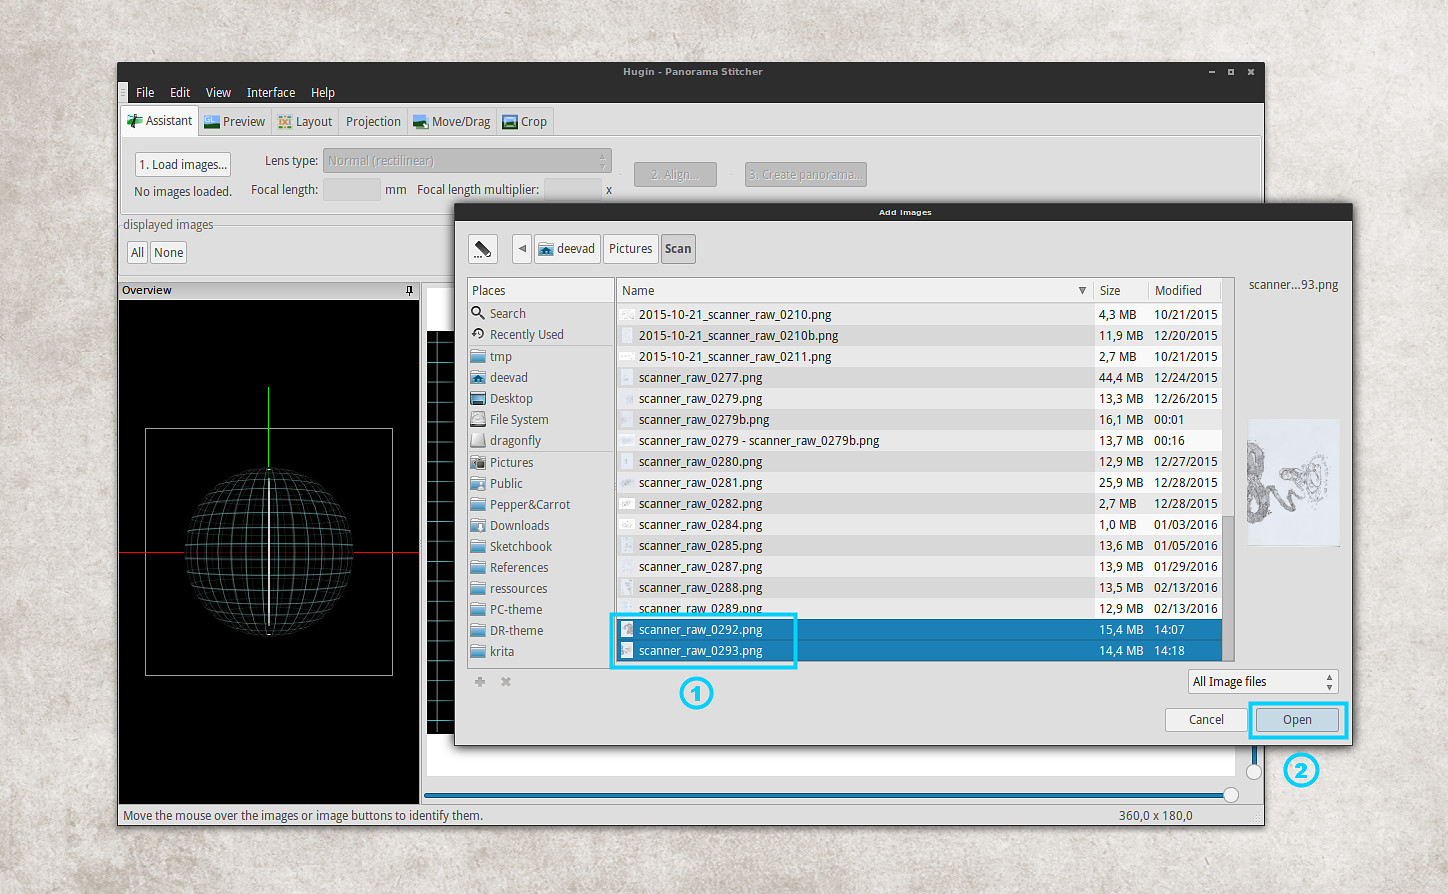
- We can finally open Hugin. Maybe in your operating system's menu, there is multiple entries for Hugin. Select the one named "Hugin Panorama creator" in this case then press the 'Load images...' button.

- [1] Do a multiple selection to select your files ( holding Ctrl key ) then [2] press 'Open'.
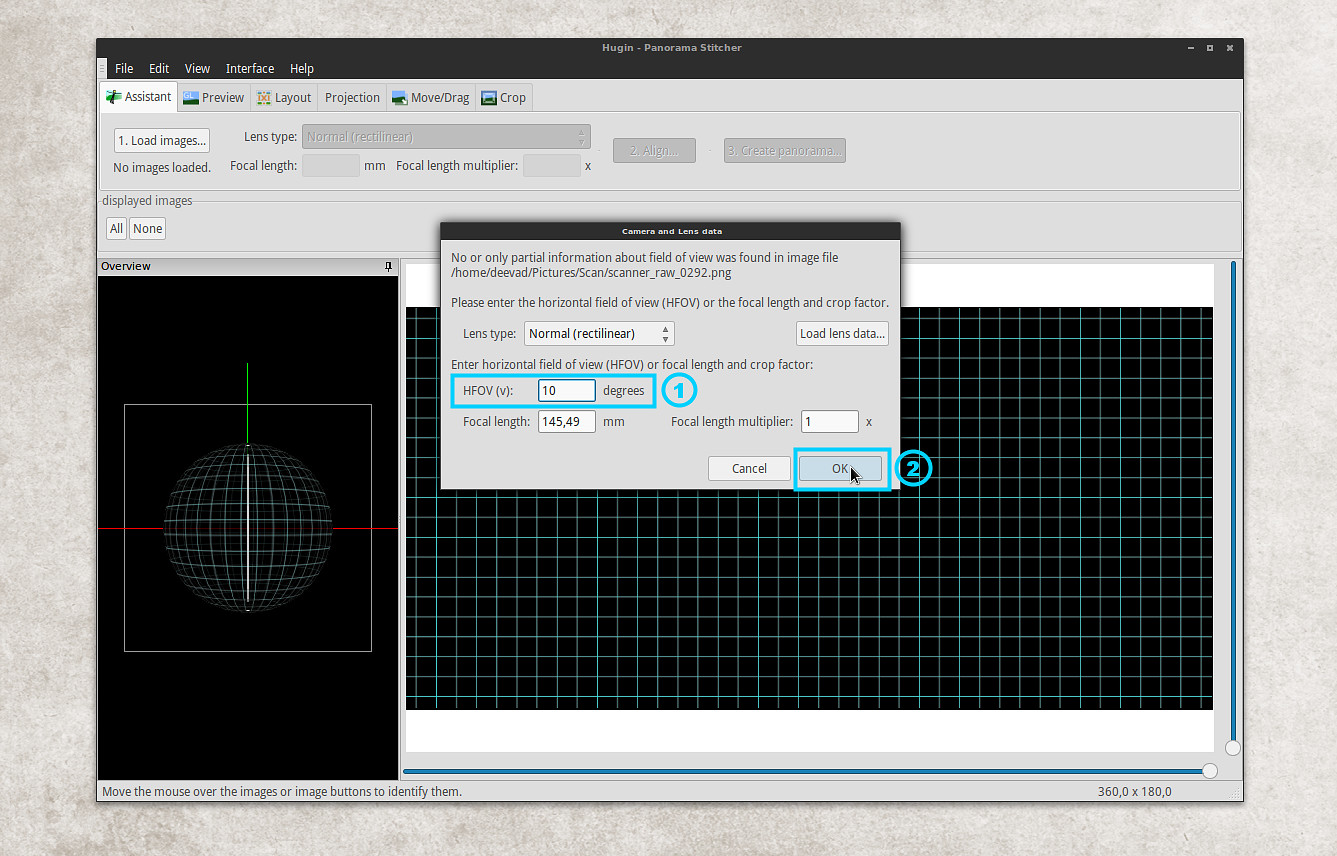
- After the files are selected, you'll see this unfriendly dialog prompting you for a 'HFOV(v)' number [1]. Don't ask me what a 'HFOV(v) number' is, I have no idea. Just remember for this field to enter '10' degrees. This magic number come from an outdated official tutorial. You'll be stuck at this dialog if you don't remember it. Too bad a simple 'scanner' preset don't exist here to make this step intuitive... When it's done, Then press [2] 'OK'.
2021 edit: Franz, in the comment section of this article, reports that '5' degrees is even more precise; and it makes sens after also reading the explanation of Zachary Vance, also in the comment section. Thank you both for the feedback!
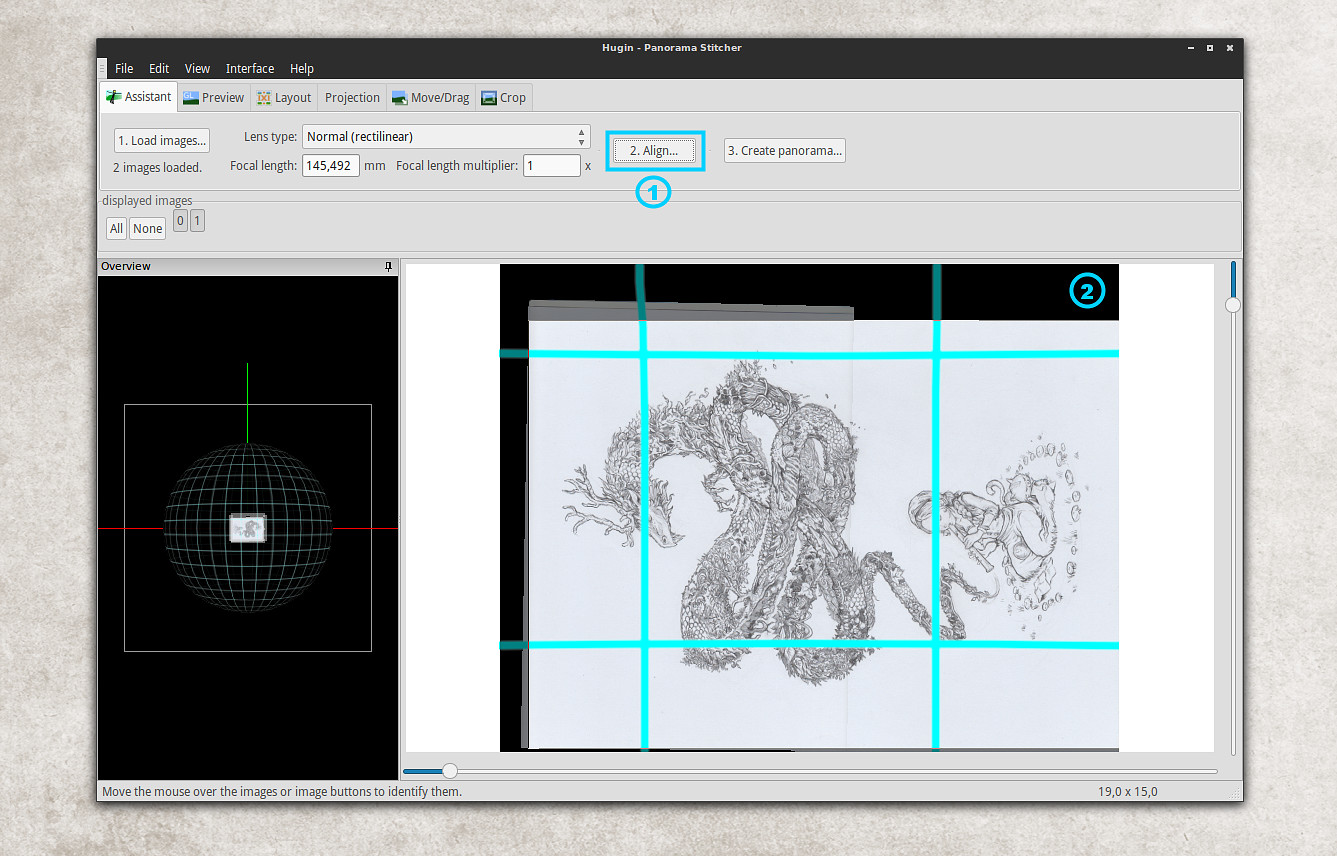
- Press the [1] 'Align' button, it should pop-up a console with computer output you don't need to read (it will auto-close itself anyway). Just check your picture properly aligned after that within the control screen [2].
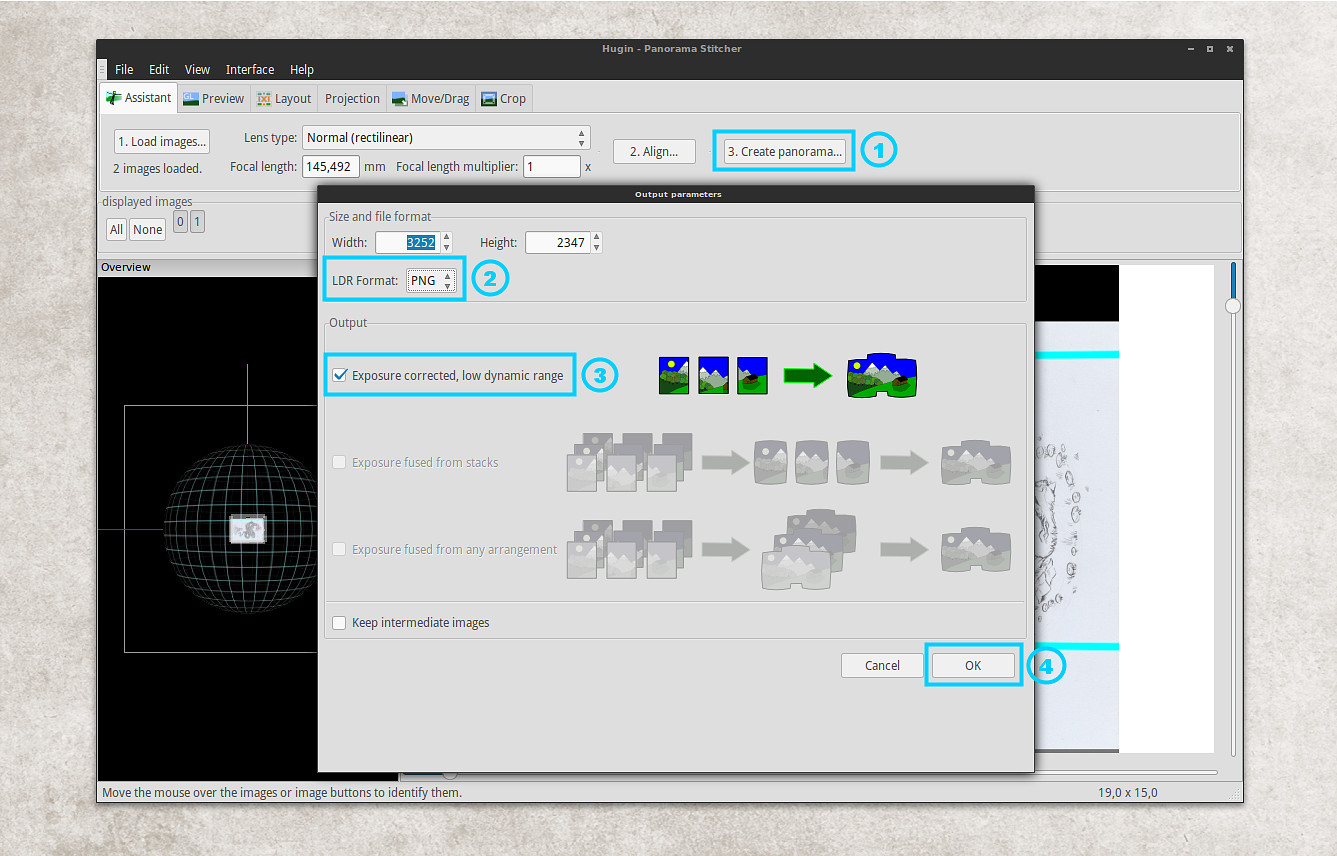
- The last step, is to [1] Press the 'Create Panorama...' button, [2] switch the format to PNG , [3] Select the only option available and [4] press OK.
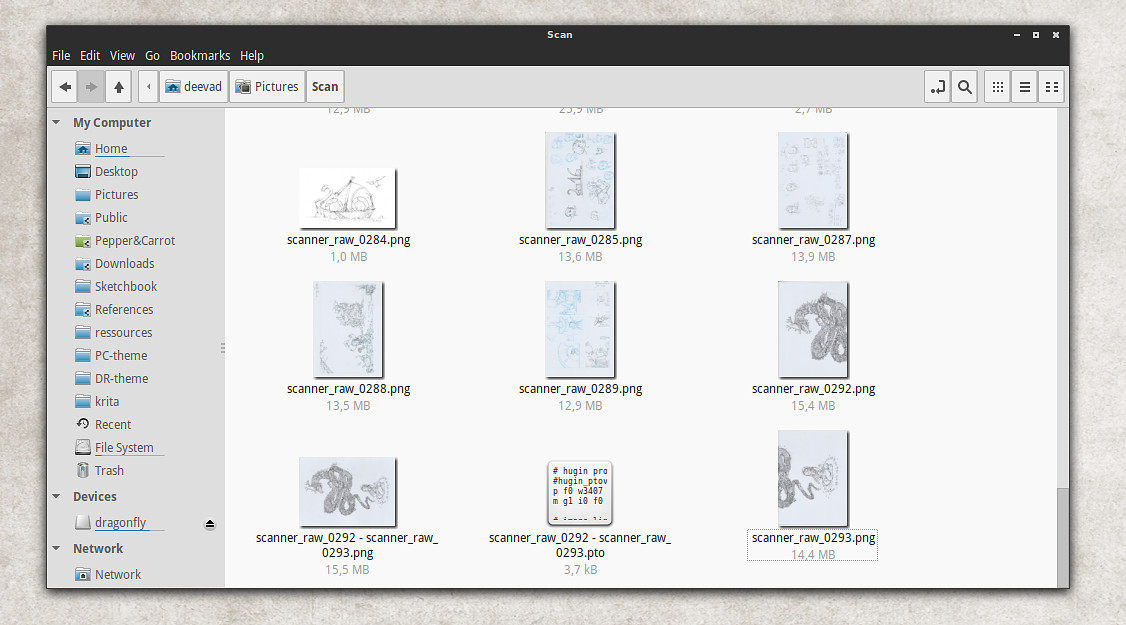
- You'll be prompted for saving two files. Just keep the default name and press OK. Then another console will pop-up with computer output, just wait it to finish, it will close itself. You should have a new dialog on screen indicating 'Status Completed'.

- Check your files on your file explorer: your autostiched version should be done. You can then close all windows of Hugin and delete the two original half-scan and the *.pto files created by Hugin.
- A last step is just a little rotation with the image viewer Nomacs and saving.

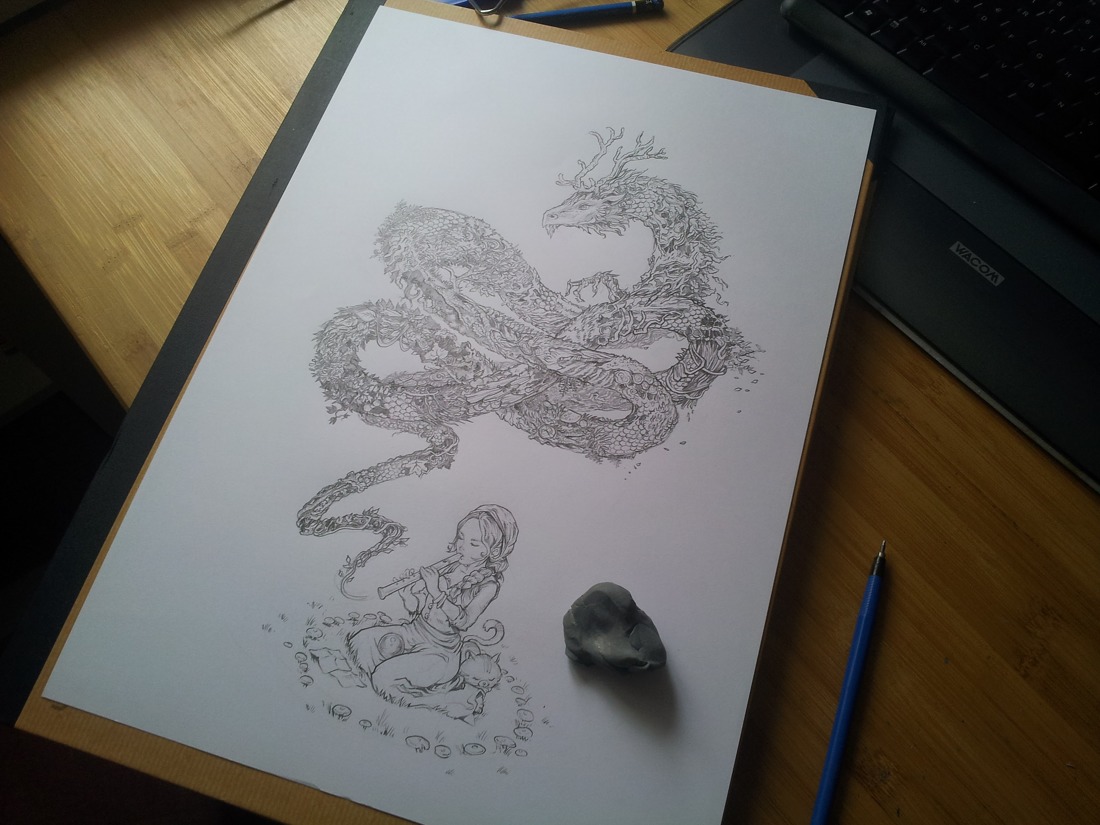
- It's done : the two scanned parts of the picture were autostiched in a single picture thanks to Hugin. You can't notice the area where the two scanned were merged, even if you zoom on the paper texture itself. It's really perfect work.
★ You can find the hi-resolution result here .
★ The final colored artwork here (note: I removed the flute girl for artistic reasons.)
That's all for today and Hugin. If you practise, you can scan many large comic pages and stich them in no time with just clicking at the right button and fighting a bit with pop-ups and temporary files. I hope this tutorial will help you to draw on larger sheet of paper and take advantage of this great tool.
A big thanks to the Hugin developpers!

20 comments
Woa! Excellent article. This gonna be very useful for our ideas, and I will not need to check for a A3 scanner on stores. Thanks a lot.
Nice and clean tutorial! (HFOV = Horizontal Field of View)
@Ricky Aceves : Thank you!
@Roberto : Haha. I still have no idea why '10 degree' is a good setting for scanner in a horyzontal field of view. Magic numbers are magic.
Cool tutorial!
I usually do this with GIMP because of the shadow on the overlapping area, so my question is: did you ever tried Hugin with color artwork? Or did you ever had to "fix" the final image?
It could be my scanner but every time I scan an A3, if I close the scanner too much it bend my artwork to the point of creating a fold and if I don't, the area close to the border will be out of focus...Did it ever happen to you?
Thanks!
@Sandro Duarte : Hey, yes, I also have the fold with my scanner ( a darker, and blury part ). Hugin make it disapear if the overlay is enough big. If not, I need to pre-crop this unwanted area. I also tested with color for watercolors, it works fine!
need to pre-crop this unwanted area. I also tested with color for watercolors, it works fine!
Hi, thanks for tutorial. Hugin is great.
But scanner related: I had Mustek ScanExpress A3 USB scanner (at Linux) for years that was optimal cost between resolution and quality / cost. It has 600 (or 1200?) dpi (core, not interpolated) and it was relatively cheap. Glass was really good (it really matters at bigger scanners), so as other hardware elements. Software (for Win) was crap. I think I used VueScan then, I'm sure that (what ever software was) it had better performances under Linux.
I know that many proffesionals were using it (@ Mac & Win), e.g. I know for Esad Ribic (Marvel comics creator) - I knew him privately but I found that fact at some documentary movie :-)
It wasn't offically supported at Linux, but it worked great for years, I had to delete only one "#" (comment) at some Linux generic conf text file.
Unfortunately it broke by accident and I never bought it again.
Oh, btw, nomacs is great also, but you should try IrfanView - it is state of the art software. And it is not just a fast viewer but also has very advanced editing etc options (and plenty of plugins, all in one package). Although Irfan is native Win software, it run flawlessly at Linux/Mac under Wine/Winebottler.
It is written to be run under Wine, I suppose (as e.g. 7-zip).
@Darko Bednjane : Hey, thanks for sharing the name of this A3 model compatible on Linux. Ha, yes, the ' #mustek' firmware blacklisted in Sane; I made this change on a file one day for my father in law owning a little mustek scanner and running Linux Mint.
@Darko Bednjanec : About IrfanView, when I read 'freeware' running under Wine ; it's not really selling the thing :D I'll have a look at the website and see video demo.
Thanks David !
This is WAY WAY better than the awe inspiringly crappy tutorial at:
http://hugin.sourceforge.net/tutorials/scans/en.shtml
Kudos! The one thing worth mentioning is whether Hugin can stitch these if they are rotate 90 degrees each. I doubt it, but haven't tried yet ;-). I'd be pleased if it did. Essentially rotate your two example files before stitching rather than after.
I so so miss Microsoft ICE. When I was on Windows I used this a lot, it's much much better than Hugin for this sort of work because it doesn't confront you with any stupid dialogs like the one we have to enter HFOV into. It simply makes no assumption per se that you are using a camera nor does it throw you into these weird 3D world views, it examines files, arranges them according to best overlaps and stitches them beautifully. Sometimes Microsoft Research has produced some awesome work that MS never commercialized but alas being developed at MS is far from portable or open source! Grrrr.
Maybe one day ... they are getting more friendly in that space of late.
I've used Irfanview for years and years and years, and am a great fan, love it. But when I moved to Linux I found no shortage of equally great image viewers, why would anyone in their right mind want to run a windows app under wine when there is a bounty of native apps just as good. Familiarity maybe, but that's not what you're pitching here, you're pitching it at someone new to it. IMHO, bizarre.
A big +1 with Bernd about it. No doubt Irfanview is great, but I prefer often to avoid running my core apps on Wine and using a Windows installer on GNU/Linux. Last time I made an exeption was for playing Portal 2. Next time will be probably for Portal 3 :D
Thank you!
Yes, Microsoft has a good stock of very cool apps they bought but who never really get well known. I remember Acrylic , a painting software able to mix vector and bitmap layer (but first class vector and bitmap) and it was back around 2005 maybe. I started to love the free beta release they made but it never really turned in a full package for an unknown reason.
The reason you want to set a small field-of-view value is that the software is made to stitch together photographs, not scans. In photos, there is some distortion, (basically as I understand it, you a photo is more like a slice of a sphere when you're stitching panorama pieces, even though the camera shows you a rectangular image--imagine a small projector shooting a square of light onto a globe. Panorama software has to be aware of this when aligning two rectangular images, so it internally it reverses this, turning the rectangle back into a sphere slice. Of course that makes no sense for scans, but panorama software isn't designed to work with scans. By setting a small field of view (10 degrees), you are saying "hey, I am stitching together very thin slices of a sphere", and the thinner the slices, the flatter they get, so the un-warping doesn't change things so much, and it can still manage to work overall. sphere slice (which is nonsense for scans, it's actually introducing distortion). Basically, this is a trick to get software made for cameras to work better for scanners. I assume it would would fine with smaller values too, although I haven't tried.
Ha, I better understand the degree thing now. Thank you for taking the time to detail the reason.
I have tried with 5 degrees as I was unhappy with the distortion on edges (I was scanning comics pages with straight lines). The result is way more satisfying but I had to do a bit more of repositioning and cropping in Hugin.
Thanks! I updated the article to write it along the paragraph mentionning the degrees. 👍
Hi, just wanted to tell you about A3 scanner on linux. I've been using Epson Workforce 7620. It has a A3 scanner and I've been using it to scan in line art, it works great. Only downside is that the damn thing is huge since its like all in one. Anyhow, its great to know I can scan in A3 using A4 scanner after reading this tutorial. Thanks:)
Post a reply
The comments on this article are archived and unfortunately not yet connected to a dedicated post on Mastodon. Feel free to continue the discussion on the social media of your choice. Link to this post:You can also quote my account so I'll get a notification.
(eg. @davidrevoy@framapiaf.org on my Mastodon profile.)