


Clean blue sketch traditional line-art to color it digital with in Krita
Intro
This is a tutorial about the "traditional to digital" topic. You'll see all the step I use for drawing, scanning and cleaning my traditional line-art when I use this technique on my webcomic Pepper&Carrot. In the first part of the tutorial, I'll show you my workflow for sketching, and 'inking' with pencil. In the second part, we will scan the lines, and clean them in Krita to keep only the pencil artwork. In the last part, I'll show how to tint the lines, and make them transparent to be ready to receive a full color work later.
1. Warming up
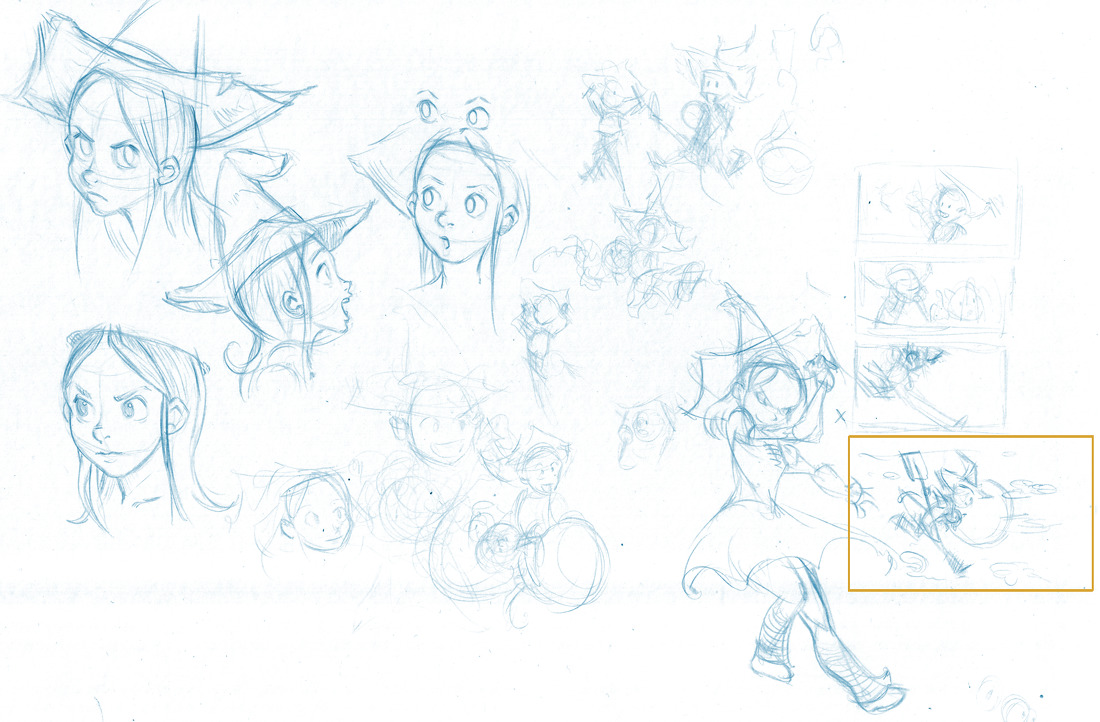
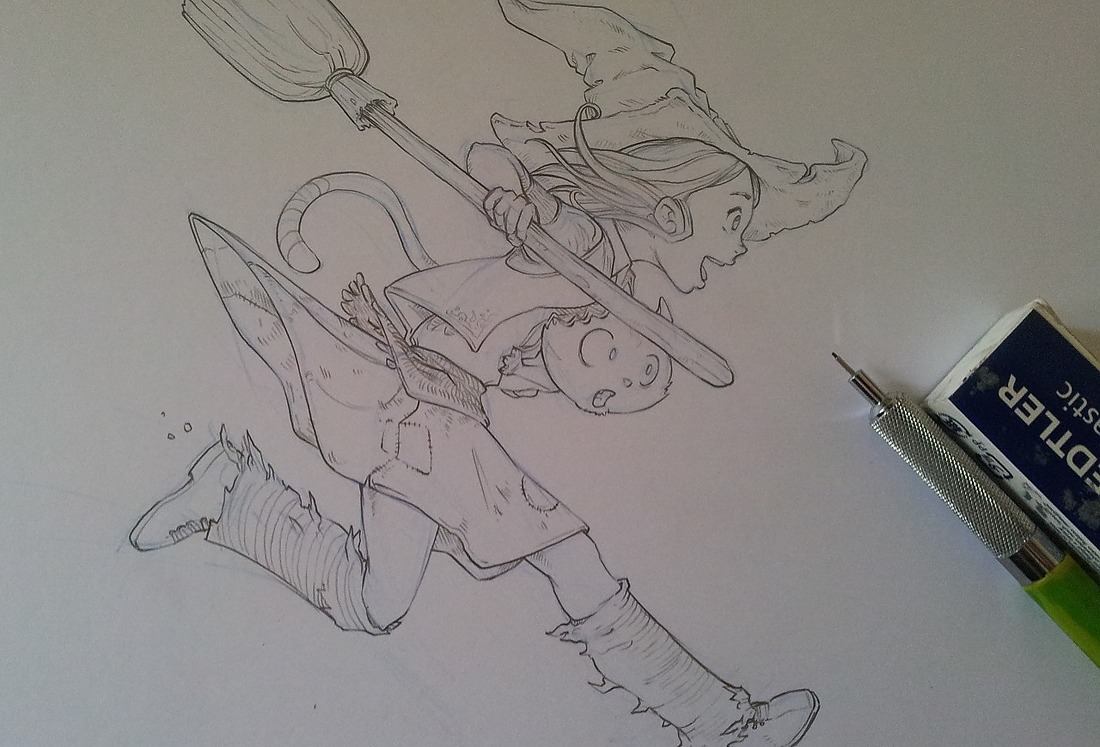
I start with a sheet of A4 random tiny sketches. I usually draw facial expression, then poses and sometime thumbnails. It's not meant to look like the good sketch you'll put into a book. It is doodling, something you'll keep for yourself; your visual notes. I do that to be in sync with my volumes, and also break the stress to draw badly later on the final sheet. On this session (illustration under), a little thumbnail had my attention. I outlined it in orange on the visual. It's certainly a classic composition, or something a bit cliché for a run and jump pose ; but I wanted to see this one with more details.
2. Guidelines
I take my reference on the side of my desk [1] and with a new sheet of paper I start drawing guidelines [2] . I keep them very light and subtle, with minimal pressure on my blue pen. I use Pentel Blue lead in 0.5mm. I tested also many other brands, and the Pentel are the one who suit more my taste and drawing style. You can see I trace large arc ; and keep the whole things undetailed. I'm looking for composition, and energy. My gesture are large, and I handle the pen also differently than usual to not draw with the wrist or finger, but involve the whole arm in the gesture.

3. Blue sketch
I keep drawing with my blue pencil, and add details. I'm doing my best to build the main volumes. I usually keep the shapes simple. I need to let room for still getting a bit of freedom on the next step. The goal is not to make a perfect blue sketch, then to just overwrite each one of lines. That would be just boring.

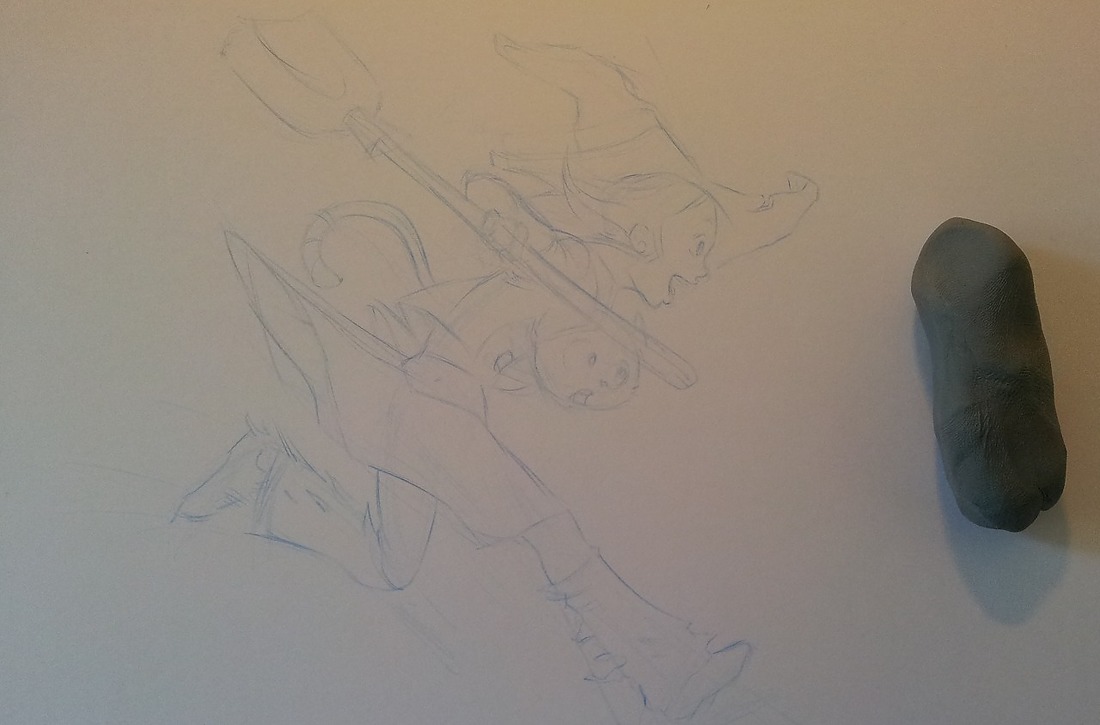
4. Erasing
With my kneaded eraser, I soft erase my blue sketch. Pentel blue lines are really hard to erase, so you don't risk to loose a part of the drawing definitely anyway. The purpose of this step is simple : make the sketch line easier to remove with Krita later, because they will be less dark ; and also bring comfort to my inking process. With a bright sketch, it's easier to see the rendering of your dark pencil lines.
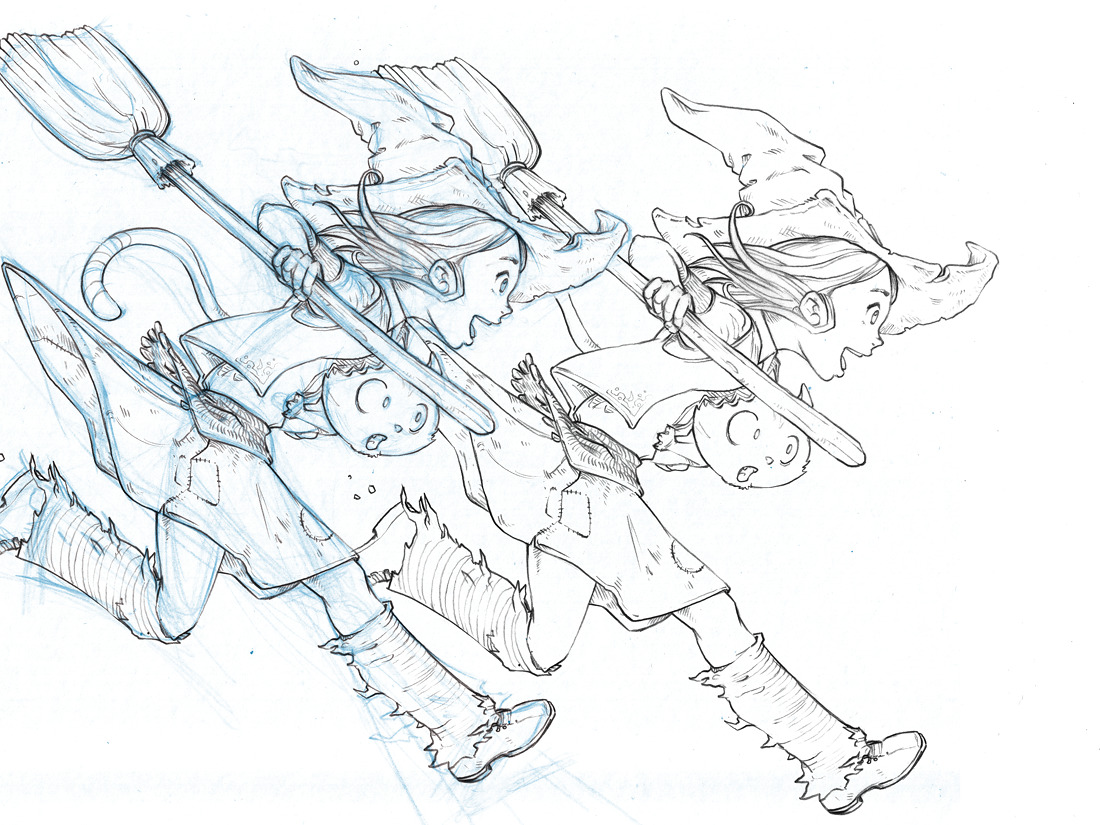
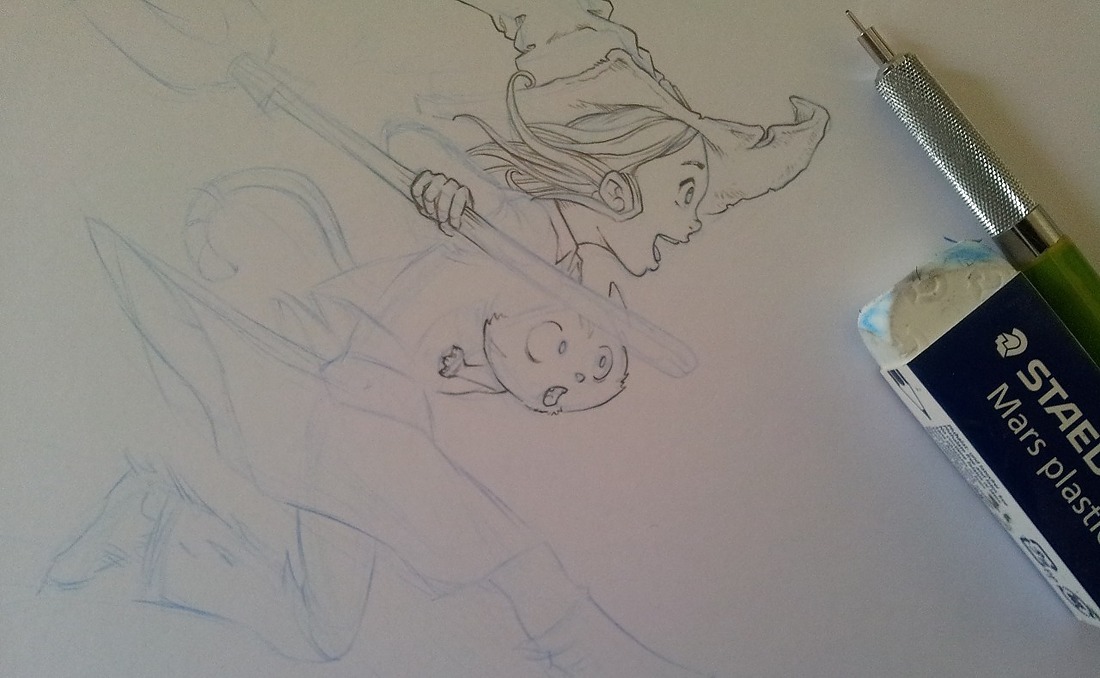
5. Inking... well, without ink
I 'ink' my drawing with Stabilo lead pencil 0.5mm B , it's soft on my Bristol paper ; and allow me dark and light grey variations. it's also very precise.
Note : my Cintiq 21UX don't allow me to draw with this same precision. That's why I'm not using it. Pixels are too big, stylus too far from the surface, and stylus nib impact this glass at 5mm over the real surface. So impracticable for my style of inking.
 'Inking' is over !
6. Scan
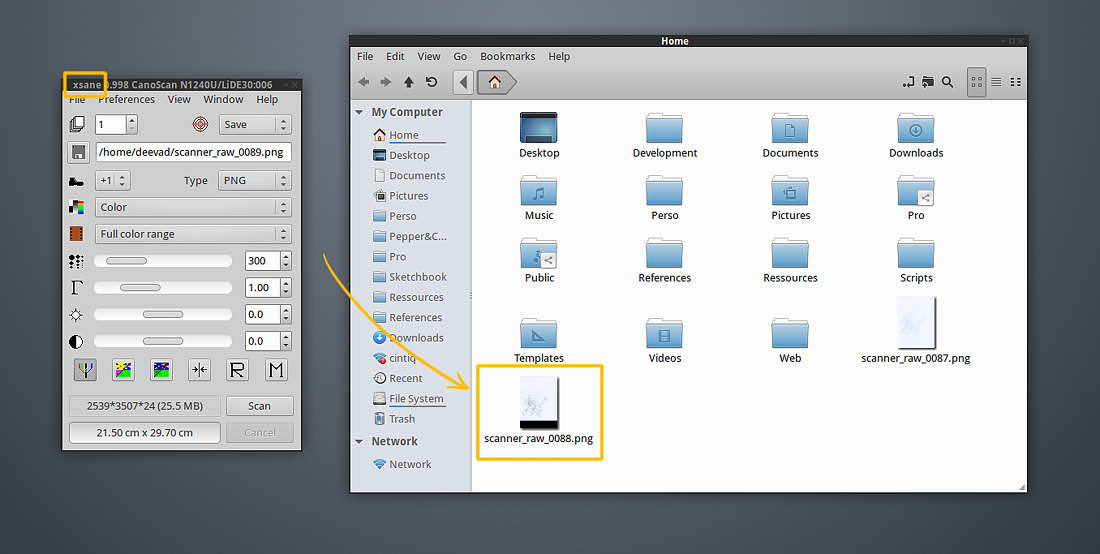
I scan on my Xubuntu 14.04 Linux desktop with Xsane, from the default package. You can notice on my screenshot my super compact dark windows border theme for Xfce. My file manager is Nemo. I can setup Xsane to just grab all the surface of the scanner, and save them as PNG 300dpi in color automatically on my disk.
7. Krita
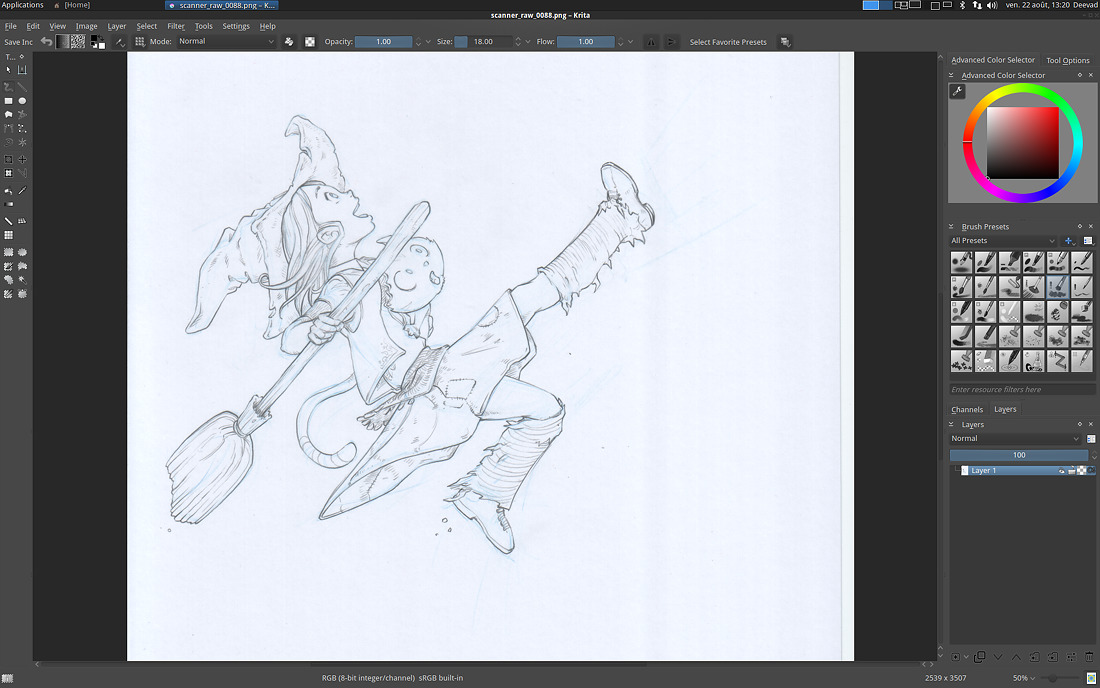
I open my file in Krita (version 2.8.5 from the Kubuntu update ppa). The only modifications I made on my Krita install is the usage of a dark theme and for the presets my latest brushkit. The raw scanned file is available at the end of this tutorial.
8. Cropping
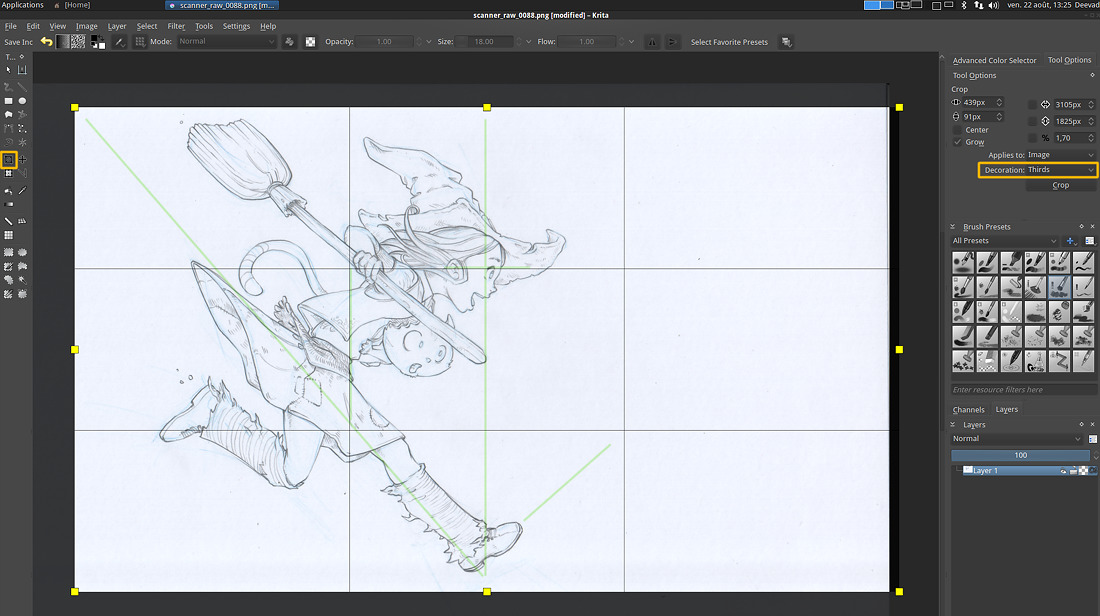
I rotate my Image with Image > Rotate > Rotate image 90° to the right . Then, I select the crop tool , and in the tool options ; I activate the 'Thirds' Decoration. This lines helps me to setup a better cropping. I added over the screenshot here under green line to show you the composition lines I'm looking for.
9. Filter : Color Adjustment curves
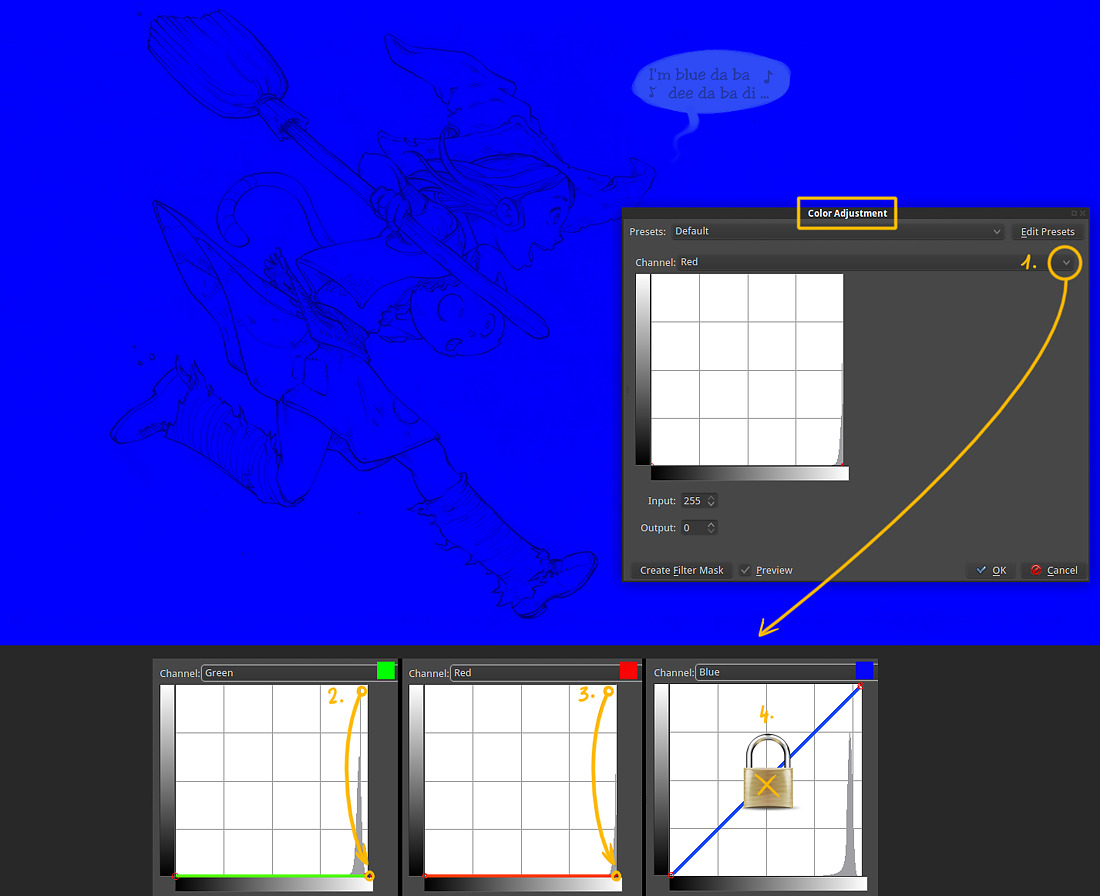
Open Filter > Adjust > Color Adjustement curves, [1] and flatten the channel RED and GREEN [2] , [3] . Don't touch the BLUE one [4]. You should get a full Blue picture. By doing this, you'll merge the blue datas of your sketch into this ocean of blue ; and so, sort of removing them.
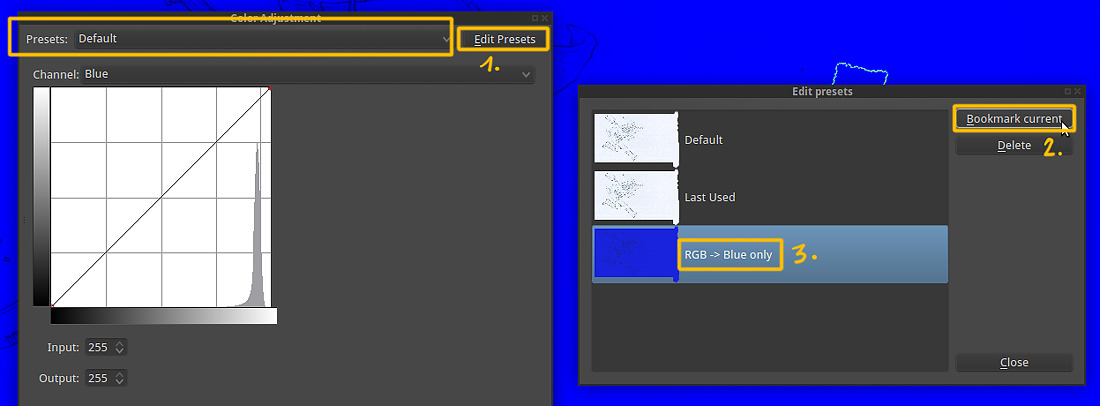
Protip : Accelerate your workflow, save a preset for your filters the next time you need to use them. It works for all the filter in Krita. Press 'Edit Presets' on the top-right corner [1]. And then 'Bookmark current' [2]. Your preset will be added to the list [3] . You can also rename the item with a right-click (eg. here : "RGB->Blue only" is my name for this preset ).
10. Desaturate Max
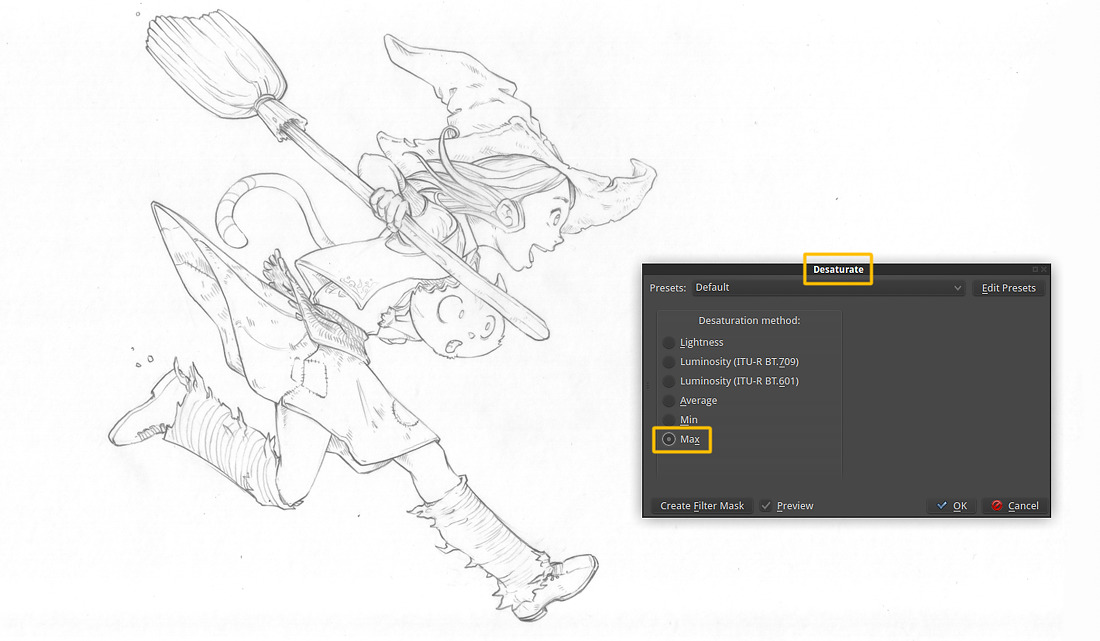
Now, to remove all the blue in our artwork, call the Filter > Adjust > Desaturate , and use the 'Max' option in the list.
11. Tweak values with Levels
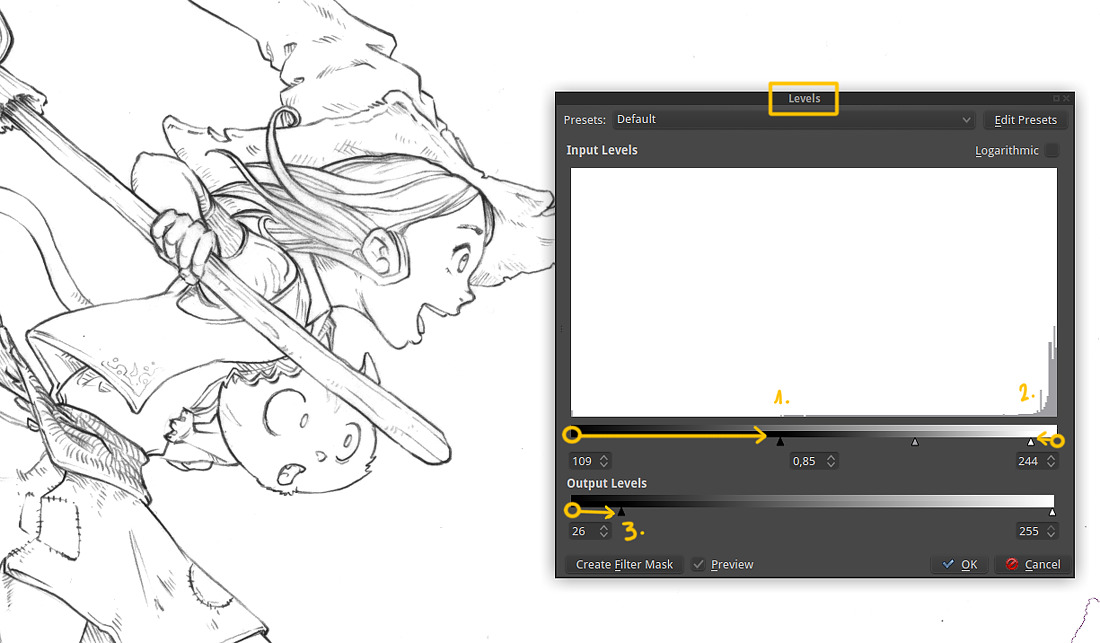
Open the levels, Filter > Adjust > Levels and move the little black triangle cursor where the histogram graph start to show datas [1] ; and clean all the white-grey noise [2]. When you scan paper, you usually get a little mountain in the histogram on the white part (right) to clean.
I also crop the black [3] because I want to avoid black pixels on my lines.
12. Manual cleaning
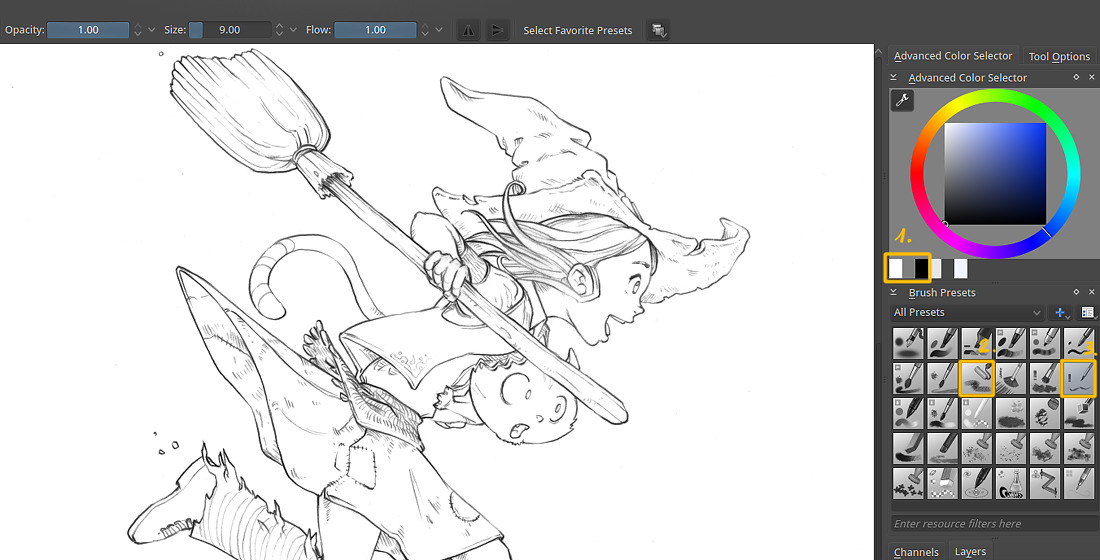
You have now time to just take a brush pick black or white color, and fix your artwork the digital way. I don't use black, but a 90% black one, so I use my color history in the advanced color selector [1] to retrieve the color each time. I manually clean the dust, redo the line I didn't like, or deform and transform the whole drawing. I 'm drawing often with a little rake [3] and clean with a bigger preset, like my roller-brush [2]. For this artwork, I did only a classic dust-removal work, painting with white over all the little dark grayish stain .
13. Line-art coloring
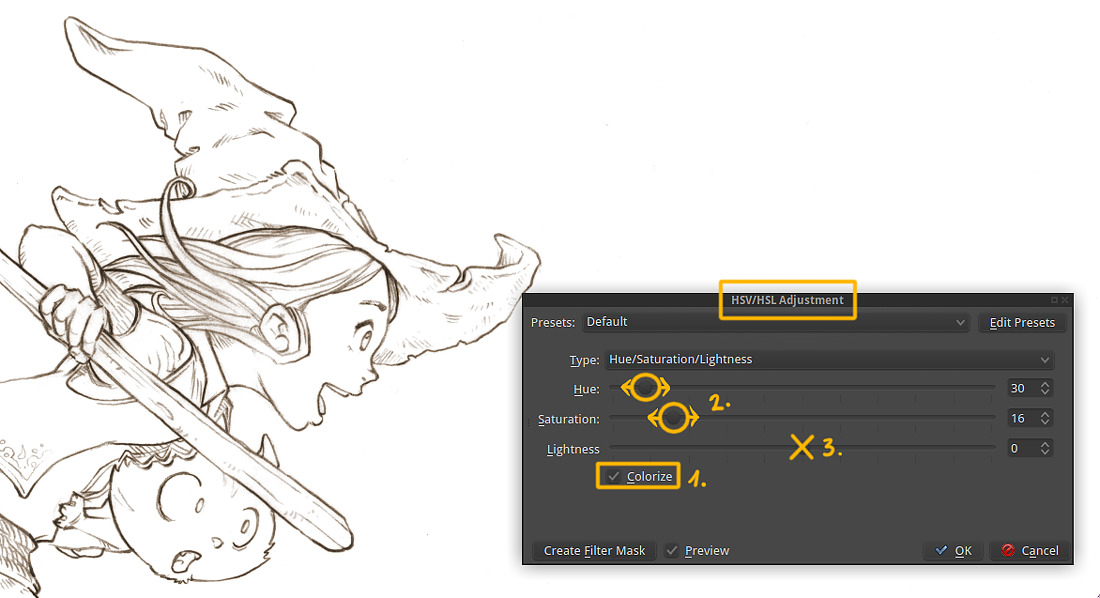
Open the Filter > Adjust > HSV Adjustement, and start to click 'Colorize' [1] , then you can adjust the hue and the saturation [2]. I don't recommend to tweak the Lightness [3]. My taste here is for a dark Burnt Sienna . Save a Presets [read : chapter 9] if you need to find the exact same color setting next time.
14. Remove the white
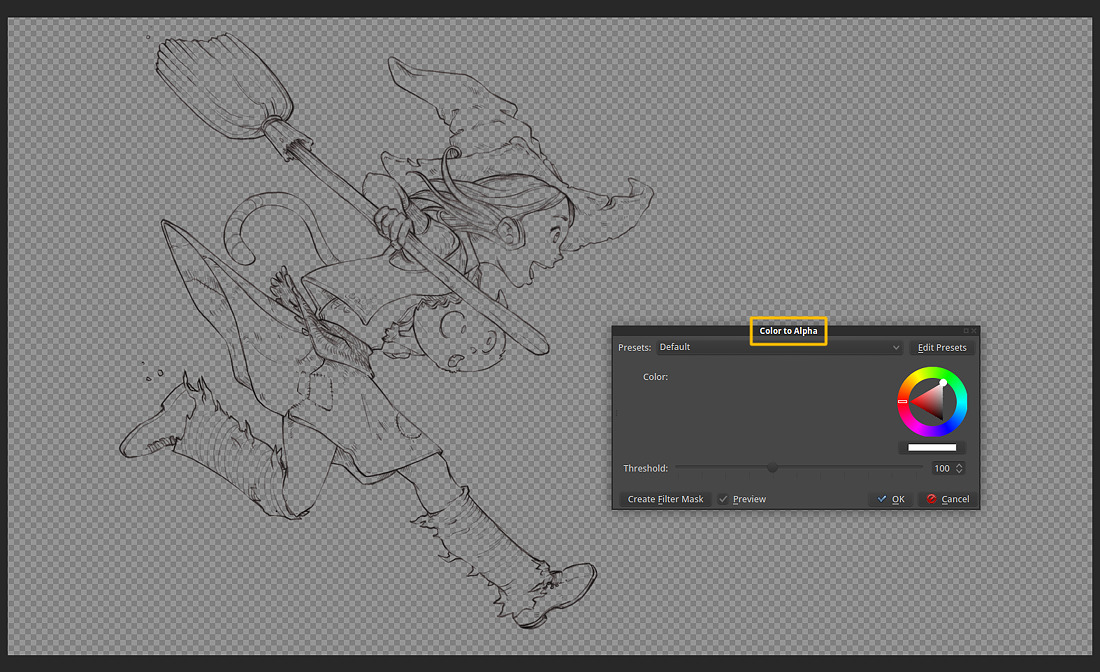
In order to keep just our lines, we need to remove the white background. But our image is flat. A good filter to handle this is the Filter > Colors > Color to Alpha.
The default setting of this filter is to remove pure white, and the default threshold is perfect for this task.
15. Manage layers
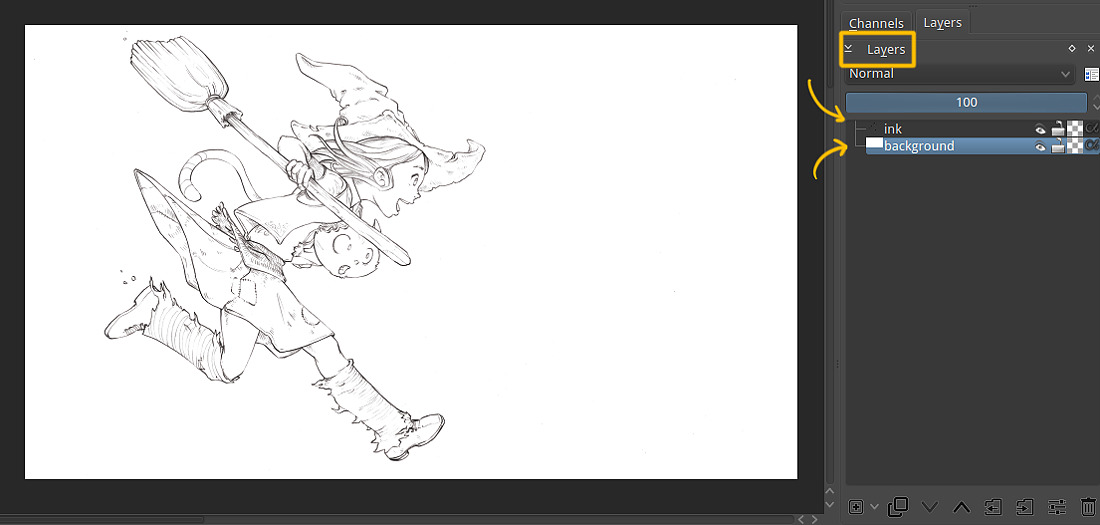
We deleted the white background in our drawing and now we will create it again. But this time it will be on a separate layer under. For doing this, create a new layer, and put it just under our line-art. Fill it with White ( select white color, then go to Edit > Fill with foreground color ). Then rename the layers for making the project cleaner.
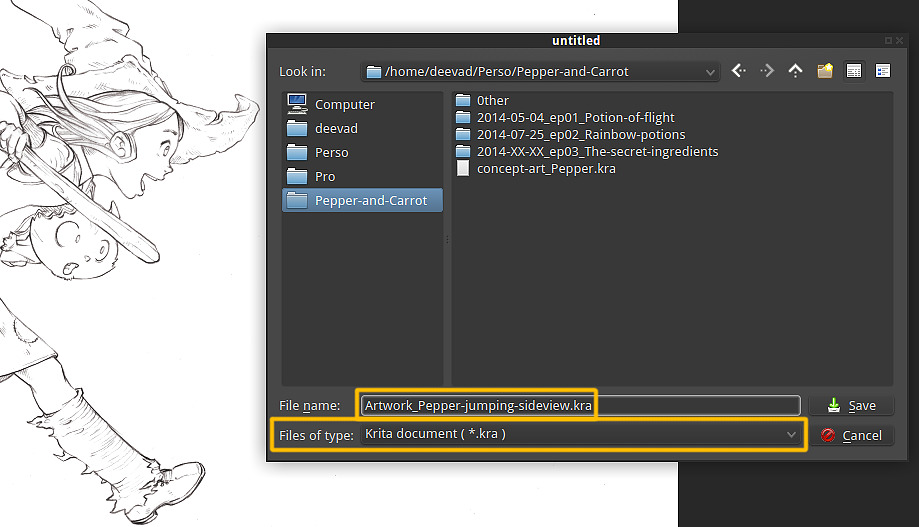
16. Save it
Just a little reminder : Save your artwork as *.kra .
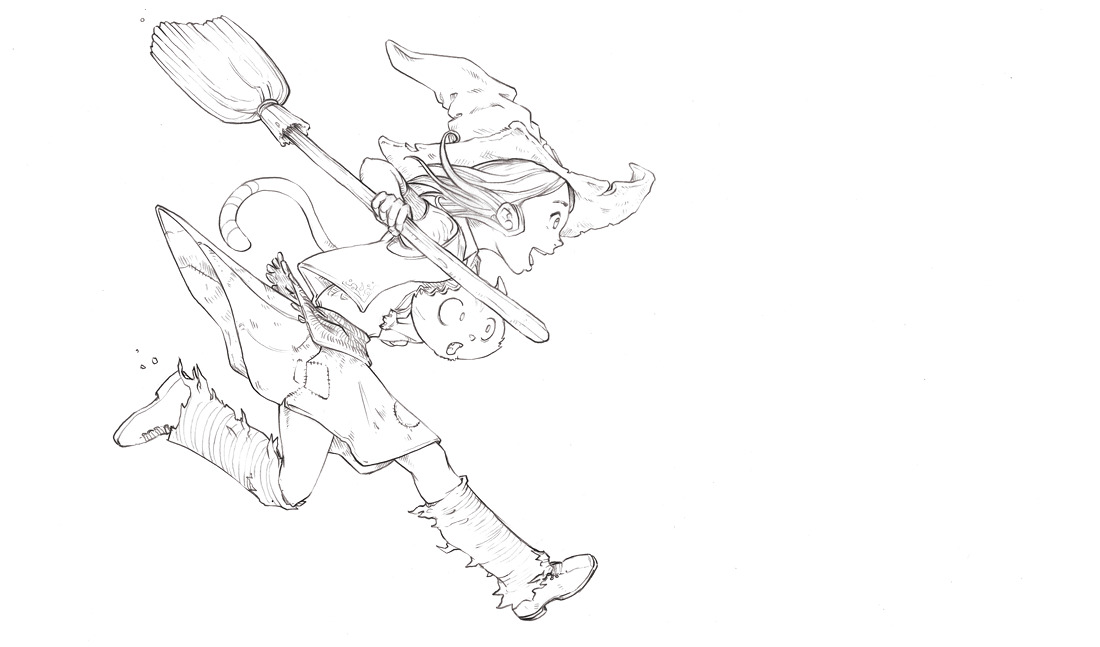
17. Final line-art :
This is a low resolution of the cleaned line-art. If you want to get a look at the full resolution, download it (link at the end of the tutorial).
Summary :
This method to remove blue-lines might look complicated and long because this tutorial is detailed with many notes and photos. But once you master it, it's a 3 min job. And you can repeat it easily across a pack of ten page of web-comics in less than 30min. The main infos to remember:
- Color adjustement curves and make Blue by flatting Red and Green channels ( 2 click with a preset )
- Desaturate Max (2 click with or without a preset)
Other part are just too easy in a workflow and make sens by themself (crop, contrast, remove alpha). From all the method I read (often about Gimp or Photoshop ) this is the fastest one for me, with the best results and centered around a single software, Krita. That's why I use it in production.
Conclusion :
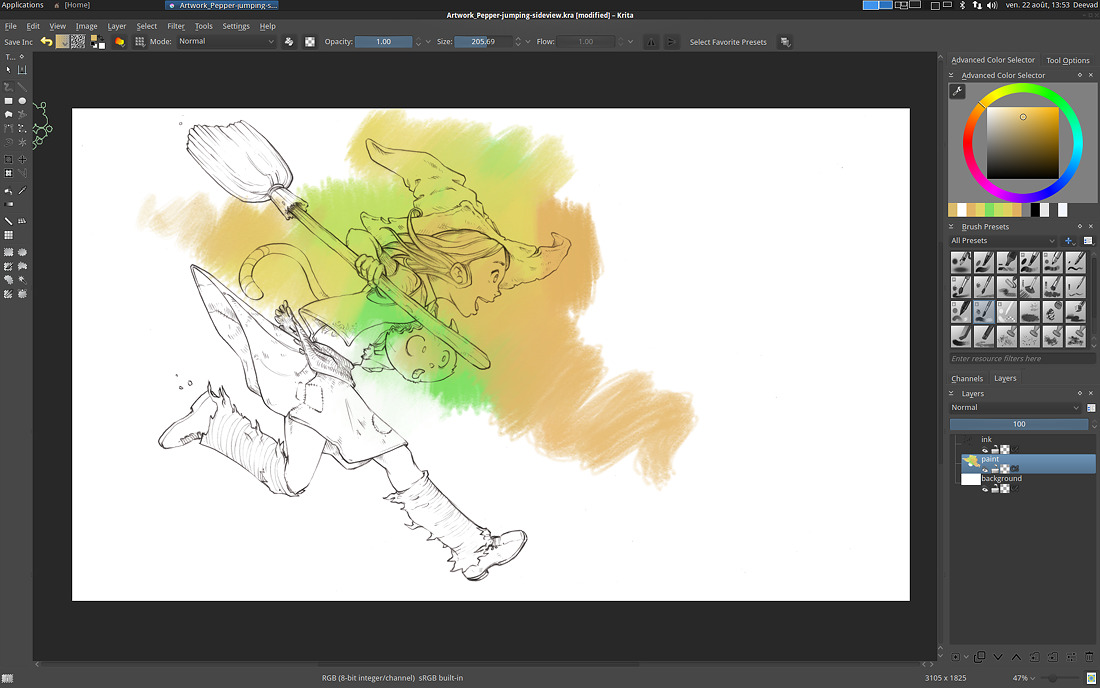
Now our file is ready to receive a paint layer between our Bakground layer and our Lines.
Also, I have a method to color my artworks, but this will be for a next tutorial ! (coming after Pepper&Carrot ep3)
Source files :
- Raw scanner (PNG, 300dpi, Xsane)
- End .kra files ready to color (Krita 2.8.5, .kra)
Download here : http://sta.sh/019n962job53e (11MB)
Links :
I recommend also you to read the exellent article : Removing blue lines from a drawing: The rise of the colour channels. with Gimp and Krita by Wolthera van Hövell tot Westerflier.

90 comments
clap, clap, clap. Man i love your articles. Ellegance, easy to follow and well explained. chapeau
I've been following your amazing work for some time. And I believe you're getting EVEN BETTER!
Very nice! I've been meaning to do more sketching on paper lately, and this is a good encouragement.
I would like to download the source files to have a closer look (and perhaps have a try at painting with the finished lines, they look a lot of fun to work with) but it doesn't work for me. Is there somewhere else you could also upload them?
Thanks! :)
Thank you very much for this tutorial David,
i just switched to krita and was wondering how to lineart seperation.
thank you very much
hi,
nice tutorial! thank you!
Are you using Xubuntu regularly now? I remember that your os of choice was ubuntu gnome. :-)
It was good to see your process. I like that you talk about even the smaller steps. Krita sadly is not running smoothly on my laptop, but I will give it an other go once I will have a new computer. I like the way I can paint with it.
I will try out the morning sketch routine you mentioned, it sounds good. :)
Now David Revoy with xubuntu and xfce?
@RamonMiranda : Thanks Ramon !
@Arn Sweatman : Oh good ! I'm working hard sketching every morning to still work on my skill. It's a long long work. I'm happy result start to be noticable. :-) thanks !
@Dandy : Source files are hosted on deviantArt Stash service ; it's usually a mainstream platform , does your country has restriction with deviantArt ? Sorry, sources files are big and I don't own a lot of room on my www.davidrevoy.com server to host them here.
@Raghavendra Kamath : Your welcome
@Andrew & @Zubr : True , Xubuntu since June 2014. UbuntuGnome 14.04 was a disaster for my use, because they ship a frankensteinish GNOME 3.10 with configpanel of 3.8 ; a big regression. And running the ppa for updating to 3.12 was really really unstable... I might be back to GNOME ; but it will be on Fedora or Manjaro. Xfce let me really fine tuning the desktop to my liking ; but I also need to do a lot of scripts to load advanced features manually ( xsetwacom , dispcal , dispcalGUI , wmctrl , etc... ). Not for beginner users :-)
@Adrienn Ecsedi : Ha, true Krita low CPU can be slow. Morning sketch routine is really a happy routine. Prepare to be invaded by drawings ! ( but it feels good to have a desk with a lot of drawing ). When I don't know what to draw ; I simply redraw something I already drew before, and try to improve pause, view angle, expression. Good luck!
David, write please install notes for xfce. Do you can install gnome-settings in xubuntu and use GUI for your wacom?
@Zubr : Oh, I already wrote them should be easy to translate them to an online document. ( I take my notes while installing my main workstation to boost my laptop install and also media center, and few PC around I admin )
No, I can't use Gnome-setting in XFCE ; the method might work while GNOME is 3.8 ( the one Unity, Mint and Ubuntu GNOME use ) but it will broke as soon as it will update to 3.10. This is because ; in my opinion ; GNOME team broke a UNIX rules somehow ; the one of modularity. In order to display full screen this beautifull widget to configure Wacom on Gnome 3.10 and after ; now Gnome settings require also the Compositor of GNOME ( I think Mutter ).
Here I use a plain *.sh script loaded at startup to load my wacom. It's based on xsetwacom command-lines and works good, because even if it 's more a pain in the ass to setup , it's has definitely more option than any GUI.
For color calibration, I use DispcalGUI a GUI for the dispcal cool module of the huge ArgyllCMS software. This also was a pain to learn. But now, I'm really 'desktop' independent.
14.04 is still a good base for package and hardware support ; and I feel the care in the update and support to make a long term support Linux. Xfce also don't change a lot ( other tweak , I use Nemo filemanager in Xfce ). The result is really really stable.
I would probably need to make "xsetwacom for cats" and "color-calibration with dispcalGUI for cats" before doing my release notes ; it's a big work. With my freelance clients, Pepper&Carrot and Gooseberry art-direction, I'm already completely mad about my schedule. I'll try to manage something.
@DavidRevoy
And what about last version of cinnamon?
@Zubr : I tested during two days in mid august 2014 ; on Antergos ( Arch based ) so Cinnamon was really last package stable available vanilla. The last release posted on Segfault blog. I concluded I didn't like it for the reason Mint team forked the Wacom control center 3.8 , with all the bug and design issue about it ( can't assign a Shift or Ctrl or Super modifier to a button or stylus button, and problems with managing multi-monitors calibrations. ) . I waited years to see that being fixed in GNOME 3.10 / 3.12 ; so it's a bit a 'meh' problem to see this old problematic GUI back on the table and for Cinnamon own desktop environment , and for Unity too fork of Gnome Control Center.
Also, Cinnamon is not really flexible ( sure, more than GNOME ) and I found a lot of little details to be really workaround and features missing ( weird way to handle theme splitted between desktop and cinnamon ; problems with maintaining community themes , link broken ). I also saw the compositor or window manager to affect performance of digital painting ; just a little feeling to be 'off' while this similar issue was fixed in GNOME 3.10. So, I think Mint inherit from a lot of bad thing from the 3.8 GNOME period , and I'm not sure if they have the internal man power to fix it. They also don't really have an audience caring about gfx performance, color management, multi monitor and graphic tablet. So, not a lot of tester + dev team forking = risky , very risky to follow , in my opinion. Same for Unity.
I bug reported, to let hope the main issue will be fixed for a future use.
XFCE is a temporary solution. I made myself more like a DIY desktop, but I'm pleased with it , because it's stable, works, has good performance and got access to a pool of package interresting and easy to grab ( 14.04 ). I like the work done on GNOME ; and I'll probably switch to Fedora , because GNOME sounds problematic for a lot of distribution/respin to make it right ; Fedora is really starting to become GNOME OS, and that's not bad in a way.
@Zubr : Note about Cinnamon : I loved the 4 corner windows placement ( à la KDE ) and the option to put a permanent windows placed ( with Ctrl+Grab on a corner, if I remind well ) on a side of a screen. This is really cool windows management option. I had to add this to the previous post :)
I'm very like ubuntu and very like xfce. But i'm did not like xsetwacomsettings in console and wacom setting in gnome control center 3.12 is the best!
@Zubr : I *totally* agree. I love the Gnome-Control-Center ; and for Wacom, and for Color-management. It took me 4h to RTFM of Argyll and DispcalGUI and 2h to do various test to just get an idea of what setting I should enter and test variations of them.... while in Gnome, I color-calibrated my both screen in a brainless 20min ... ... Same for xsetwacom. That's why I doubt a 'xsetwacom for cats' is the right way. In a way , I prefer keep my workaroundish-xfce-buntu install for now and jump next Fedora and make a clean "Fedora install for digital painters" with Gnome 3.14. It can be better for community than showing again thousand of terminal lines of codes and workaround :-)
Thanks, I actually managed to download the file after a few days. I don't know why the problem happened.
As for desktop setups, I've recently been trying to go very minimal on my low-powered laptop, in an attempt to get more performance out of Krita (despite the laptop being below the recommended system specifications, it works OK), and I ended up using Openbox with just a few additions. I discovered that I can be lazy about tablet configuration because Krita handles it well enough on its own, although I don't get into colour management at the moment. How much extra use do you get from the more carefully configured approach?
@Dandy : Oh good for the file. This stash hosting file on my premium deviantArt account is really convenient for upload/download my source at the moment, and I was affraid to need to change service.
Openbox is a good choice, with really good performance and a lot of possibilities of customisation to setup the desktop in depht, and something I really like about it : even pixel-art precision desktop ( thin windows bar, sharp font, etc...). With wmctrl and script here and there ( community Manjaro open-box, or Archbang, or Crunchbang are famous to make top-notch Openbox cool scripts for windows placement, conky desktop decoration and other cool things with menu bars ).
Here, my extra configuration includes :
1. a wmctrl script to resize a windows on the fly to a bit less than 1/3 rd of the screen, and toggle to 2/3 ; I usually resize this way speedly references on side of the screen and keep 2/3 room for Krita to paint. It's a script I use mainly on laptop, on desktop workstation I added another screen.
2. my screen calibration are calibrated with dispcalGUI and the pantoneHuey colorimeter ; in a nutshell, I setup colors to be 6500K and Gamma 2.2. I played during a period to make the luminosity also constrain to 120 or 150 cd/m² ; but I saw my monitors were better using there native default luminosity/contrast setting ; so , they don't match about luminosity but match for the color temperature.
3. Xsetwacom ; I like to get ctrl or shift on the buttons, also / key ( it switch to previous preset used in Krita , and toggle to last used after, really time saving ) I also use the shortcut , comma for a color-selector.
4. A script to take screenshot with a crosshair on desktop, and save them on picture folder with YYYY-MM-DD_screenshot_HHMMSS.png name pattern.
And a propos xsetwacom, here are my scripts ; they are *really* simple and short, and manage keeping ratio between my screen and my tablet, and configuring extra button or mapping tablet to the monitor I want.
xsetwacom scripts for my Intuos 3 L :
==============================
#! /bin/bash
# INTUOS 3 Large
# max area : 0 0 60960 45720
xsetwacom set "Wacom Intuos3 9x12 pad" Button 1 "key KP_Divide"
xsetwacom set "Wacom Intuos3 9x12 pad" Button 2 "key Shift_L"
xsetwacom set "Wacom Intuos3 9x12 pad" Button 3 "key Control_L"
xsetwacom set "Wacom Intuos3 9x12 pad" Button 8 "key comma"
xsetwacom set "Wacom Intuos3 9x12 stylus" Button 2 "key ctrl"
xsetwacom set "Wacom Intuos3 9x12 stylus" MapToOutput "HEAD-0"
xsetwacom set "Wacom Intuos3 9x12 eraser" MapToOutput "HEAD-0"
xsetwacom set "Wacom Intuos3 9x12 pad" MapToOutput "HEAD-0"
screenX=1920
screenY=1200
areaX=60960
areaY=$(( $screenY * $areaX / $screenX ))
xsetwacom set "Wacom Intuos3 9x12 stylus" Area 0 0 $areaX $areaY
xsetwacom set "Wacom Intuos3 9x12 eraser" Area 0 0 $areaX $areaY
xsetwacom scripts for my Intuos 4 Medium :
====================================
#! /bin/bash
# INTUOS 4 Medium
# max area : 0 0 44704 27950
xsetwacom --set "Wacom Intuos4 6x9 pad" Button 1 "key exclam" #ring
xsetwacom --set "Wacom Intuos4 6x9 pad" Button 2 "key z"
xsetwacom --set "Wacom Intuos4 6x9 pad" Button 3 "key y"
xsetwacom --set "Wacom Intuos4 6x9 pad" Button 8 "key colon"
xsetwacom --set "Wacom Intuos4 6x9 pad" Button 9 "key semicolon"
xsetwacom --set "Wacom Intuos4 6x9 pad" Button 10 "key w"
xsetwacom --set "Wacom Intuos4 6x9 pad" Button 11 "key shift"
xsetwacom --set "Wacom Intuos4 6x9 pad" Button 12 "key e"
xsetwacom --set "Wacom Intuos4 6x9 pad" Button 13 "key m"
xsetwacom set "Wacom Intuos4 6x9 stylus" button 2 "key Control"
screenX=1920
screenY=1080
areaX=44704
areaY=$(( $screenY * $areaX / $screenX ))
xsetwacom set "Wacom Intuos4 6x9 stylus" Area 0 0 $areaX $areaY
xsetwacom set "Wacom Intuos4 6x9 eraser" Area 0 0 $areaX $areaY
xsetwacom scripts for my Cintiq 21UX : ( note: with auto shutdown laptopscreen )
================================
#! /bin/bash
# CINTIQ 21 UX
# max area : 0 0 87200 65600
xsetwacom set "Wacom Cintiq 21UX pad" Button 1 "key KP_Divide"
xsetwacom set "Wacom Cintiq 21UX pad" Button 2 "key Shift_L"
xsetwacom set "Wacom Cintiq 21UX pad" Button 3 "key Control_L"
xsetwacom set "Wacom Cintiq 21UX pad" Button 8 "key comma"
xsetwacom set "Wacom Cintiq 21UX stylus" Button 2 "key ctrl"
xsetwacom set "Wacom Cintiq 21UX stylus" Area 327 374 86436 65171
xsetwacom set "Wacom Cintiq 21UX eraser" Area 327 374 86436 65171
xsetwacom set "Wacom Cintiq 21UX stylus" MapToOutput VGA1
xsetwacom set "Wacom Cintiq 21UX eraser" MapToOutput VGA1
if xinput --list | grep -q Cintiq; then
echo "*Note : Cintiq connected, shutting laptop screen"
xrandr --output LVDS1 --off
else
echo "*Note : NO Cintiq connected"
fi
xsetwacom scripts for my Bamboo fun A5 :
===================================
#! /bin/bash
# BAMBOO FUN A5
# max area : 0 0 21648 13530
xsetwacom set "Wacom BambooFun 6x8 pad" AbsWUp "core key -"
xsetwacom set "Wacom BambooFun 6x8 pad" AbsWDn "core key +"
xsetwacom set "Wacom BambooFun 6x8 pad" button 1 "core key Control z"
xsetwacom set "Wacom BambooFun 6x8 pad" button 2 "core key e"
xsetwacom set "Wacom BambooFun 6x8 pad" button 3 "core key Control y"
xsetwacom set "Wacom BambooFun 6x8 pad" button 4 "core key b"
xsetwacom set "Wacom BambooFun 6x8 stylus" button 2 "core key Control"
screenX=1920
screenY=1080
areaX=21648
areaY=$(( $screenY * $areaX / $screenX ))
xsetwacom set "Wacom BambooFun 6x8 stylus" Area 0 0 $areaX $areaY
xsetwacom set "Wacom BambooFun 6x8 eraser" Area 0 0 $areaX $areaY
Ah, of course, the buttons on the tablet! For whatever reason I don't usually find those to be in a convenient position, so I tend to forget they're there. The screen ratio is also a good point -- I'm probably causing trouble with my drawing by having a mismatch between my tablet and the screen. I'll have a go at setting mine up more properly, it doesn't look like it should be too difficult.
David, your wacom intuos 4 m is without led?
@Dandy : oh yes, a mismatch of ratio can affect drawing skill (eg. you draw a perfect circle on tablet, and an ellipse appear on screen. ) Having ratio matching is highly recommended :-)
@Zubr : The tablet has, and I was one of the first to get them to work on Linux even back in 2011 ; ( http://www.davidrevoy.com/article70/set-the-led-display-of-the-wacom-intuos4-tablet-on-ubuntu-linuxmint ) . Nowaday, I don't really mind to see them turn-off ; but I love the way GNOME after 3.10 handle this automagically with cool labels. Another cool thing Ubuntu-Unity and Cinnamon-Mint ( and Elementary-Pantheon ) will never know because they lasy-forked an old 3.8 version and I guess they'll can't update to the 3.10 or 3.12 without breaking things on their side ; so they are in a bad situation about this. But , in my opinion the wacom audience is so little that having something semi-functionnal is OK for the dev teams :-/
Hi :)
I fell so much in love with just this simple sketch that I tried to make a wallpaper out of it! Hope you like it :)
http://leojava.altervista.org/wordpress/nuovo-wallpaper/
@Leonardo : wow, that's a lot of colors :-) thank you for sharing the link, I like to see creative derivation from my artworks. And thank you for linking my sketch!
Wow! It's very useful article. I tried to take my paper line work from my digital camera instead of using a scanner, but it has low DPI (72 Dots per inch). I think we need at least 300Dpi to create good painting.
It's glad to see another tutorial. Have a nice day!
@Tharinda Divakara :Thanks ! ha yes, digital camera produce too much noise to do clean result for artworks. By the way, my scanner is dying here ( a lot of band noise start to appear on my scan ) I have to replace it soon. It will be hard to find a cheap one with good performances and compatible plug&play with XSane.
Thanks a lot for these detailed explanations!
I am curious about one thing though: why do you say in step 11 that you don't want black pixels?
@Aurélien : Hi Aurelien ! ;-)
There is often a large visual gap between 0% black pixels and 1% dark-dark-grey. It really makes the pure black pixels appear sometime to be outside the picture. Just a personal feeling. So, I prefer to keep my dark shade away from pure blacks when I start an artwork. It's easier to contrast later if I need to get rich black back.
Interesting. I think I hit a similar issue while drawing for my game but since I mostly draw with flat shapes I ended up using darker versions of the shape color for the outlines. It's unfortunately a bit more painful to draw that way with Inkscape, I'll try dark-grey outlines next time :)
@Aurélien : oh, btw congratz for your game visual ; I follow the screenshot on G+ ; and you really improved a lot !
Thanks! Coming from you, it means a lot to me!
Good article, thanks !
Thank you for the tutorial! It can be hard finding good Krita tutorials as good as yours.
Also, have you ever tried MyPaint for digital painting? It's also a free software that runs in Xubuntu. Krita has better features in my opinion, but I like MyPaint's unlimited canvas feature. Would really appreciate it if you could somehow make a tutorial using MyPaint! If not, I'm happy enough to keep stalking your Krita tutorials ;-)
@Tanjung : hey thanks ;-)
For Mypaint feel free to check http://en.wikipedia.org/wiki/MyPaint 'Media attention' or also the about box of the software ;-) I had a quite long love affair with Mypaint.
You can find ressources on my blog ; type 'mypaint' in the search box , and you'll get article, brushes, video :)
Nowaday, the project is a bit sleepy and I prefer invest my time on Krita , also the GTK3 version of Mypaint UI removed a bit of the fun for me and broke features of the software. I guess on Xubuntu they still package the 1.1 version so it's fine.
Thanks for the tutorial !
This is one of the best tutorials I've come across to date. Thank you for sharing your process!
I have a great fascination for sketching artwork! Oh now my duty is to follow your tutorial to make such sketch!
wonderful tutorial, thank you for sharing with us .keep it up
This is really great work. I have seen very few creative tutorial like this one. Thanks for sharing the tutorial.
Dear David!
It is incredible how generous you are. Thank you for sharing your knowledge, you inspire me!
You're awesome
Hey, what if I use nankin instead of pencil? It could be a problem?
@Lorena : I'm not familiar with Nankin ; from a speed search it looks to be a black pen. No problem for black pen ; cleaning is even easier with the contrast than pencil.
Wow! This was simply amazing. Thank you for sharing your positive feedback with us!
Amazing tutorial. thanks a lot for sharing
Great Tutorial! I'm sure you understand, sometimes you get into a rut where nothing works and everything looks awful.
This design was fantastic and opened my eyes to trying something different and unique.
The techniques you described were simple to implement but extremely effective and creative. Great job! I really loved it!!
Your work is really awesome. Your method is easy to me and I follow this. Thanks for sharing.....................
Really you have done a good job. I am impressed , I will follow your tutorial. Thanks for sharing
Great Tutorial! I'm sure you understand, sometimes you get into a rut where nothing works and everything looks awful.
This design was fantastic and opened my eyes to trying something different and unique.
Great job! I really loved it!!
Really your tutorial help be success to related this work. Thanks for sharing a brilliant post. g
Where do I get this pencil? I've looked online and I can't seem to find a .5mm B anywhere. Although I can find HB.
@Alex : Hi, I just checked on my desk ;
The mechanical pen I use Stabilo technic 0.5 :
http://ecx.images-amazon.com/images/I/416lukIQpWL.jpg
( I put fabric-black-tape on it to improve the comfort )
The mechanical lead box I have got this on label ( french ) :
"STABILO mines B
0.5 60 mm x 12 pces"
I tried to google for them, and I didn't found them.
Probably something I bought to my local art store long time ago.
You can fallback on 'Staedler Mars micro carbon', I think it might even be better quality than Stabilo :
http://ecx.images-amazon.com/images/I/31rd3MKq2DL._AC_UL160_SR160,160_.jpg
Will probably be back once again fairly often to check out up on latest posts. ! Has a fantastic perspective of your brain.After reading this informative article, I honestly thank you for your effort and hard work and my request is always to please share us a lot more post in future. Keep writing
Great article with details. I will frequently visit your site for new post. So plz keep posting like that.
Thank You.
Your tutorial is very helpful for me. I have already bookmark this.
Really great job and wonderful post ,, thanks for sharing with us !!!
I read your tutorial. This is absolutely mind blowing. Keep writing....please.
Great sequence of art work. Very helpful. I like it. Thanks a lot.
I am continually amazed by the art available on this post. What you presented was well done and wonderful in order to get your stand on this across to all your viewers.
Great Article..Awesome design. Keep Posting
Just want to say "WOW!!". Nothing to say more :D
Hi,i met your site recently and i like it realy.Thanks.
<a href="http://www.takpartition.net/">پارتیشن</a>
This design was fantastic and opened my eyes to trying something different and unique.
This stash hosting file on my premium deviantArt account is really convenient for upload/download my source at the moment, and I was affraid to need to change service.
This is one of the great design you have made you are so skilled.
Wow great job..thanks for sharing with us
This is so amazing. Im still overwhelmed by all the info here, being a novice at digital painting sometimes instruction flies high above my head =P ... im just so thankful for people like you , who are willing to share their knowledge in such a generous manner. You have a fan for life!
@artfulbutterly : A big thank you !
What a great sketch that is. its really very good.
You are very skilled CG designer. I like your all post in the blog. You make me interested about Krita and cartoons. I admire your work. Thanks again for the article.
Thanks yet again for the tips. You guys are awesome
I really appreciate your efforts
and I am waiting for your further write ups thank you once again.
i like ur draw but i think u must be go to drawing soreal charachter.ur charachter are so real:(
Thank you very much. Great information. Best regards…
I actually wish to read meaningful blogposts from well written websites such as yours.
Thanks, I was wondering how to let the white space transparent ^.^
your cleaning-blue-lines-sketch-in-kritapost is really awesome and more effective. i have got more informative idea. thank you so much for this best idea
I am sooo glad I found this tutorial! I had been looking all over for a tutorial on making the lineart transparent using Krita. This was perfect. Thank you so much!
Muchas gracias por este tutorial, era lo que buscaba y necesitaba.
Your welcome!
Hi David,
Nice works, i'm a newbie at Krita, but liked what i got working into, also saw a few youtube collection by you. I'm using Peppermint 8, works fine, nemo and xfce interface are good and tweaked a lot (although have all the latest versions of Linux Mint, Ubuntu, Knoppix as well as Puppy and Lubuntu and Kubuntu, tried and went back to Pep8 :-)). Earlier i used Fedora in late 2009, later it was all windows, its just recently i switched back to Linux, although i don't like their package installation system and updates are messy, mostly unstable and get my mouse and keyboard stuck.
Well I'm learning Krita at the moment, and like your tutorials. Find a bit complex in the begining, but was similar with PS too as a beginner. Thanks for the great works. Keep Sharing
Thanks for the feedback Lakhan!
Xfce is a very good choice of D.E. for digital painting ; good performance of openGL for windowed apps, with minimal latency ( open-box, awesomeDE, i3 too ).
A very useful piece of information. thanks
I can't afford Photoshop, so after watching several reviews on Youtube about Krita, I decided to give it a try. My only problem was that I couldn't figure out how to separate my lineart from the white background of my scan. After searching for hours on the Web for a tutorial, I finally stumbled upon yours. Words cannot express how thankful I am for your tutorial, because I was at my wit's end trying to figure the process out on my own. Thank you very much! Be well.
By the way, your artwork rocks!
Ha, thank you very much Jase for the feedback!
Have fun coloring your linearts ;)
Thank you so much for a very detailed tutorial! I hope you don't mind me asking, if I don't use blue pencil lead or I use black pen to ink and erase all the pencil sketch, how do I change the color adjustment curves in step 9? Should I flatten all three of them or let them be? And then what should I do in step 10? Sorry if my question sounds ignorance, I'm new to digital art and still have so much to learn.
Hi Aki and thank you for the feedback!
Good luck starting the journey of digital art.
Blue is a better color because of a couple of factor:
1. A lot of scanner have difficulties to catch bright blue (even if with time this argument is less and less a good one, the optic of scanner is better and better)
2. with an artwork scanned with the three channel RGB; you have 'blue' in the three to do the curve.
3. Blue lids, or blue pencil for sketching is a bit standard; so it is easier buy 'ready made' solution.
That being said; it is totally possible to use Red or Green (I tested red, it leaves a bit of grey ; and green works better)
To adapt the tutorial ; you just need to adapt the curve (eg. pick the red, not the blue)
For the inking; yes, it will work better with markers, ink, or any very dark pen.
Good luck !
Update 2019: I lost the morning routine of drawing sketches :-/ I adapted the article introduction a bit so the article doesn't pretends I'm doing something I couldn't maintain in the years.
Hiya David! I really enjoyed seeing your sketch process. I do have a quick question though, what kind of references do you collect before drawing anything? (or if you even use references at all haha). I love hearing how each artist has their own unique way to prepare before drawing, so I'd love to hear how you do it!
Keep on creating David, you truly are an inspiration to me! ( •̀ ω •́ )✧
Thank you Coze for your sweet words!
I usually draw without reference and from imagination but in many situation I like to check how something is made; might be anatomy of an animal, or various ideas of how helmets and swords are decorated; this type of things. I saw a trend on Youtube digital-art instructors to recommends to heavily reference everything, pose, clothes, face, style... Why not, everyone has their own way to cook artwork and I'll never blame a technic. But here I prefer to collect all reference in visual memory as much as I can, I feel more free when I draw on sketchbook or during signing session. Now I'm thinking about it, when I draw the comic pages, I keep a big reference; https://www.peppercarrot.com/0_sources/0ther/misc/hi-res/2016-07-26_references_by-David-Revoy.jpg it helps me at keeping consistency as I can for clothing of my characters and general mood.
This is so helpful! I actually was not trying to erase the lines from physical sketches, I was looking up help articles for something else in Krita, and your notes about how to hide the colors and a lot of the rest of it are really helpful for me. And I just happened to look at your refs sheet you posted in comments and your characters are so cute! Now I have to check out the comic :) Thank you!
Thank you for taking the time to enter a little comment about your research; I'm happy to see this old article is still read and brings tips.
Have a good reading for Pepper&Carrot!
Thanks for the very clear tutorial - and all the work you do explaining how to use Krita efficiently.
Post a reply
The comments on this article are archived and unfortunately not yet connected to a dedicated post on Mastodon. Feel free to continue the discussion on the social media of your choice. Link to this post:You can also quote my account so I'll get a notification.
(eg. @davidrevoy@framapiaf.org on my Mastodon profile.)