


Krita brushes v5
This brush pack is a free, minimalist, compact, with black&white thumbnail brushpreset kit for the free and open-source software Krita. It was designed for my own productivity. The icons were designed for less color pollution on screen, and tested during monthes incrementally on git.
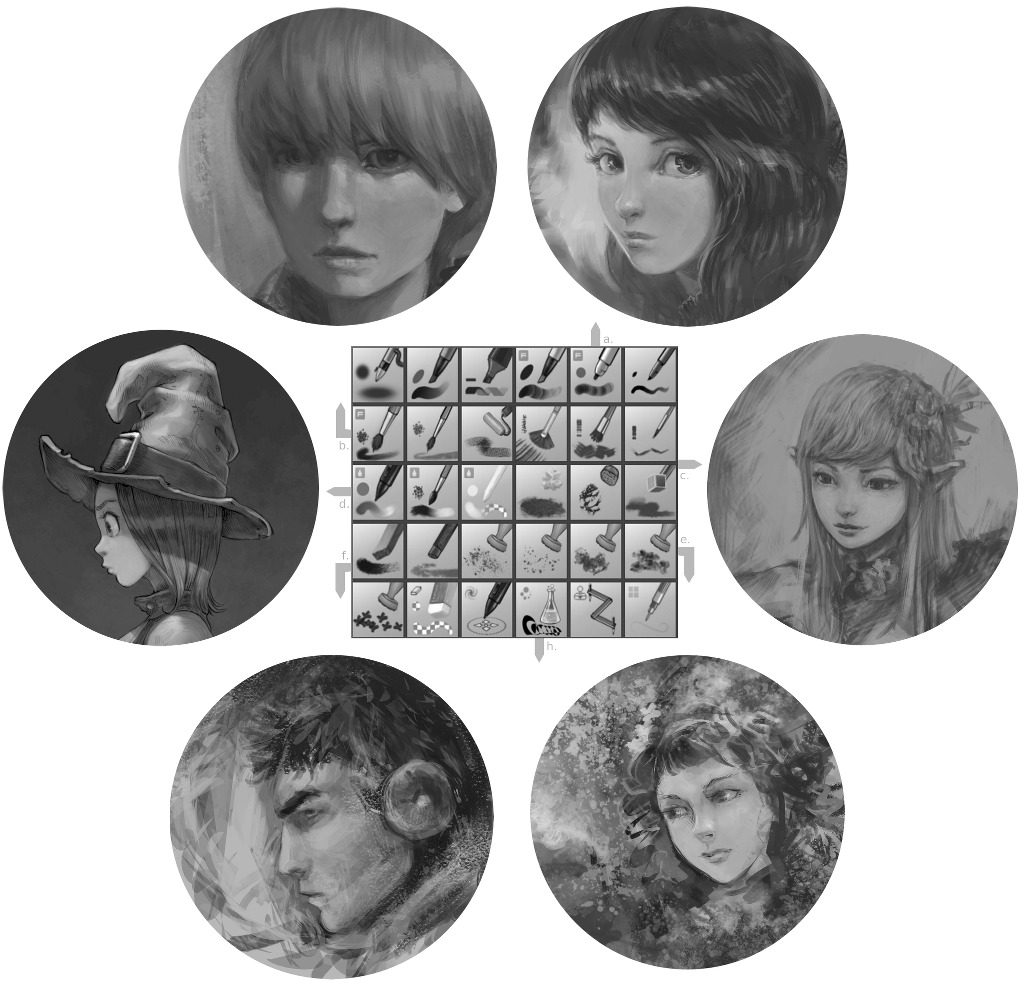
a. Digital brush, rounded, flat, angular. Opacity on pressure. F symbol = flow opacity.
b. Expressive brushes
c. Rakes or textured strokes
d. Mixbrushes and blend tools
e. Stamp / textures, cloudy, grungy
f. Hard texture and chalks
h. Tools : Eraser, Warp, Alchemy, Clone,Line.
Download on Github :
https://github.com/Deevad/deevad-krita-brushpresets/releases/tag/v5.0
Compatibility :
With Krita 2.8 serie
License :
Brushes CC-0 /public domain . Demo picture on this page : CC-By , attributed to David Revoy.
Installation :
Unzip, and copy/paste the folders into your Krita user-preference directory : screenshot on Linux .You can open your preference directory inside Krita : Edit > Ressources > Open Resources Folder. Restart Krita.
Support :
If you need support for installing brush in your operating system, connect now to the Krita developper chat here . Fill a nickname and ask your questions, someone will reply to help you. (Note : It can take some time, be patient ).
Versions:
this is V5.0, previous releases pages : V4.0 | V3.0 | V2.1 | V1.0a .

18 comments
what is the "F" (flow opacity) in brushes?, for example the difference between the hairy brush with the "F" and the one without the F... could you explain the other icons (top left corner) as well :)
Thank you so much, I've been using your brushes since v3 and I like them so much. I can't think in doing an artwork in Krita and not using them.
Awesome brushes!! thanks for sharing ^-^
Thank you for your "less is more" set.
I will try it as soon as I come back from summer holiday.
Cheers.
@Nahuel Belich & @Tepee : :-)
@Jose Navas : The difference between normal opacity and flow opacity is something a bit long to explain, but also a fundamental to understand how digital-painting works. Ok, let's do it :
First , picture link to watch :
http://david.revoy.free.fr/forums/krita/opacity-and-flow.jpg
http://www.diyphotography.net/wordpress/wp-content/uploads/2014/05/opacity-flow-comparison-diyphotography.jpg
http://www.smashingmagazine.com/wp-content/uploads/images/photoshop-brushes/opacity-vs-flow.gif
Flow opacity VS Normal Opacity in FLOSS
===================================
It probably deserve a full article about it, but for the moment I won't risk to write it as it's still a mess in FLOSS world : sometime missing (Mypaint), sometime limited option/incomplete (Krita) , sometime weird GUI (Gimp).
* Mypaint only support Flow Opacity.
* Krita is a mess for Flow/Normal Opacity : you can choose to have sensor on Flow or have sensor on Normal opacity ( it will make the other setting linear ) , but you can't use both sensor. That's why the pressure on opacity of Krita can't match the creamy soft pressure opacity of Photoshop for the moment ( just a pressure on Flow + Opacity at the same time ). My brushes here are tricking this to make the 'flow' behaves. But it's not easy.
* Gimp sort of do it right with a Opacity ( Normal Opacity ) and a Flow opacity ( Rate ). it's just you have to open 4 modal dialogs and do the ping-pong between them to tweak the dynamic of a setting.
1. Flow opacity
============
--> Opacity of each single dab ( disk or whatever shape of your brush ).
Eg: In a common digital painting stroke, each dab overlap the previous one.
if the Flow Opacity is equal to 20% and the dab overlap with a 10% spacing,
you'll see each dab disk drawed on canvas having a 20% opacity but building opacity on the previous one.
So the overlap will go by 40%, 60%, 80%, 100%. The core of your stroke will be then 100% opacity even if you set your flow to 20% in this exemple.
2. Normal opacity
===============
--> Opacity of the resulting stroke ( can be composed of X dab of disk or whatever shape of your brush ).
Can be certainly named 'resulting stroke opacity' . This opacity apply to all the stroke.
Of course, there is a bit of cheating for making opacity variation with this type of opacity (eg; with pressure on opacity. Often a code to smooth opacity infos collected during the stroke creation, and recompose it on the final stroke live )
You can paint with this opacity a single stroke, and overlap your own stroke without seeing the overlap ; even if you are using a low opacity.
When to use them
===============
Both method are useful when working the edges in a painting, combining both often result as a game to balance toward the quality of one type, and shrink the quality of the other in consequences.
*Flow opacity* will create more muddy color mix, soft stroke, and flabby edges. It has advantage in smooth color mixing, depiction of soft shaders like skin, or peach skin, or velvets, etc... and make gradient creation easy.
*Normal opacity* shows more the layers of strokes, and so creates more dynamism and has advantage to produce low opacity hard edges. The lack of own overlap inside the stroke make it look really digital but also make it a better tool for laying constant colors, values, or cleaning area.
Could you give me recommended and minimum Hardware requirements for Krita v5, please ?
@Tharinda : I can, but it's only 'in my opinion' , and also only on Linux ( ex; Xubuntu; or Ubuntu Gnome, or Kubuntu ) as I don't own any Windows license since 5 years.
The minimum hardware I would recommend :
Gfx card : a Intel HD 4000
Processor : a Intel i3, i5 or i7 ; but with more than 2.5Ghz / core
Ram : 4GB
Screensize : 1920x1080px minimum recommended
Tablet : A5/Medium size
Colorimeter, for color calibration.
Good luck!
Thank you David. I have another thing to ask...
By the way, I'm glad to inform that Krita 2.8 series works well in my laptop with Intel core i5 2.5Ghz, 2.6 GB RAM.
In my graphic tablet, tilt function doesn't work because there is a hardware malfunction.
I like to know that without tilt, does Krita make any particular inconvenience for me, specially when I'm going to use wonderful brushes in Krita?
Second question :-), What's Colormeter
@Tharinda Divakara : Good news for Krita. No problem if you don't have tilt ; really few brushes use Tilt and the effect produced isn't very important. A stylus with pressure is perfect; I painted during years with a little tablet with only 512 level of pressure and no tilt.
About Colorimeters ; in a nutshell : it's a device ( often USB ) you can stick on your screen from time to time to help your computer to see what's going on about your monitor's colors ; and adapt the color of your screen to something more standard, or pleasing. Because sometime, screen are too dark, too bright, too red, or to bluish. A colorimeter can fix this, and also tell your computer what's are the limit possibilities of the color your screen can display. So, it's help to convert other color space ; for example to work for printing stuff.
I'm glad to show my first digital painting from Krita.
http://tharindart.blogspot.com/2014/08/first-paiting-from-krita.html
@Tharinda Divakara : Hey good volumes and glossy specular point Tharinda. Don't hesitate to also share it on the Krita forum too :)
Thanks David :) much appreciated!
I have been slowly working my way through your website in order to learn how to use krita better.Thank you so much for all you tutorials,tips,and resources,they are all invaluable.This is what I drew today, its not much, but I am pleased with it because I finally feel like I am getting comfortable with the software's capabilities (this being my first foray into digital art)
Cheers
http://gomagoti.deviantart.com/art/who-knew-478454347
@zara : Thanks for sharing and for the feedback. Drawing is a long path, but being surprise each day about making something new, a new canvas, or artwork is a really cool and personally enriching experience :)
Thanks for the brushes. I love them! I want to show to my friends and everyone that Linux can be used to create art and much more. Thanks for being an open source digital artist! You're a great help and inspiration to me :)
Hello, please tell us in detail how to load brushes on mac os. on windows installs easily on mac did not understand.
@Alex : Hi Alex, send me an email to get my postal adress, then send me a Mac computer so I can guess how it works and do a documentation for you. [joke]
Sorry, but I never owned a Mac or Apple product and I have no idea how it works.
i cant get the brushes to download... help
Please, read the article; and the text in red on the top is here for a reason.
Also, the link here is working: https://github.com/Deevad/deevad-krita-brushpresets/releases/tag/v5.0
Post a reply
The comments on this article are archived and unfortunately not yet connected to a dedicated post on Mastodon. Feel free to continue the discussion on the social media of your choice. Link to this post:You can also quote my account so I'll get a notification.
(eg. @davidrevoy@framapiaf.org on my Mastodon profile.)